1. Start Typing Your New Document

Adapted from Shauna Kelly's site with modification to Ribbon version. Original page: http://shaunakelly.com/word/concepts/starttyping.html

What this page is about

For those of you who have just joined us, this is a page in the series of Basic Concepts in Word. Use the menu at left to go to the different pages.

Each Basic Concept page has three sections:


Next: Concept 2: Rules for typing in Word

Tutorial

This tutorial will take you through the basic steps in creating a new document and entering the first text in the sample document. In Word 2007 an orange Office button in the top-left corner of the window takes you to some commands. In later versions this is replaced with a blue File button. If you have Word 2007 use the Office button where directions are given to use File.

Step 1: Start by opening Microsoft Word

If you want to work through the steps on this page, it might be useful to print out this page. Alternatively, arrange the windows on your screen so that you can see this page and Word at the same time.

Open up Word. How you do that may depend on your machine. Click the big blue W logo on the Office Shortcut bar in the top right hand corner of the screen. If you can't see a blue W logo there, try clicking the Start button. If you don't see a blue W Word logo there, choose Programs. Click the blue W Word logo to start Word. The logos change with each version of Word.

Here are some of those logos as displayed in Windows 8.1:

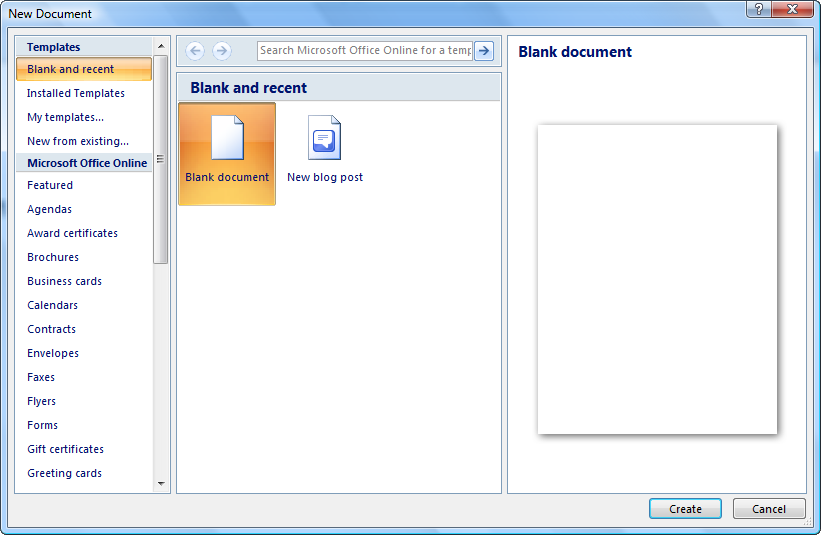
Note, you can also start Word by double-clicking on a Word document, but starting Word directly is preferred by many experienced Word users.

Step 2: Create a new document

In Word, choose File > New.

In Office 2007 this is done starting with the Orange Office button in the top left of the window. Then select New. In later versions of Word, the Office Button is replaced by a File button that looks like a Tab heading. In Word 2010 - 2013 it is blue. You'll be given a choice of types of documents to open, mostly from Office Online.

New File Dialog in Word 2007 - See File New Variations for other Versions

Click on the Create button under Blank Document. (Alternative keyboard shortcut: Ctrl+N)

Professional users wouldn't use Blank Document. They would pick a custom template that they had designed. But for now, let's just click Blank Document.

You can now see your new, empty document on the screen.

You will notice three important things about your new document:

  • in Word 2007-2010 there may be a rectangle drawn in a dotted line on the page (In Word 2013 and later there may be a dotted box on the page.)
  • there's a flashing cursor at the top of the page
  • the top highlighted bar says "Document1" or something similar.

Step 3: Type within the dotted lines

If you don't see a rectangle drawn with dotted lines in Word 2007-2010, do this. Go to Word Options > Advanced under the Office Button or the File Button. Under "Show Document Content," tick the box that says "Text boundaries" then click OK. Under the View Tab, choose Print Layout.

You can see dotted lines that show you the text boundaries. When you type, you'll type within these boundaries. They are showing you the margins of your page.

(I do not recommend using text boundaries in Word 2013/365 or later because they became paragraph rather than page boundaries for reasons known only to the designers of Word. See Text Boundaries in Microsoft Word for a discussion and workarounds.)

Step 4: Type where you see the cursor or Insertion Point

At the top left, you see a flashing cursor. It's called the Insertion Point, because if you type, your typing gets inserted at the Insertion Point. (Just to make the point, move your mouse around. You'll see that the Insertion Point didn't move, the cursor or mouse pointer did.)

We're going to create a sample document in Word, to demonstrate the basic concepts. So, type the first line of text so that it looks something like the following (you'll have to imagine that the cursor is flashing).

If you make a typing mistake, use the Backspace key to reverse what you've done, and try again. (You'll learn about niftier ways to edit mistakes later.)

About foxes and lazy dogs|


Step 5: Save your document

In the very top center of the window, the highlighted bar next to the Word logo says Document1 - Word (or some such). This is because you haven't yet saved your document and given it a more useful name.

Even though you haven't typed much yet, it's a good idea to save your document now, and save it again every few minutes, so you don't lose your work.

So press the keyboard shortcut Ctrl+S or Alt+F then S. The Save As box will open, where you can give your document a name. So type a name in the "File Name" box, and click Save.

You can now see your own file name in the top highlighted bar next to the Word logo.

It may not say a lot, but you have created and saved a new document in Word.


Reference

This page covers the first Basic Concept of Word: how to create a new document and start typing.

  • To create a new document, press Ctrl+N or use File (Office Button) > New.
  • A large dotted rectangle on the page can be used to show the text boundaries. This is less useful in Word 2013/365 and later.

    If you can't see the text boundaries, choose File  > Word Options > Advanced. Under Show Document Content, tick "Show Text boundaries" then OK. Choose View (tab on ribbon) > Print Layout.

  • A flashing cursor or Insertion Point shows where your text will be inserted. To position the cursor or Insertion Point, click with the mouse or move the cursor with the arrow keys.
  • Type your text. When you type, your typing appears where the Insertion Point or cursor is flashing.
  • If you make a typing mistake, use the Backspace key to reverse what you've done, and try again. (You'll learn about niftier ways to edit mistakes later.)
  • To save your document, choose File > Save. Save your document frequently, to prevent losing your work.


Go to the next basic concept: Concept 2: Rules for typing in Word or continue to read the Curiosity Shop box

Curiosity Shop: Using Ribbon Tabs and the Quick Access Toolbar

One of the important features of Microsoft Word is that you can do almost everything in several different ways. It makes Word a fantastically flexible program, because you can use it the way that suits you. It also makes it hard to write about, because there are often umpteen ways to do the same thing.

When there is a choice, these Basic Concept pages prefer to use the Ribbon. But you can decide how to invoke the commands.

Using the Ribbon with the mouse

You can use the Ribbon by clicking on a Tab with the mouse and then on the appropriate button.

Using the Ribbon with the keyboard

You can use the Ribbon by using the keyboard. To do that, Press and release the Alt key and press the letter that is shown in the tooltip that pops up. So you can open the File area (backstage) by pressing Alt and then F.

You can then choose an item on a Ribbon tab by pressing the key that is associated with that item after you press the Alt key and display the tab. On the File area, the Save option has the S showing. So you can choose Save by pressing S.

Using shortcut keys

You can also use Word's built‑in shortcut keys. In addition to those which are shared with other Windows programs there are shortcuts associated with many Word commands. If you look under "shortcut keys" in Word's help, this will get you started.

You can get a list of shortcut keys in Word help or by printing a list. In Word 2007 (or earlier) you do this in the print dialog under Print What.

In Word 2010 and later instead of Print Entire Document under Settings on the Print Dialog, you would pick "Key Assignments" at the very bottom.

In any version of Word you can use the Word command listcommands under macros to create a document with a list of commands and their keyboard shortcuts.


Using the Quick Access Toolbar (QAT)

Earlier versions of Word had a plethora of customizable toolbars. So many that people were having trouble remembering where to find commands. Word 2007 introduced the Ribbon to replace those with tabbed groups of commands. It also introduced a single user-customizable toolbar called the Quick Access Toolbar and know as the QAT. This appears above the Ribbon by default but can be placed below the ribbon. The key thing about commands placed on the QAT is that they appear with every ribbon tab. If you click on the dropdown at the end of the QAT you have the option to place it above or below the Ribbon and to add commands. A small selection of useful commands is shown on that menu as well as the ability to "More commands..."

More commands gives the user access to all commands, including those not shown in the Ribbon and to macros written by the user.

For more on this topic, see Modifying the QAT and Ribbon in Microsoft Word.


Next: Concept 2: Rules for typing in Word