File New in Microsoft Word - Access to User and Workgroup Templatesby Charles Kyle Kenyon, Esq. There are no promises that this chapter is of the same quality or depth as the other chapters of this guide. That is because it was written by a single author not working with Microsoft and not subject to peer review. Last updated Thursday 09 November 2023. Comments are welcome.
Introduction. This could be a part of the chapter on Templates but would bloat that chapter. This is about what you see when you use File => New in the various versions of Word and how to get to your own user and workgroup templates. (Word 2007: Office Button => New). This chapter is about how to get to some variation of the Word 97-2000 new file dialog and how to modify your version of Word so you can get there quickly and easily.
Macintosh versions of Word (2004, 2008, 2011, 2014, 2016, 2019 / 365) are not covered here although they may be similar to the Windows versions. I have not used Word on the Mac since Version 6.0 and do not have the experience to write helpfully about those versions. Things Covered In This Web PageThis page takes a look at: Additional Written and Web Resources
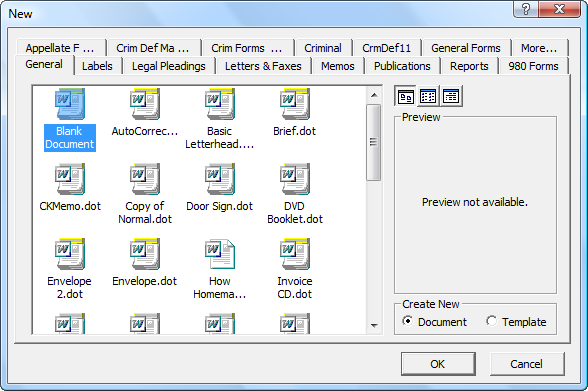
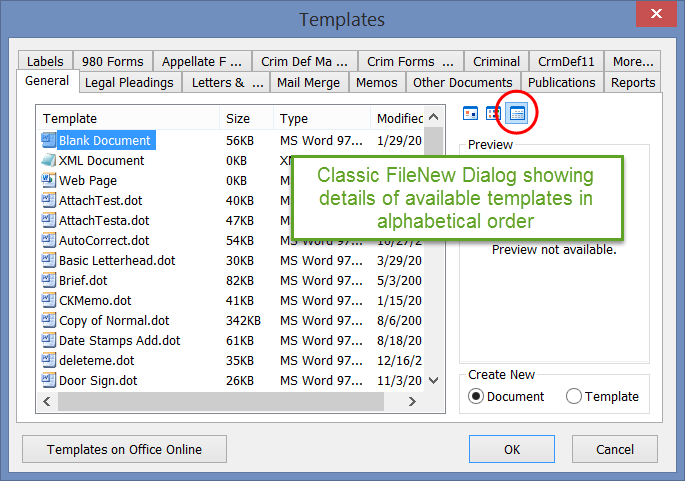
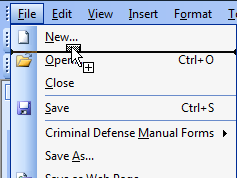
Creating a New Document Based on a TemplateWord uses the standard Windows keyboard shortcut (Ctrl+N) to create a new document. This is actually a new document based on the Normal template (Normal.dot or Normal.dotm). This should be a blank document without text. However, it is rare that we want to begin documents from scratch. Ordinarily what we want to do now is similar to something we have done in the past. For that we can save a lot of time by using a template. There are many templates distributed with Word and many available online. Those who use Word extensively, tend to build their own set of templates, often based on modifications of the generic ones. This is good practice. The FileNew dialog gives access to these templates. That access has changed through the versions of Word. Starting Point - Word 97-2000In Word 97-2000, when you selected "New" under the File menu you saw a dialog that looked something like this:
In this article, I refer to this as the FileNew dialog. As is explained in the Templates chapter, this dialog gives quick access to templates on your computer in certain designated locations. It includes templates distributed with Word (some built into the program), those in the User Templates folder and those in the Workgroup Templates folder and their subfolders. It does not give access to templates that may be stored elsewhere on your computer or on the Office site. Every installation of Word will have a User Templates folder which has a default location but which can be designated by the user. A separate folder (local or network) can be designated by the user as the Workgroup Templates folder. Word does not create such a folder upon installation, it must be created by the user. I have found using these two folders to store any templates for daily work to be beneficial and this FileNew dialog to be a quick way to use templates that have been developed or modified locally. Over time, there was a great push for new users to have access to templates they can use immediately without developing their own. This has resulted in changes to what shows up with File => New making the basic FileNew dialog shown above harder to find. This chapter is about those changes and how to use them but still reach and use the FileNew dialog.
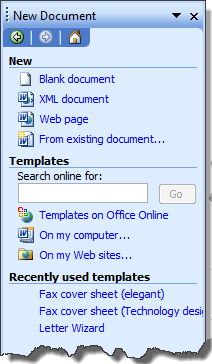
Word 2002-2003 and the Introduction of the New File PaneSelecting New from File in Word 2002-2003 opens a Task Pane on the right side of your Word window something like the following:
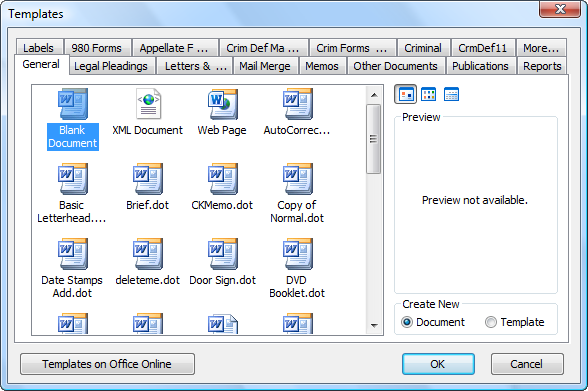
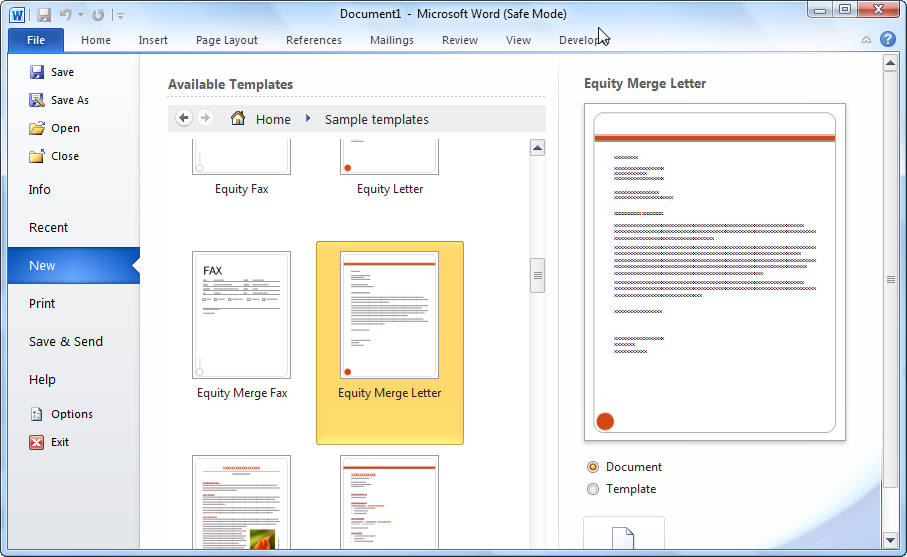
Selecting "General Templates" (Word 2002) or "On my computer" (Word 2003) gets you the FileNew dialog:
The Task Pane also has the option to look at Templates on Microsoft.com (Word 2002) Office Online (Word 2003) or on My web sites. The Word 2003 new file dialog itself has a button to go to Office Online. It is possible in all versions from Word 97 on to also look at lists of templates including details in this dialog.
In Word 97-2003, the FileNew dialog includes (1) installed templates, (2) user templates, and (3) workgroup templates. Here's how to get to this dialog without going through the New File Pane.
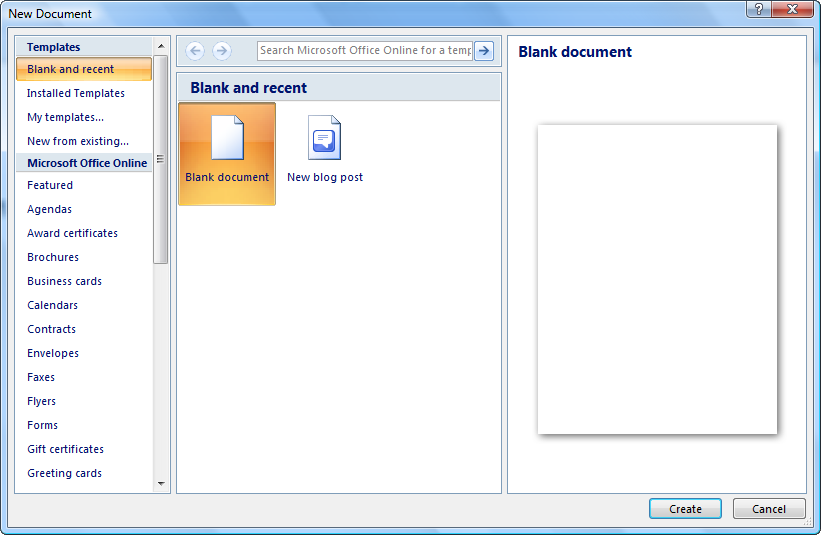
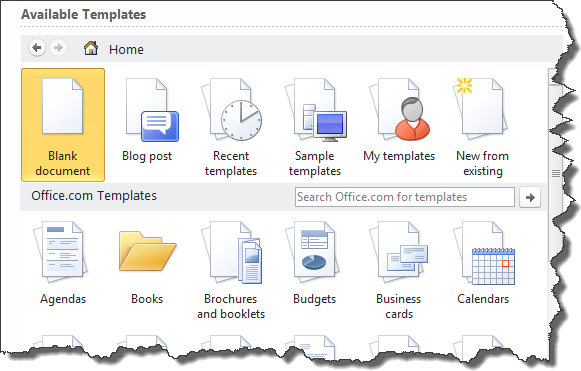
Word 2007 - the Ribbon Interface and the Emphasis on Office Online TemplatesWord 2007 brought us the Ribbon Interface. This was part of a drastic makeover of Office and eventually Windows and many other programs (not produced by Microsoft). The idea is to make many more commands accessible to the novice. As a part of this, the Office Online templates were moved toward center stage. The File menu disappeared, replaced for some purposes with the orange Office Button. Going to Office Button => New starts with Blank and recent templates but provides other choices.
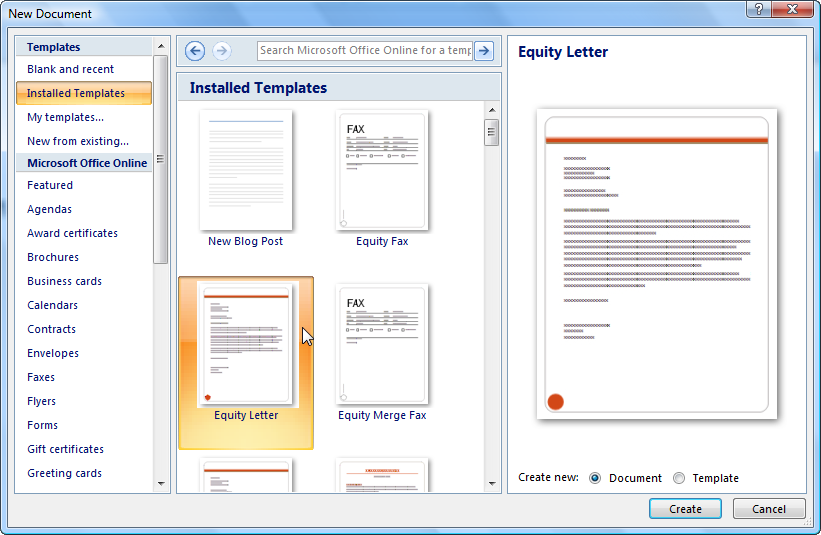
The long list of categories for templates looks like the tabs in the FileNew dialog but refers to Office Online templates, not those installed on the computer with Word or placed there by the user. Installed templates refers to templates from Microsoft, not user or workgroup templates. These "Installed" templates are actually built into the program rather than separate template files on the computer.
Microsoft Office Online gives a bevy of templates divided into categories (searches on Office Online). What we are interested in here, though, is templates created or modified locally. If stored in the User Templates Folder or the Workgroup Templates folder, these are accessed using "My templates..."
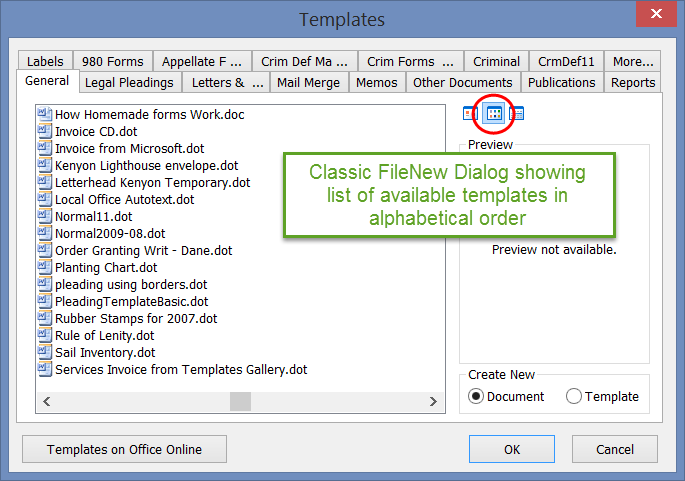
This brings us our traditional or classic FileNew dialog (with no button for Office Online). Beginning with Word 2007 this dialog no longer includes the "Installed" templates but simply those found in the User Templates Folder and the Workgroup Templates Folder. For me, this is fine. If you want to be able to get to this dialog with a keyboard shortcut or an icon on the QAT, skip to that section.
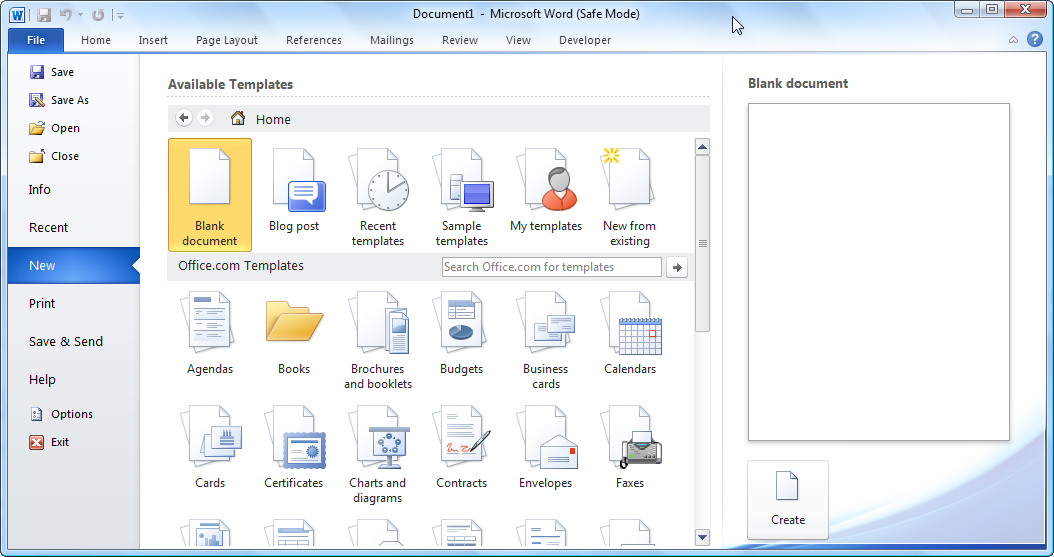
Word 2010 Starts With Graphic Office Online IconsWord 2010 returned something that looks like a File menu - the blue File Button which takes us to the "backstage" of the document. When New is selected there, we get a graphic emphasis on Office Online templates right away.
or - closer up -
The categories with icons shown in the predominate bottom part of the screen are for Office Online templates, not built-in templates, not user or workgroup templates. These look like the tabs in the FileNew dialog but are not. Again, these give a search result (Bing) for templates in that category on Office Online. The "Sample templates" in the Home part of the window are those built into the program -- the same as Word 2007's "Installed Templates."
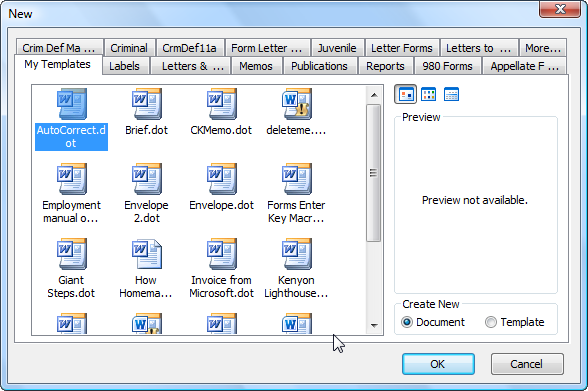
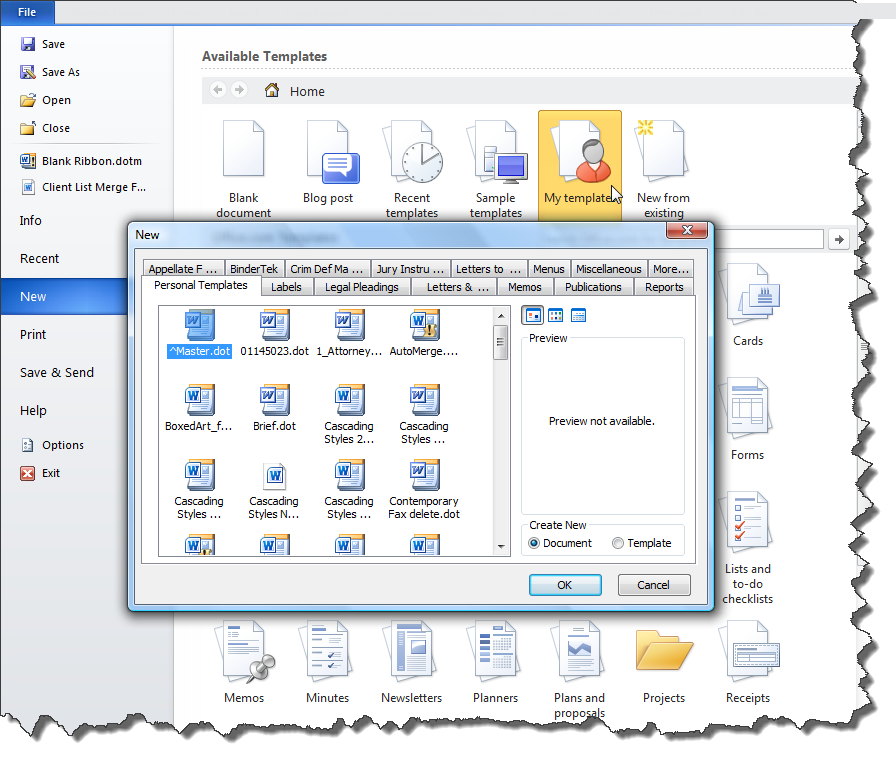
Again, these are built into the program, not separate files on the computer. It is possible, using XML, to add your own custom templates to the featured templates. Your author has not done this, but it is discussed in Deploy Custom Templates. If "My templates" is selected we get (surprise!):
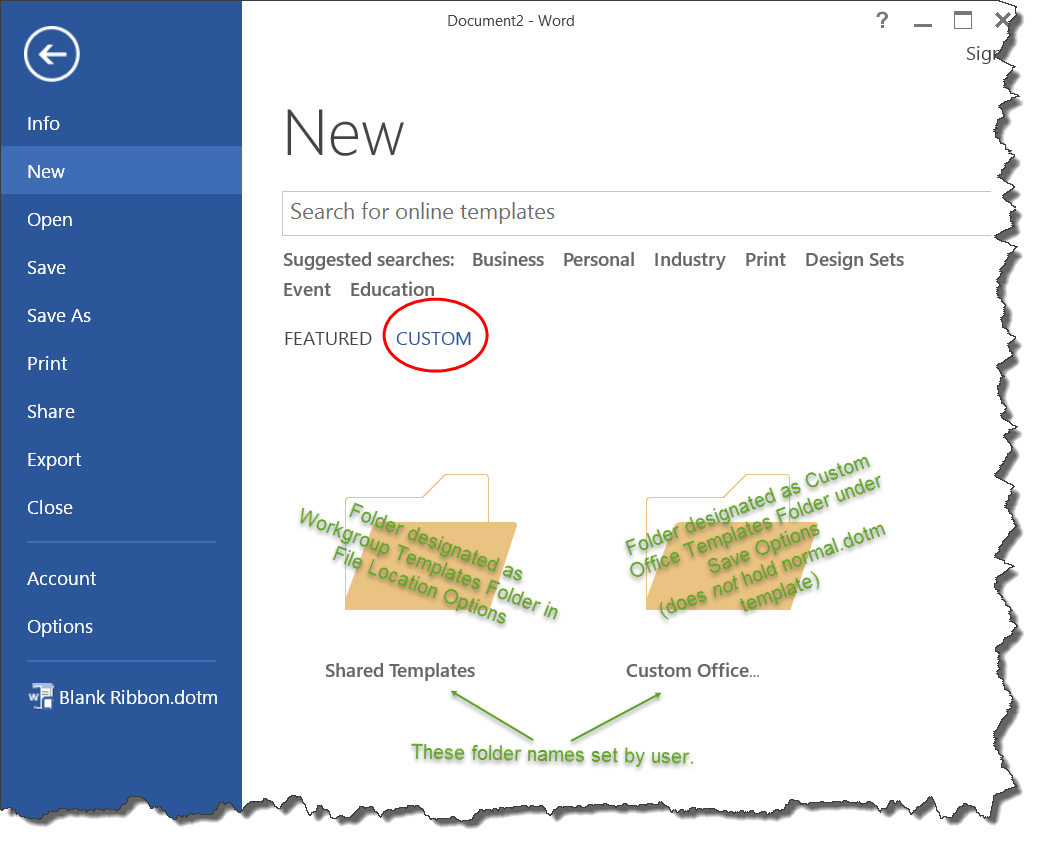
Again, this dialog is a combination of the templates in the User Templates folder and the Workgroup Templates folder under tabs. The tabs are representations of subfolders in those folders. See the Templates Chapter for more on that relationship and the folder organization. If you want easier access to FileNew Dialog in Word 2010, you can skip ahead to that section to see how to get a keyboard shortcut, an Icon on the QAT or even a button on the Ribbon to take you there. Word 2013 Changes Things Up AgainWord 2013-21 changed the default location of custom user templates from a hidden Templates folder to one called "Custom Office Templates" stored in the user's Documents folder. Again, this is a default. Word 2013 tries to store any document you save as a template to the this templates folder (returning to earlier behavior). The normal.dotm file is still saved in the User Templates Folder. See below for more on this distinction. When you choose File > New, Word 2013-21 does not display the FileNew dialog or even look like it gives you a choice of your custom templates! It starts you out with icons of Office Online Featured templates.
Note: If when you Start Word 2013-21 you are seeing something like this when you expect or want to see a blank document, see Word 2013-21 Startup Screen. It is possible, using XML, to add your own custom templates to the featured templates. Your author has not done this, but it is discussed in Deploy Custom Templates. Hidden in the clutter of that crisp-looking screen next to "Featured" is the word "Personal" or "Custom" or "Shared." My thanks to this Wiki article for the explanation for the variations in what shows up.
Each of these words look like text, but they are buttons that you click on to get to another screen.
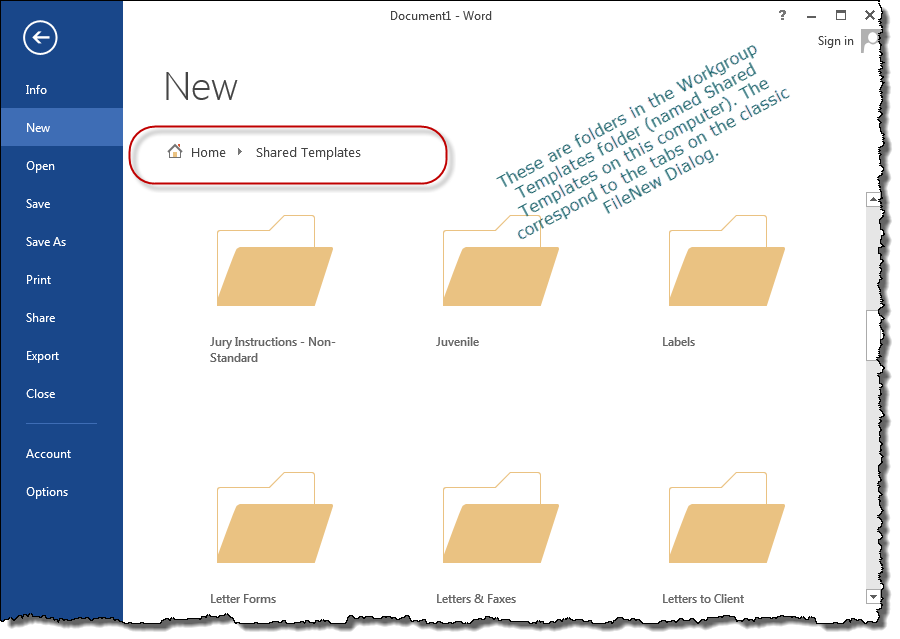
The folder names shown above were set by the user. The default location for user templates changed in Word 2013 from "Templates" to "Custom Office Templates." The old template folder (which contains the normal template) does not show up on this dialog. Workgroup Templates have no default name or location in any version of Word.
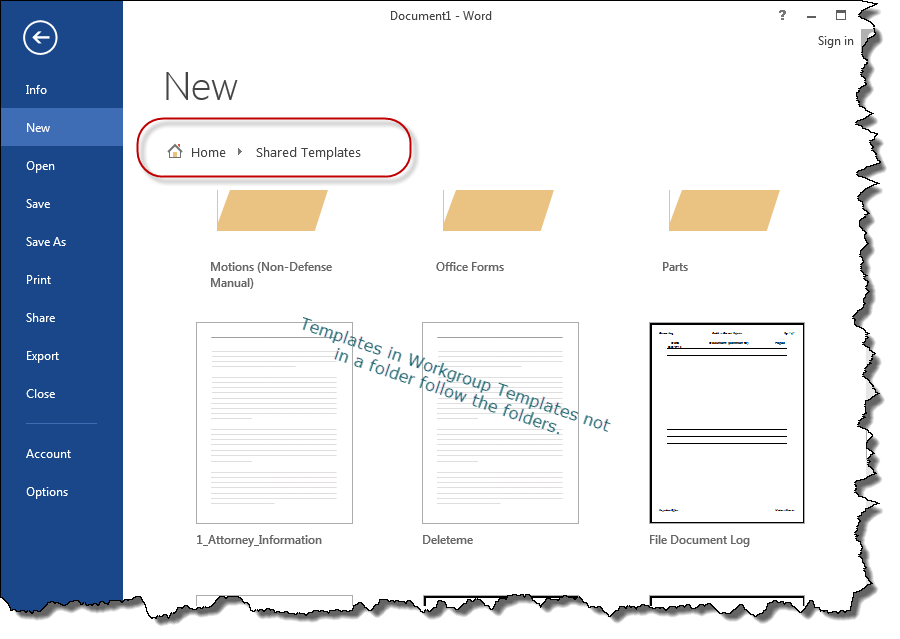
Figure 2013-3. If you click on one of the folders, you get to see icons for its contents, beginning with the folders.
If you click on one of those internal folders, you get to icons for its contents.
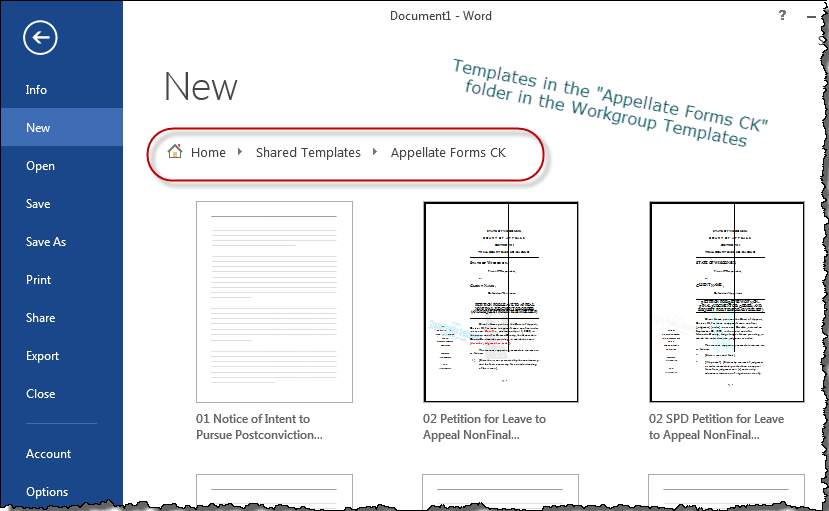
In the classic dialog there would be a tab for "Appellate Forms CK." Clicking on that tab would get you to those templates, shown as (smaller) icons or as a list. The Classic File New dialog (which you would reach by clicking on "On My Computer" or "My Templates" in earlier versions is not available in Word 2013-21 without modification. That dialog allows direct manipulation of templates (i.e. copy or delete) as in Windows and lets you show lists of template names rather than icons. It combines the templates in the user templates folder and those in the workgroup templates folder. It does not show any templates in the Custom Office Templates folder unless that folder is set to also be the user templates folder or the workgroup templates folder. You can easily add access to the classic FileNew dialog to your Word 2013-21. Advantages of the Word 2013-21 method:
When you mouse-over a template, the pin icon (pin pointed horizontally) will appear. If you click on that pin icon, it will rotate and the template will appear on the initial File New dialog. Word 2013-21 installs with the "Take a Tour" template pinned. Clicking on the pin of a template already pinned, will rotate the pin back to horizontal and unpin the template. If you hesitate in clicking on the pin/unpin icon, you'll get a tooltip as shown.
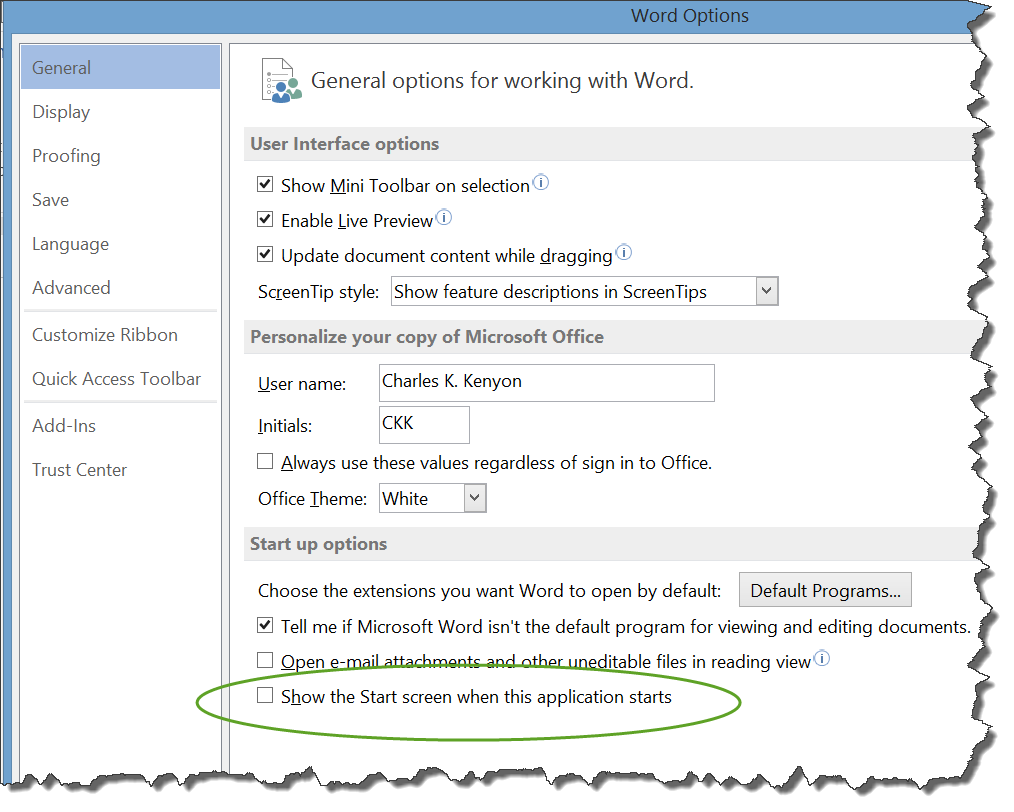
None of the proposed 2013-21 modifications preclude using the native Word 2013-21 method and screens. Word Start Screen adds another wrinkle.One more wrinkle is that Word 2013-21 comes with a new Startup (splash) screen that makes things even more confusing. You can get rid of it in Word Options.
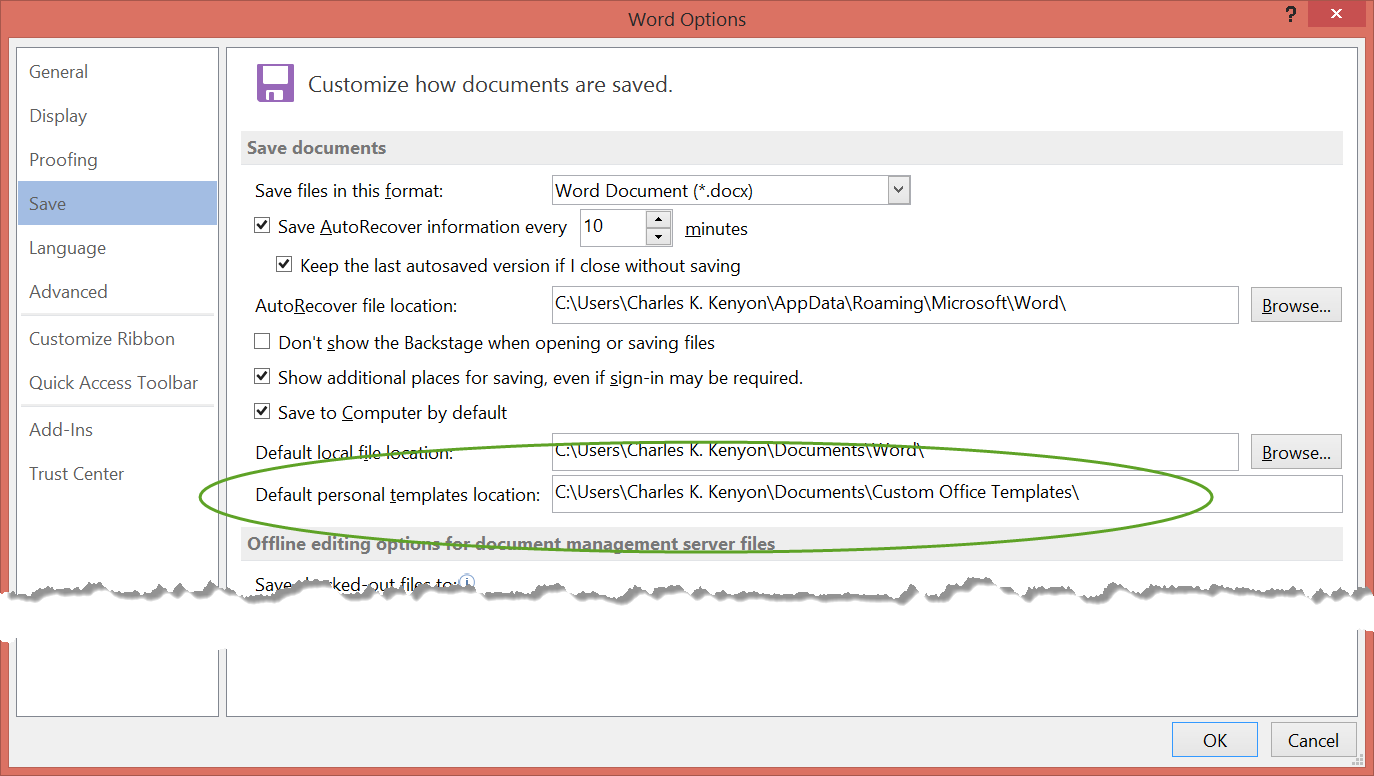
The Distinction between the User Templates Folder and the Default Personal Templates Location in Word 2013/365 and later.Word 2007-2010 save newly created templates where documents are saved, by default. This is not a good place to be saving templates. Earlier versions saved them in the User Templates folder, by default. Word 2013/365 introduced the "Default Personal Templates Location." By default this is a separate folder called Custom Office Templates in the documents folder. It holds templates created or saved by the user but does not hold the normal.dotm template. The user can change the location of the Default Personal Templates folder under the File > Options > Save dialog. Again, this folder is distinct from the User Templates folder set under File > Options > Advanced > File Locations. That folder contains the normal.dotm template.
This (Default Personal Templates folder) is the location Word will look for templates under the File > New dialog as Personal. It will NOT look at the User Templates folder unless that folder is the same folder! Unless this folder is also designated as the User Templates folder, it will not contain the functioning normal.dotm template. The User Templates folder is a roaming location by default and can be set under File > Options > Advanced > File Locations. It will contain the normal.dotm template and will show up in the classic FileNew dialog. I recommend that most users designate the "user templates folder" and the "default personal templates" folder to be the same location. See also this discussion on the Word Answers forum.
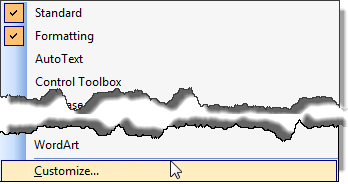
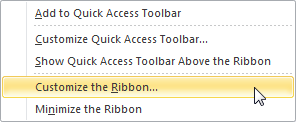
Getting to the FileNew dialog without all the intermediate stepsEvery version of Word since Word 2000 has inserted intermediate steps to reach the FileNew dialog. This gives the user more choices. It also clutters the screen and takes time if what you usually want is the FileNew dialog. Let's look at methods to get there quickly, through menu choices, keyboard shortcuts, and toolbar icons. This may be a bit of a stretch for many users, but these modifications are simple to make and can be ignored or undone if you don't like them. There is also a free Add-In available that you can put on your computer to use the modifications without doing the work. The steps for each version are given separately, so there is quite a bit of repetition. Each looks to use the Word command for the FileNew dialog. No macros are used or created. Let's get started. Word 2002-2003Underlying each method is the FileNewClassic Word command. A free Add-In that incorporates these methods is available on my Downloads page. Add a Command to the File MenuYou can add a command to the File Menu like "New Dialog" To do this get to the Customize dialog. The quickest way to reach this is by right-clicking on any toolbar and selecting Customize at the bottom of the choices.
This will bring up the Customize Dialog.
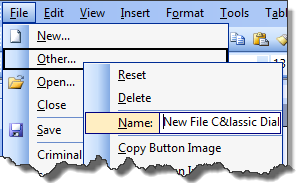
Under the All Commands category, find the command FileNewDialog. Click on that and holding the mouse button down, drag the command to your File Menu and put it under New. The little + symbol by your mouse pointer indicates you are adding a command.
You will get a command for "Other..." there which is not especially intuitive.
With the Customize dialog still open, right-click on that "Other..." command and release the mouse button. You'll get a menu to modify it. Change the name to something like "New File C&lassic Dialog."
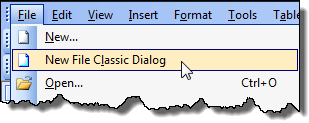
The "&" gives you a menu shortcut (underlined letter in menu for keyboard access), in this case "l." You end up with something like this:
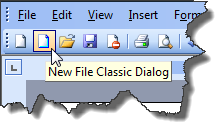
The icon was copied from the New... command and edited. Clicking on this choice will give you the FileNew dialog without the intermediate New File Pane. Add an Icon to the Standard ToolbarYou may want to skip the menu and just put it on the toolbar. If you have already created the menu choice, with the Customize dialog box open you can just drag it from the menu to the toolbar or copy it to the toolbar by Ctrl+Dragging it to the toolbar. Dragging the command shown in the menu above we get:
If you don't want the text, you can right-click on the command (with the Customize dialog open) and select the option to only display the icon (the default for a toolbar). When the mouse pointer hovers over the button, the name you gave it on the menu will display.
Warning! You can easily drag commands off menus and buttons off toolbars when the Customize dialog is open. Add a Keyboard ShortcutInstead of menu and toolbar modificatons, or in addition to them, you could use a keyboard shortcut like Alt+Ctrl+N to open the dialog. This can also be done through the Customize dialog, using instead the Keyboard button under the Toolbars tab. (The free Add-In uses Alt+Ctrl+Shift+N.)
In the Categories window select "All Commands" and then choose "FileNewDialog" in the Commands window. Click in the window for the new shortcut key and press the key combination you want to assign. If it is already in use, you will be warned. Modifications Saved in Normal.dot by DefaultThe modifications made to the menus, toolbars, and keyboard are stored in the normal.dot template by default. Instead you can save them in your own template. If that is placed in the Word Startup Folder, the modifications will apply in all documents. Taking the template out of that folder removes them from Word. This is the easiest way to make modifications you may want to remove or may want to share with others. (Normal.dot should never be a shared file.) Such a resource template is called a Global Template. You will see a storage location option on each of the Customize dialogs. An Add-In that incorporates all three of the suggested modifications is available for free download on my Downloads page.
Word 2007 and the QATWord 2007 abolished traditional menus and toolbars in favor of the Ribbon interface but does have keyboard shortcuts and the Quick Access Toolbar (QAT). An Add-In that incorporates both of the suggested modifications and modifies the Ribbon is available for free download on my Downloads page. Using a Keyboard Shortcut to Reach the FileNew DialogThe quickest way to create or modify a keyboard shortcut in Word 2007 is through the dialog to modify the QAT. At the right end of the QAT there is a drop-down menu.
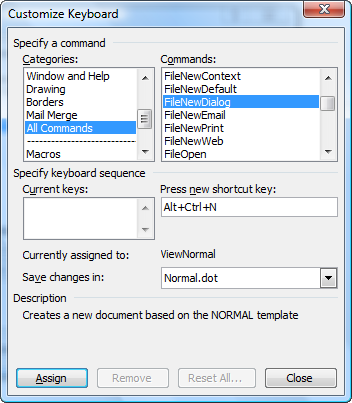
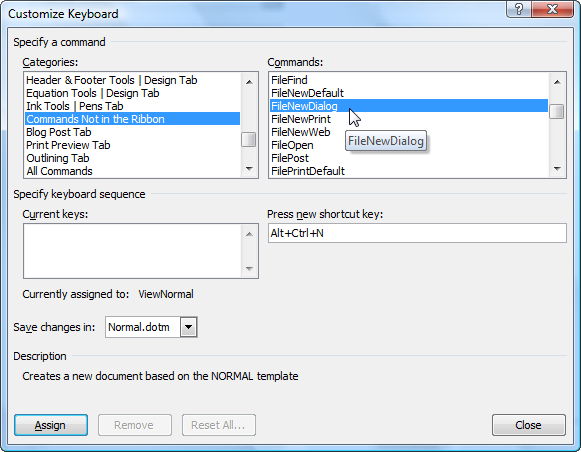
Picking "More Commands..." from this menu brings up a dialog we'll look at later. At the bottom of that dialog, though is a button to Customize the Keyboard shortcuts. Click on that button to get to the classic customize keyboard dialog.
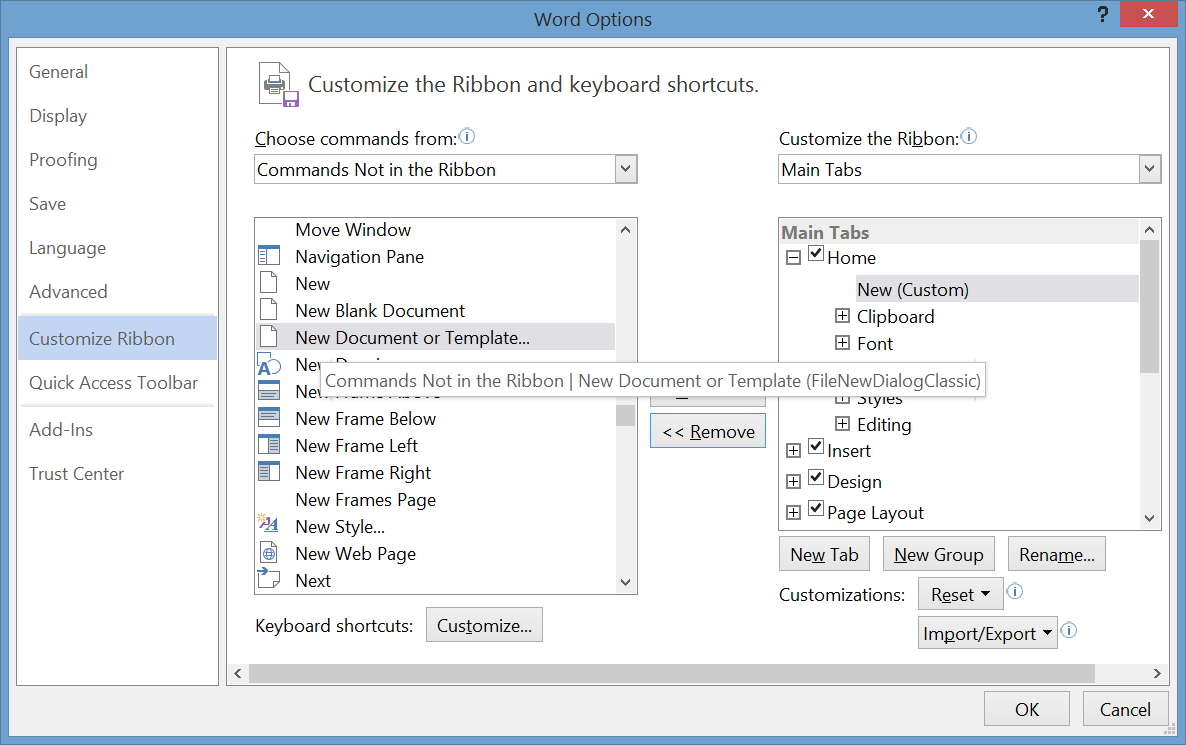
In the Categories window on the left pick "Commands Not in the Ribbon" then from the available Commands pick FileNewDialog. Then click in the box or window for the new shortcut key and press the key combination you want to use. It will show the keys you pressed. If that combination is already in use (here Alt+Ctrl+N is already assigned to ViewNormal or Draft view) the current use will be shown. If this is what you want to use, click on the Assign button. Note the default file location is the Normal.dotm template. More on that later. Modify the Quick Action Toolbar (QAT)You can also put this on the QAT. You start with the same drop-down from the QAT.
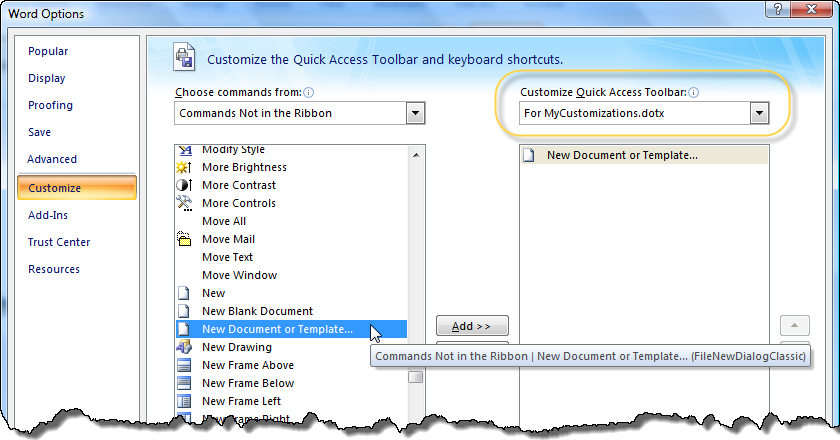
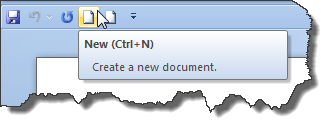
You may be tempted to simply check "New" which will give you the little New icon on your Toolbar. That, however simply gives you a new blank document based on the Normal template, the same as pressing Ctrl+N. For right now, I suggest unchecking that if it is already checked and going to "More Commands..."
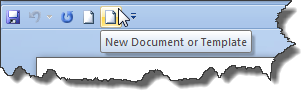
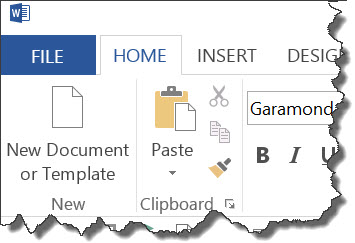
That brings up the Customize the Quick Access Toolbar and keyboard shortcuts dialog that we skipped through on the way to customizing the keyboard. This time it is set (top right) to save the customization in a custom template. The default save location is the Normal.dotm template. More on that later. You want "Commands Not in the Ribbon" in "Choose commands from." Then from the list presented you want "New Document or Template..." Click on the Add button to add it to the QAT. Note that there are three New commands available, all with the same icon; you want the third one. This puts a page icon on your QAT. If you have New on there as well, you will have two identical page icons. If you have tooltips displayed, they will give you different tooltips, though.
Keyboard Modifications Saved in Normal.dotm by Default, QAT additions in the Word.qat file - you can and should choose a different templateYou will see an option for storage location option on each of the
Customize dialogs. Instead, you can save them
in your own template(s). If such a template is is placed in the
Word Startup Folder,
the modifications will apply in all documents. A custom template can hold our addition of the FileNew dialog. Such a separate resource template is called a
Global Template. Jay Freedman has a different Add-In that uses a custom dialog box instead of the classic dialog. It is available as a free download from his MacroZone site. The name of the download is NewDocUserForm.zip. Add Command or Menu to Home Tab or Other Tab on the RibbonIt is possible in Word 2007 to modify the Ribbon itself, but not through the Word interface. You would need to edit the XML in a template. That is beyond the scope of this page. See Customize the Ribbon (It doesn't take rocket science). While it doesn't take rocket science, it takes considerably more work and patience than what we're discussing in this page. Some programming knowledge is required. The free Add-In has such a modification.
Word 2010 ModificationsWord 2010 allows keyboard shortcut and Quick Access Toolbar(QAT) modifications. It also allows limited Ribbon modifications without resorting to XML programming. Let's start with adding a keyboard shortcut. The process is similar to that used for Word 2007 except that you can also modify the Ribbon. An Add-In that incorporates all three of the suggested modifications is available for free download on my Downloads page. Using a Keyboard Shortcut to Reach the FileNew DialogThe quickest way to create or modify a keyboard shortcut in Word 2010 is through the dialog to customize the Ribbon. If you right-click on any Ribbon, you will see a drop-down menu.
Picking "Customize the Ribbon..." from this menu brings up a dialog we'll look at later. At the bottom of that dialog, though is a button to Customize the Keyboard shortcuts. Click on that button to get to the classic customize keyboard dialog.
In the Categories window on the left pick "Commands Not in the Ribbon" then from the available Commands pick FileNewDialog. Then click in the box or window for the new shortcut key and press the key combination you want to use. It will show the keys you pressed. If that combination is already in use (here Alt+Ctrl+N is already assigned to ViewNormal or Draft view) the current use will be shown. If this is what you want to use, click on the Assign button. Note the default file location is the Normal.dotm template. More on that later. Modify the Quick Action Toolbar (QAT)You can also put this on the QAT. You start with the drop-down menu on the right end of QAT.
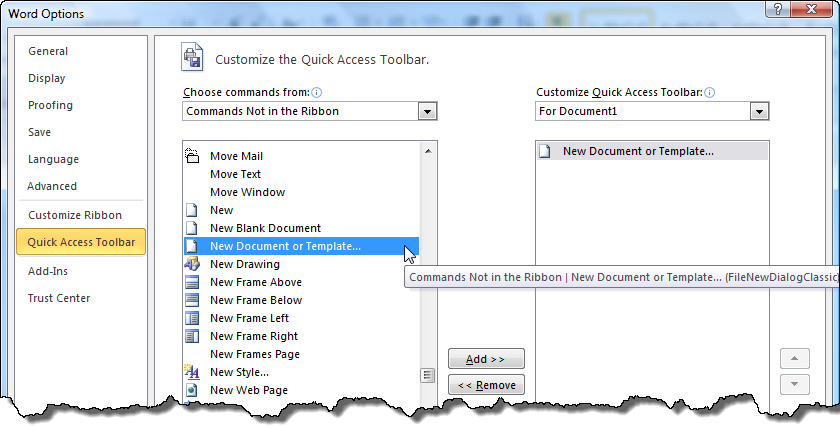
You may be tempted to simply check "New" which will give you the little New icon on your Toolbar. That, however simply gives you a new blank document based on the Normal template, the same as pressing Ctrl+N. For right now, I suggest unchecking that if it is already checked and going to "More Commands..."
That brings up the Customize the Quick Access Toolbar. It is set (top right) to save the customization in Document1. The default save location is the Normal.dotm template. More on that later. You want "Commands Not in the Ribbon" in "Choose commands from." Then from the list presented you want "New Document or Template..." Click on the Add button to add it to the QAT. Note that there are three New commands available, all with the same icon; you want the third one. This puts a page icon on your QAT. If you have New on there as well, you will have two identical page icons. If you have tooltips displayed, they will give you different tooltips, though.
Modify the Ribbon in Word 2010It is possible to modify the Ribbon in Word 2010 through the interface. This not a method to use, though, if you want to share modifications. That still requires XML modification. For that kind of modification, see Customize the Ribbon (It doesn't take rocket science). For your own use, though, you can add a custom group and button to any tab on the Ribbon or create a custom ribbon tab using the Word Interface itself. To modify the Ribbon from within Word is a two-stage process. First you create a place for your commands, then you add the commands. The place would be a Custom Group on an existing Tab or on a Custom Tab. For now we'll look at adding it to the Home tab. Note, however, that the QAT modification is probably not only easier, but more useful, since the QAT is displayed with all Ribbon tabs. To start, right-click on the Ribbon and select the choice to "Customize the Ribbon..." |


.png)


|
Back to Table of Contents Word 2002-2003 Changes - Potential Modifications Word 2007 Changes - Potential Modifications Word 2010 Changes - Potential Modifications Word 2013-21 Changes - Potential Modifications Alternative Ways to Access Custom Templates - Alternatives for File New in Word |
Word 2013-21 Modifications
Word 2013-21 allows keyboard shortcut and Quick Access Toolbar(QAT) modifications. It also allows limited Ribbon modifications without resorting to XML programming. Let's start with adding a keyboard shortcut. The process is similar to that used for Word 2007 except that you can also modify the Ribbon. An Add-In that incorporates all three of the suggested modifications is available for free download on my Downloads page.
Note that in Word 2013/365 and later the Classic FileNew dialog will still access a combination of the User Templates Folder and the Workgroup Templates Folder. It will not access templates in the Default Personal Templates location unless that location has been set to be the same as the User Templates location or the Workgroup Templates location. These locations are set in different dialogs. The Default Personal Templates location is set under File > Options > Save. The User Templates Folder and Workgroup Templates Folder are set under File > Options > Advanced > File Locations. I recommend that most users designate the same location for the User Templates Folder and the Default Personal Templates location. That way, they will have access to all of their templates whether using the Classic FileNew dialog or the File > New method of creating a new document.
Using a Keyboard Shortcut to Reach the FileNew Dialog
The quickest way to create or modify a keyboard shortcut in Word 2013-21 is through the dialog to customize the Ribbon. If you right-click on any Ribbon, you will see a drop-down menu.
Picking "Customize the Ribbon..." from this menu brings up a dialog we'll look at later. At the bottom of that dialog, though is a button to Customize the Keyboard shortcuts. Click on that button to get to the classic customize keyboard dialog.
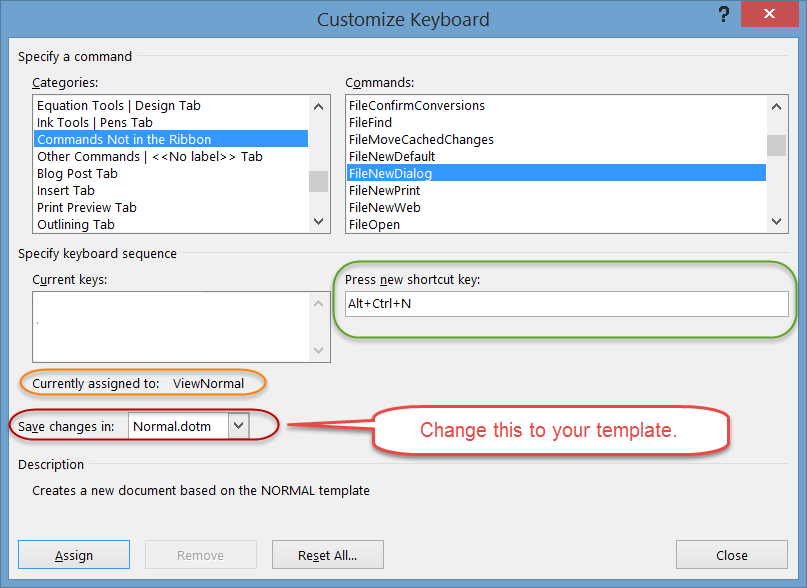
In the Categories window on the left pick "Commands Not in the Ribbon" then from the available Commands pick FileNewDialog. Then click in the box or window for the new shortcut key and press the key combination you want to use. It will show the keys you pressed. If that combination is already in use the current use will be shown. Here I pressed Alt+Ctrl+N and it shows that this was already assigned to the ViewNormal command. If this is what you want to use, click on the Assign button. Note the default file location is the Normal.dotm template. More on that later.
Modify the Quick Action Toolbar (QAT)
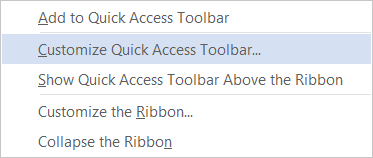
You can also put this on the QAT. You start with the drop-down menu on the right end of QAT or with a right-click to the Ribbon.
Two ways to reach the QAT Customization Dialog
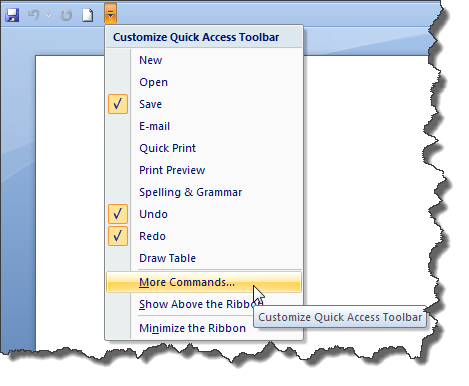
You may be tempted to simply check "New" which will give you the little New icon on your Toolbar. That, however simply gives you a new blank document based on the Normal template, the same as pressing Ctrl+N. For right now, I suggest unchecking that if it is already checked and going to "More Commands..."
That brings up the Customize the Quick Access Toolbar. It is set (top right) to save the customization in Document1. The default save location is the Normal.dotm template. More on that later.
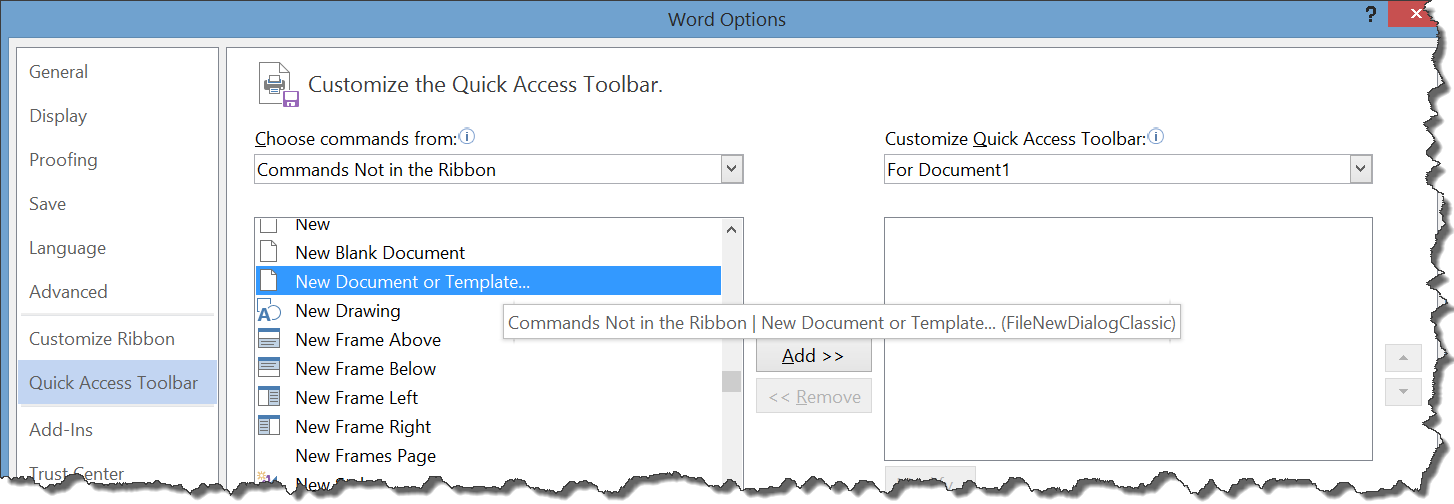
You want "Commands Not in the Ribbon" in "Choose commands from." Then from the list presented you want "New Document or Template..." Click on the Add button to add it to the QAT. Note that there are three New commands available, all with the same icon; you want the third one.
This puts a page icon on your QAT. If you have New on there as well, you will have two identical page icons. If you have tooltips displayed, they will give you different tooltips, though.
Modify the Ribbon in Word 2013-21
It is possible to modify the Ribbon in Word 2013-21 through the interface. This not a method to use, though, if you want to share modifications. That still requires XML modification. For that kind of modification, see Customize the Ribbon (It doesn't take rocket science). For your own use, though, you can add a custom group and button to any tab on the Ribbon or create a custom ribbon tab using the Word Interface itself.
To modify the Ribbon from within Word is a two-stage process. First you create a place for your commands, then you add the commands. The place would be a Custom Group on an existing Tab or on a Custom Tab. For now we'll look at adding it to the Home tab. Note, however, that the QAT modification is probably not only easier, but more useful, since the QAT is displayed with all Ribbon tabs.
To start, right-click on the Ribbon and select the choice to "Customize the Ribbon..."
This time we will use the Customize the Ribbon dialog for more than reaching the Keyboard shortcut modifications.
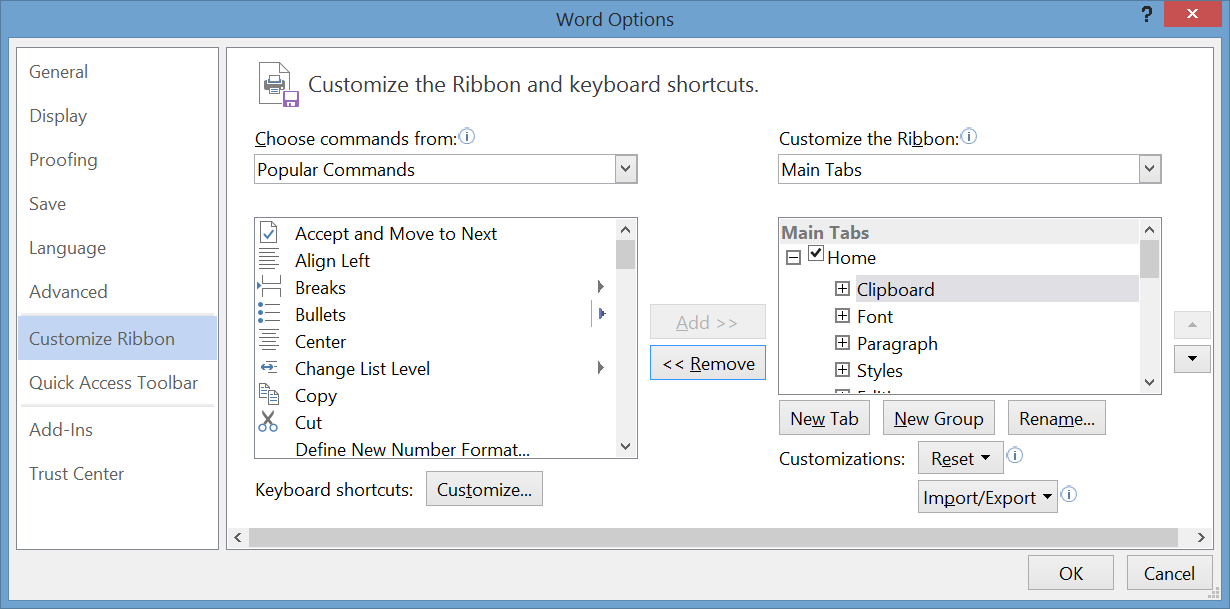
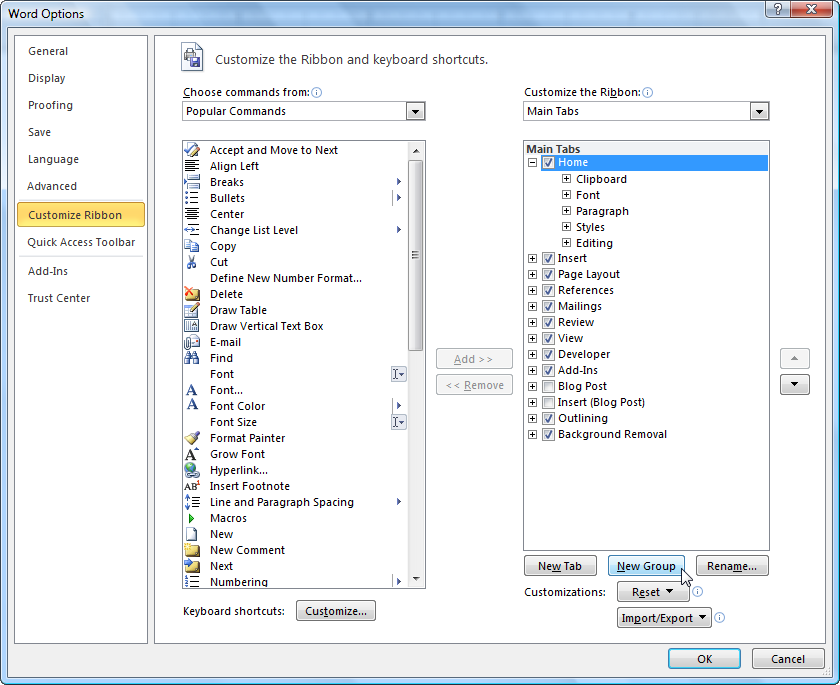
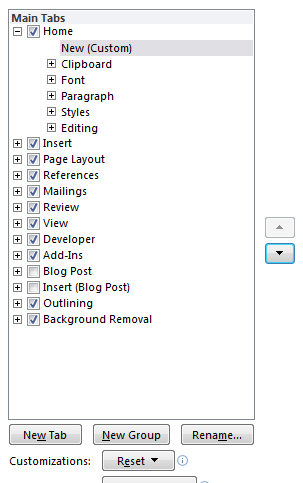
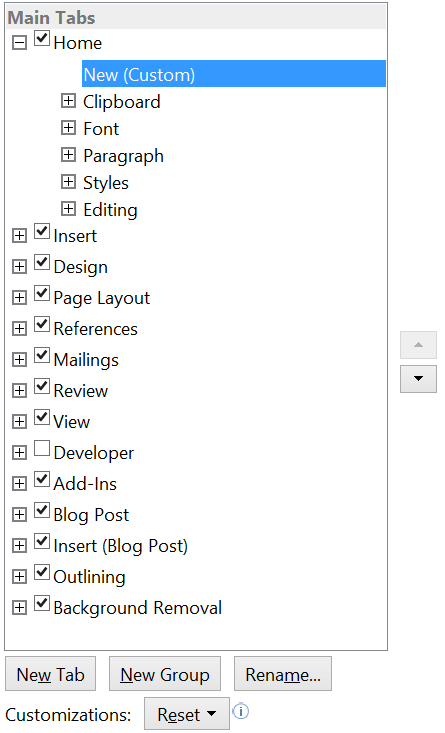
Let's start by adding a new "Group" to the Home Tab. Select the Home Tab in the Window on the right and click on the button for New Group. Then use the Rename button to rename the Group to New and the up and down buttons on the right to move it to the top of the home tab groups.
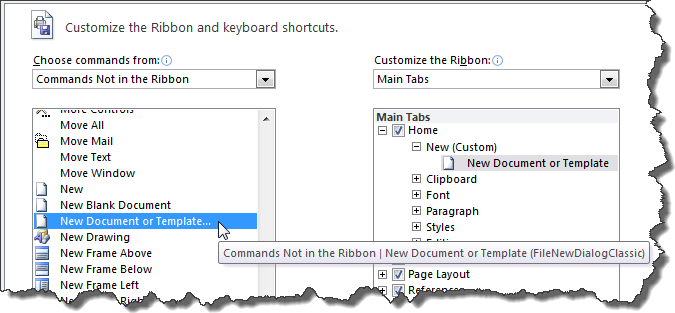
Next we find the command in the list on the left. We want to look in "Commands Not In the Ribbon" and add "New Document or Template" to our New group.
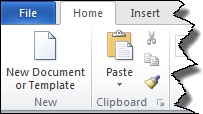
We end up with a large page icon on the left side of our Home tab.
The name of the Group appears along the bottom of the Ribbon; the name of the command under the icon. I personally find the QAT modification and Keyboard shortcut far more useful. They also take up less screen space and are more easily transferred to other computers. Depending on your screen size, other icons and commands on the ribbon may have down-sized to make room for your new entry.
Keyboard Modifications to Word 2013-21 are Saved in Normal.dotm by
Default
This may not be where you actually want to store them.
You will see an option for storage location option on each of the
Customize dialogs.
The modifications made to keyboard shortcuts are
stored in the normal.dotm template by default.
Those to the QAT or Ribbon are stored in a different file by default, which
like the Normal.dotm file, should not be shared.
These are the easy place to keep your modifications and
you may want to do so, but you should be aware that you are making a
choice.
Instead, you can save them
in your own template(s). If such a template is is placed in the
Word Startup Folder,
the modifications will apply in all documents.
Taking the template out
of that folder removes the customizations from Word.
This is the easiest way to make
customizations you may want to transfer, share or remove. (Normal.dotm
should never be a shared file.)
A custom template can hold our addition of the FileNew dialog. Such a separate resource template is called a
Global Template.
See Modifying the
QAT for more on QAT storage locations. The free
Add-In is intended for use as such a Global Template.
If you want Ribbon customizations only to certain templates or want to be able to easily transfer ribbon customizations without wiping out existing ones, explore XML modification. Customize the Ribbon (It doesn't take rocket science)
Here is a free Add-In you can download contains such a global template.
Word MVP Jay Freedman has a different Add-In that uses a custom dialog box instead of the classic dialog box. It is available as a free download from his MacroZone site. The name of the download is NewDocUserForm.zip.
|
Back to Table of Contents Word 2002-2003 Changes - Potential Modifications Word 2007 Changes - Potential Modifications Word 2010 Changes - Potential Modifications Word 2013-21 Changes - Potential Modifications Alternative Ways to Access Custom Templates - Alternatives for File New in Word |
You can reach me by e-mail.
Copyright (c) 2000, 2014-2023 Charles Kyle Kenyon, Madison, Wisconsin, USA All rights reserved. Please do not copy this without express permission.
page
views since 13 April 2004
 Copyright 2000, Microsoft Corporation.
Copyright 2000-2002, 2004-2006, 2010-2025
Charles
Kyle Kenyon
See information about copy permission.
Search Intermediate Users Guide to Microsoft Word Using Google My office page as a Madison, Wisconsin Criminal Defense Lawyer.
Original Legal Users Guide to Microsoft Word 2002 - Documents in Zip Format
A note about link exchanges. This site does not participate in link exchanges to build web presence. If you have a link that you think would be of use to people reading this page, please send it to the webmaster with the url of the page where you think it should appear and it will be considered. Your placing a link to this site will not affect the decision on whether to add your link, though.