|
| |
| |
Using Tables for Organizing and Formatting in Microsoft Word
What You Will Learn
After completing this lesson, you will be able to:
Tables of Contents and Tables of Authorities
(Figures, etc.)
are not covered in this chapter (CK
Note)
 | This chapter is about a method of formatting or layout - it is not
involved with what goes into a table |
| See: Complex Documents
for information on Tables of Contents / Tables of Authorities / Tables
of Figures |
Additional Written and Web Resources
Word for Law Firms and Lawyers
|
Nested Tables
Demonstration - change from Word 97 to Word 2000 |
|
My Seven Favorite Word Table Tricks by Legal Guru Debora Savadra |
|
MVP FAQ on Tables |
|
How to make rows in a table the same height by Shauna Kelly, MVP |
|
Smart ways to to control vertical and horizontal spacing in a table
by Shauna Kelly, MVP |
|
Table Basics by Suzanne S. Barnhill, MVP and Dave Rado, MVP |
|
Table Basics (Ribbon) by Suzanne S. Barhill, MVP |
|
Setting Tabs in Tables (MVP FAQ page) |
|
Table Styles (advanced) by Romke Soldaat |
|
Table Styles (advanced - vba) Word 2000 and later |
|
Sort Table Entries by legal guru Deborah Savadra (video) |
|
Why I don’t use Custom Table Styles in Microsoft Word 2002 and 2003
by Shauna Kelly, MVP |
|
Using (Table) Borders in Microsoft Word - Run for the Border by
Suzanne S. Barnhill, MVP. |
|
Why Don't My Table Borders Print? |
|
How to Add a Graphic or Logo to Every Label (KB) |
|
Maximising the Performance of Word Tables by Dave Rado, MVP |
|
Keep Tables on One Page (assuming they'll fit) by Suzanne S.
Barnhill, MVP |
|
Table Movement Tricks - Woody's Office Watch |
|
Sorting in Word - Woody's Office Watch |
|
Changing table rules with compatibility options (KB) these can
change how Word acts with tables. |
| Insert logos
/graphics on business cards and mailing labels by Graham Mayor, MVP. |
|
Master Documents "Feature" in Microsoft Word
|
|
How to create a "Continued" table title?
|
|
Continuation headings and other creative use of fields in tables by
Peter Jamieson |
|
AuthorTec Table Styles by Rich Michaels, MVP - Add-in to make Table
Styles that work |
|
Automating Word Tables for Data Insertion and Extraction by Cindy
Meister, MVP |
|
How to Format Microsoft Word Tables Using Table Styles (Advantix
Learning) |
|
Create Flashcards Using Microsoft Word (web search) |
|
Three Ways to Insert Tables by Erin Wright |
|
Advanced Tables in Word: Table Styles, Breaks and Formulas - video
from Simon Sez IT |
|
How to Insert Formulas and Functions in Word Tables by Advantix
Learning |
|
Use a formula in a Word or Outlook table - Microsoft Support |
|
Sum a column or row of numbers in a table - Microsoft Support |
|
Calculations in the Table - Office Tooltips |
|
This chapter (unsupplemented) for Word 2002 in Word Format |
This chapter last edited by Charles
Kenyon on
Thursday 02 January 2025
 
(this guide table of contents) ------- (MS
Word New Users FAQ)
Tables Overview
Everything from pleading captions to file
indices to stock certificate listings can be managed in tables. In this
chapter, we cover the basics first—how to create, modify, and prepare
your tables for the legal environment. Next we'll look at some of the
ways to make tables useful in your firm. You will also see a greater
number of references to Word 2000 than in other chapters. This is
because the Table feature in Word 2000 has been greatly enhanced to
offer more functionality. The enhancements continued through Word 2024.
You may prefer
Table Basics (Ribbon) by Suzanne S. Barhill, MVP.
You can use tables to align numbers in columns, and then sort and
perform calculations on them. You can also use tables to create
interesting page layouts and arrange text and graphics.
"Like a hammer, the time-proven spacebar has been used countless
times to perform chores for which it was never intended. Yes, a
hammer can compel a screw to join two pieces of wood together, and a
spacebar can be used to move text around so it looks like a table.
However, just as a hammered screw makes for a shaky wooden table, a
word processing table fashioned together with spaces is equally
fragile. Add something to the table and it doesn't hold together.
Which table? Take your pick."
Microsoft Word 2010 Bible by Herb Tyson
There are many ways to create tables in Word. Some of the more
commonly used methods include:
| Using a button on the Insert tab to insert the table (Word 2007
and later), |
| Choosing Insert from the Table menu (Word 2003 and earlier),
|
| Picking a Quick Table (Word 2007 and
later) |
| Drawing the table using the Tables and Borders toolbar tools
(Word 2003 and earlier). |
Some less common ways to insert a table include:
| Inserting an Excel worksheet into a document, |
| Copying and pasting Excel information into Word, and |
| Converting existing text not in a table to a table format by
choosing Convert Text to Table from the Table menu. |
Method 1: The Insert Table button (on the Insert Tab in Word 2007+; on
the Table Menu in Word 97-2003)
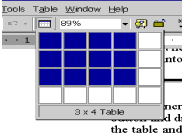
The Insert Table button on the Standard
toolbar or Insert Tab is one of the fastest ways to insert a table in a
document. If you click the button, a box extends below the button with
smaller boxes inside. Move your mouse over the number of cells you'd
like to insert into the document. Notice that the cells change color as
you move the mouse over them. This indicates the size of the table to be
created. When you have the desired number of cells selected, click to
insert the table into the current location of the mouse pointer.
In Word 2007 and later, you can also select a
Quick Table using this button.
 |
Note You can increase the size of the table you insert.
Hold down the left mouse button and drag farther down, to the right,
or click the bottom right corner of the table and drag to increase
both length and width of the table. The number of cells that can be
inserted using this method is dependent on the size of your display,
and the position of the Insert Table button on the toolbar. You can
only select as far to the right as is visible on your monitor.
CK Note: In the Word
version of the Legal Users' Guide all Notes, Tips, and Warnings
(with the little pictures) are contained in two-cell tables.
|
 |
Tip To increase the number of cells that can be selected
using the Insert Table button you first need to reposition the
button further to the left on the toolbar. Hold the ALT key, and
drag the Insert Table button to a position to the left of the
current location. |
Method 2: The Insert Table dialog
The Insert Table button is limited in how many cells it can display
initially. When building a large or more complex table, you may find
using the Table menu more useful. In Word 97, from the Table menu,
choose Insert Table; in Word 2000-2003, from the Table menu, choose
Insert, and then select Table. The Word 2000-2003 Insert Table dialog
box is shown in the next figure.
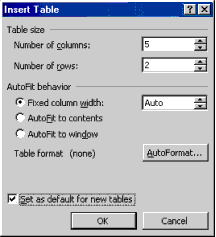
The Insert Table dialog box in both Word 97 and Word 2000 allows up
to 63 columns and 32,767 rows in a table, but Word 2000 lets you
exercise more formatting choices and allows you to set defaults for
subsequent visits to the dialog box.
Practice: Insert a Table with the Insert Table dialog
- Make sure you're on a blank line in your document.
- In Word 97, from the Table menu choose Insert Table. In Word
2000, from the Table menu choose Insert, then select Table.
- In the Number of columns box, type 100.
- Click OK. Note the error message (Both Word 97 and 2000 have a
limit of 63 columns, no matter the paper size, orientation, etc.).
- In the Number of columns box, type 4.
- In the Number of rows box, type 100.
- Click OK.
If you need more than 63 columns or 32767 rows, consider using
Microsoft Excel or Access, depending on the task.
|
Note Microsoft Excel is a powerful spreadsheet program
that includes functions for data analysis, database, and
presentation. The entire Excel worksheet is like a very large table
made up of cells.
Microsoft Access is a relational database application that is
easy to use for simple or complicated tasks. |
Method 3: Draw a Table
One of the most exciting things about Word is a feature called Draw
Table. Draw Table allows you to create your own tables with special row
and column dimensions to begin with—no more messy eyeballing your row
and column sizes. To activate the table-drawing tool, click the Tables
and Borders button on the Standard toolbar—the button resembles a pencil
resting over a table.
Notice that now you not only see the Tables and Borders toolbar if
you couldn't before, but you can also click and drag with the mouse
pointer in the document to create a table. Draw Table is a great feature
for situations where a standard-sized table won't do: pleading captions
are a perfect example. Let's draw one.
Practice: Insert a Table with the Draw Table tool
- On the Standard toolbar, click the Tables and Borders button. If
you want to add the new toolbar near your menu bar instead of having
it float over the document, you can "dock" it by double-clicking
anywhere in the title bar that says "Tables and Borders." This gets
the toolbar out of the way of your work and gives you more room to
create and modify your table.
- Notice that when you move your mouse pointer within the
document, the mouse pointer changes shape and resembles the pencil.
Click and drag from one corner of the table you're making to the
opposite corner. You should see a large box, which is really a
one-celled table. Your table should resemble the following example:

- Inside the middle of the table, click and drag from top to
bottom. Repeat to create a very narrow column in the center of the
table as shown in the next example.

|
Tip To eliminate all of the printing borders in your
table, place your cursor in the table and then press ALT+CTRL+U. |
- Type your scallops in the middle column and you're on your way
(scallops are created using the ")" key) and pressing ENTER multiple
times. Your pleading caption probably still needs some touching up, but
once you're finished, you could save this as an AutoText entry and never
have to create a pleading caption again!
If you accidentally lose the Draw Table tool on your mouse pointer,
click the pencil button at the far left side of the Tables and Borders
toolbar to reactivate it.
|
Note To create an AutoText entry, select the text or
object and then from the Insert menu choose AutoText, and then
choose New. Type a unique name for the AutoText entry and click OK.
If your AutoText name is less than four characters, or if the name
applied is not unique, you will need to press F3 to complete the
AutoText entry and place the text or object within the document at
the current location. If the entry is four or more characters, after
you type the fourth character, a ScreenTip appears as you type.
Press TAB, F3, or ENTER to insert the AutoText entry. |
|
Note A new feature to Word 2000 is guidelines that appear
on the ruler as you create the table (shown in the following
figure). This provides a visual representation of the measurement of
the table being created. |

While these three methods are the most common for creating a table in
Word, other methods are also available. They include:
| Inserting an Excel worksheet into the document by clicking the
Insert Microsoft Excel Worksheet button on the Standard toolbar,
|
| Using the Text to Table feature under the Table menu. |
These methods are discussed further throughout the rest of this
chapter. Help on each method to inserting a table into a document can be
found in Help files in Word.
Method 4: Import Data from Another Application
If you have already created data in a tabular format in another
application, there is a good chance that all you need to do to create a
table with that data in Word is copy and paste.
Practice: Create a Table from Another Application
- Make sure Word is open. Open the file in the other application that
contains your tabular data.
- Select (if necessary) and copy the data from the source file.
- Switch to Word.
- Choose Paste from the Edit menu.
|
Note For most applications (and especially those in the
Microsoft Office suite), this will be all you need to do. For
others, a more complicated export procedure is required. | Method 5: Insert a Table Using on of the Quick Tables (Ribbon Version)
See the Quick Tables section
below.
Word 2000 and later has the ability to "nest" tables within another
table. Nested tables are particularly useful when you use a table to lay
out a page and then want to use a table to present other information
such as quarterly earnings as a table within the table. To create a
nested table:
- On the Tables and Borders click Draw Table. The pointer changes
to a pencil.
- Position the pencil in the cell where you want the nested table
(or a table inside another table).
- Draw the new table. To define the table boundaries, draw a
rectangle.
- Then draw the column and row lines inside the rectangle. When
you finish creating the nested table, click a cell, and start typing
or insert a graphic.
 |
CK Note:
WARNING:
Using nested tables will make your document incompatible with
Word 97. A nested table is a table within a table. You can follow
the directions given above pretty much in Word 97 and create a good
result. That is, you can use the pencil to draw new cells within an
existing cell. What you can't do in Word 97 is create that second
table outside of the first one and then copy or move it into the
first table.
You can download samples of a nested table and a pseudo-nested
table if you want to look at this more closely. One document is
compatible with Word 97, the nested table sample can't be properly
opened in Word 97. (It will open, it is just that the table will be
scrambled.)
Download Page |
The size of a table is dependent on information being added or
removed from the table structure. To insert a row at the end of a table,
press TAB while in the last cell of the table. You can also add a row or
column in different locations within the table by accessing the Table or
Shortcut menu (alternate click) while the mouse pointer is within the
table.
To insert or delete rows and columns, select what you want to
affect—rows to affect rows, columns to affect columns—and then select
the appropriate option from the Table menu (rows or columns).
|
Note
In Word 97, rows are inserted above the selected row(s), and
columns to the left of a selected column(s). In Word 2000, you can
define whether rows are inserted above or below the current row, and
whether columns are inserted to the left or right of the current
column.
To change row or column height in a table, pause the mouse
pointer over the border between two rows or columns and click and
drag to alter the table structure. In Word 2000, tables act as
drawing objects, which means you can use the drawing handle in the
bottom right corner of the table to modify the table easily. Just
click and drag. |
|
Tip You must be in Page Layout view (Print Layout in Word
2000) in order to change the height of a row by dragging the border. |
|
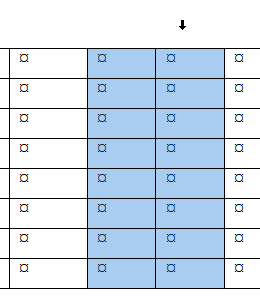
Tip In Word 2000+, if you click within a table, you'll see
a move handle that allows you to click and drag the table to another
place on the page. (See the following figure for an example of this
new feature). |

Word 2013-2024/365 lets you insert rows and
columns using your mouse
Word 2013 added another on-screen control to allow insertion of rows
or columns. It is a plus sign in a circle at the beginning of a row or
top of a column.
When active, it will put a slight division between rows/columns
showing where the insertion will take place. Clicking on the plus sign
inserts the number of rows/columns that were selected at the division
mark.
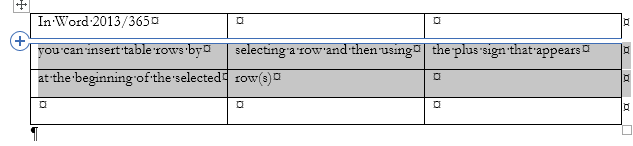
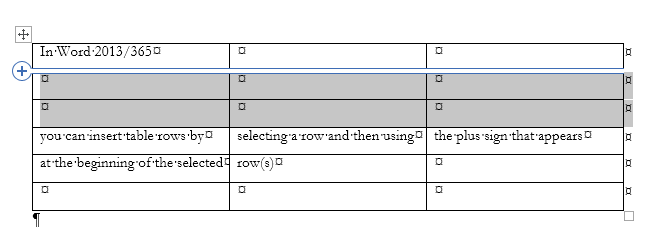
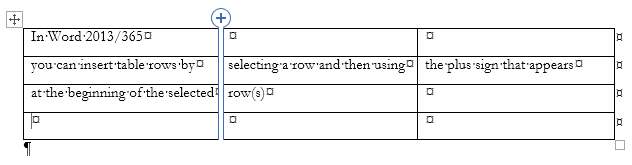
If you click on the + sign Word will insert a row or column where the
divider shows in the table. If you have multiple rows or columns
selected, it will insert the same number of rows or columns as you have
selected.
The Tools for Working with Tables - Toolbars and
Ribbon Tabs
You can manipulate tables using tools on the Tables and Borders
Toolbar (Word 97-2003) or on the Table Tools Tab Ribbons (Word
2007-2024)

Tables and Borders Toolbar (long form above, compacted below)
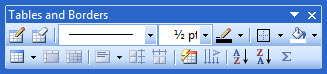
You can choose to view the Tables and Borders Ribbon by selecting it under
the View Menu or by right-clicking on one of the docked toolbars at the top
of the page. (Word 97-2003) They may be docked already at the top of your
page (or along the side or at the bottom of the page).

Table Tools Design Ribbon (above) and Table Tools Layout Ribbon (below) -
Word 2007 and later

These Table ribbons are context ribbons. They become visible and active when
you are in a table and are hidden when you are not.
You can use any of the tools you normally would use to format text in
tables. See Basic Formatting.
Probably the best method, though, is to use Styles.
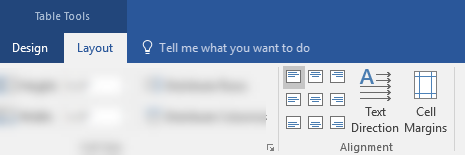
 Text
in selected cells can be aligned in any of nine directions using the
alignment buttons on the Tables and Borders Toolbar or the Alignment
group of the Table Layout Ribbon. This is a form of direct formatting. Text
in selected cells can be aligned in any of nine directions using the
alignment buttons on the Tables and Borders Toolbar or the Alignment
group of the Table Layout Ribbon. This is a form of direct formatting.
Your author does not know much about Table Styles and they were
introduced after the original chapter on Tables was written.
You can see
them in the Design Ribbon above; here is a
screenshot from the Word 2010 Table Style Gallery.
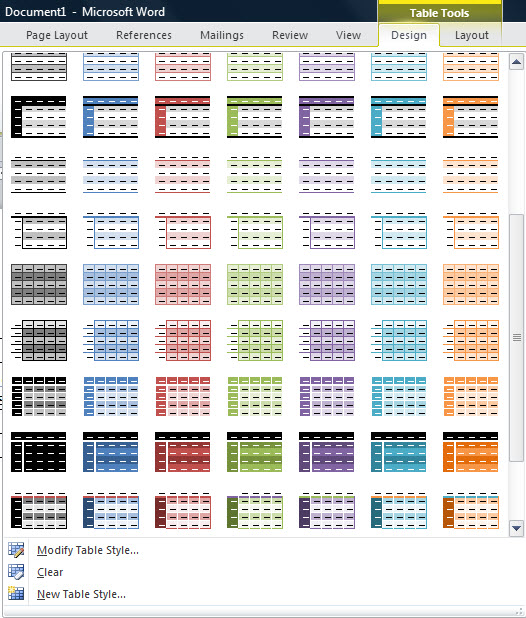
See more
below on using
and creating Table Styles.
You can get many of these same built-in styles using the
Table AutoFormat command in Word 97-2003 (on the Tables menu).
For creating new Tables uniformly, also consider using
Quick Tables.

Using either of these can allow you to make dramatic
changes for better or worse to your table's appearance. Remember, UnDo
is your friend!
See
Why I Don't Use Custom Table Styles by Shauna Kelly
There are a number of operations you can do to selected parts of a
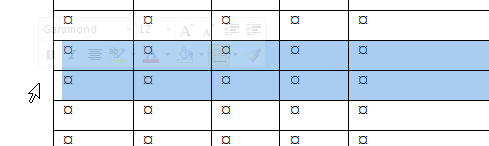
table but first you have to select those parts!
The most straightforward way is to click in one cell, hold the mouse
button down, and click in a different cell. A rectagular section of your
table will be selected.
If you move your mouse pointer outside the table near the left edge
of a row or top edge of a column, it becomes a superpointer. Clicking
when that is active will select the row or column. The superpointer for
a column is a small black arrow pointing down. That for rows is a
right-pointing white arrow. If, after selecting one column or row, you
hold the Shift key down, you can select one or more contiguous columns
or rows.
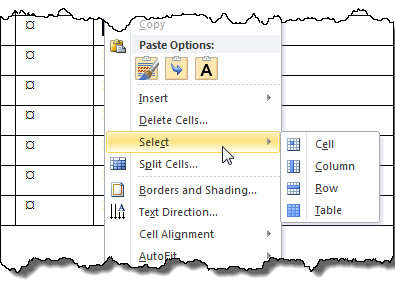
In Word 2007 and later, on the far left side of the Table
Layout Tab there is a Select button you can use to select the Table, a
Cell, a Row, or a Column.
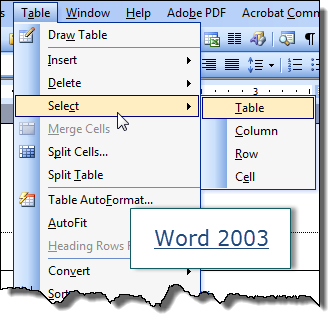
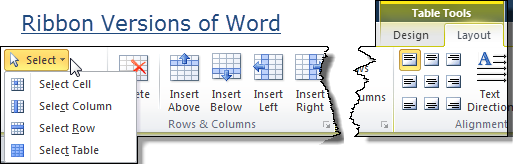
In Word 97-2003 there are Select commands under the Table Menu
that allow this.
In Word 2010 and later, you can also right-click in any cell
and pick the Select command from the pop-up context menu.
Once you have portions of a Table selected, you can apply formatting,
copy, paste, and perform other operations on that portion. One of the
key things you can do is to mark one or more rows as a "Header Row" for
the table. This is something completely different from
Headers and Footers for pages.
Keyboard Shortcuts - with selection
point (cursor) in table
Alt+5 (on the numeric keypad) Selects the entire table.
Move the selection to the top or bottom of a row and use the
following to select the column:
Shift+Alt+PgDn to select entire column from the top cell.
Shift+Alt+PgUp to select entire column from the bottom
cell.
Using the Backspace and Delete Keys to Modify
Tables
The Backspace and Delete keys act on selected text to delete the
preceding character (Backspace) or delete the following character
(Delete). When text is selected, both will delete the selected text.
However, in a Table when the table or cells are selected (rather than
just text), they act differently.
When you have a table, rows, columns, or cells selected, the Delete
key will empty whatever you have selected, leaving the table structure
intact.
The backspace key will delete the structure as well.
| If a row is selected, it will be deleted and rows below will be
shifted up. |
| If a column is selected, it will be deleted and columns will be
shifted to the left. |
| If cells are selected, you will be prompted on what to do with
the remaining cells.
 |
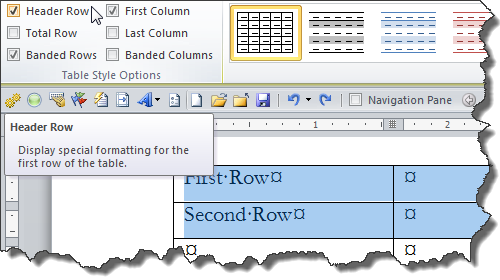
Marking Header Row(s) - Table Rows that repeat
after a page break - CK Addition Word 2003-2024
Tables often have header rows that describe what is in the columns
underneath. When a table breaks across a page it is useful to have these
header rows repeat. Documentation and tooltips talk about "the first"
row, but multiple contiguous rows can be marked as the table header.
They do need to be the first row(s) in the table, though.
Word 2003-2024
- Select the row(s) at the top of the table that you want to repeat.
- Right-click on one of the cells in the selected row(s)
- Pick Table Properties from the context menu
- Click on the Row tab in the dialog box
- Check the box to "Repeat as header row at the top of each page"
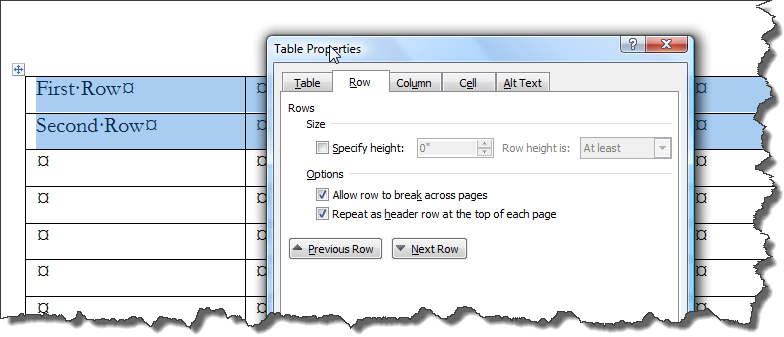
Note this may work in earlier versions than 2003 but does not work
in Word 97. I believe this feature was introduced with Word 2000 but do
not know for sure.
Word 2007-2024 (Ribbon versions) can also use the ribbons
- Select the Row(s) you want to repeat across page breaks.
- On the right end of the Table Tools Layout Tab check the
option to "Repeat Header Rows."
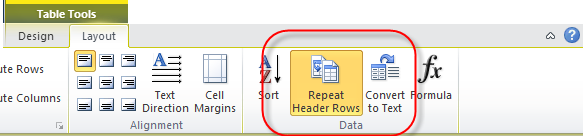
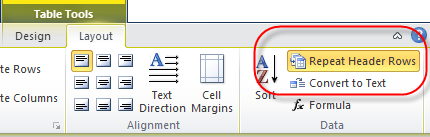
Two variations on the Ribbon command to Repeat Header Rows
-
Note, that there is on the Design Tab also a checkbox
for header row. This is a design choice for picking a table style
and has nothing to do with repeating on the next page.
-
Final note, header rows do not work if you have a table
set to have text wrap around it.
Using Cell Properties to Change the
Appearance of Text in a Cell (Wrapping and Fit Text Options)
It is easy to miss these Options which have been available at least
since Word 2003.
Table Properties -> Cell -> Options
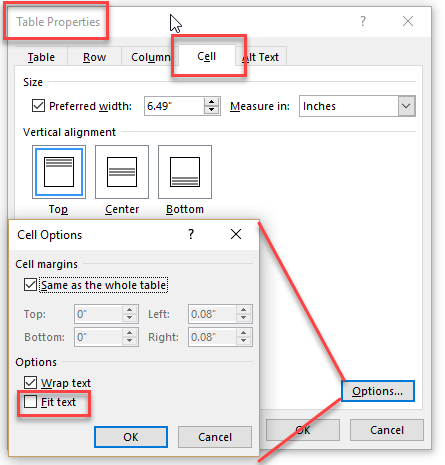
Wrap Text is checked by default and Fit text is unchecked by default.
The table shown below has the top two cells set to fit text. The font
typeface and size is the same in all three cells.
The text in the top cell appears compressed. It is the same text as
the first three sentences in the bottom cell.

Use Word's Quick Tables and Add Your Own
(Ribbon Versions of Word - CK Section)
|
The ribbon versions of Word added a
gallery of sample tables called Quick Tables. These are
Building Blocks.

Word 2007 and later come with nine built-in sample "quick"
tables. Again, these are building blocks and come in the file
Built-In Building Blocks.dotx in Word 2010 and later (Building
Blocks.dotx in Word 2007).
Unlike table styles, these are actual tables. The user can
add their own table to the Table or Custom Table Quick Parts
Gallery and have them show up in this menu.
At the bottom of the Quick Tables dropdown you can see the
command "Save Selection to Quick Tables Gallery. That
command is active only if a table is currently selected when
this drop-down is used.
You can reach the same Create New Building Block dialog by
using the keyboard shortcut of Alt+F3.
* |

The Create New Building Block dialog gives you the
opportunity to choose:
- The name for your Quick Table. The tables will be
listed in alphabetical order, within the category.
- The Gallery to store it in. If you want it to
show up under Quick Tables, you must save it in the Tables
Gallery.
- The Category. The tables appear in alphabetical
order in their categories which also appear in alphabetical
order. The default category is "General," which will appear
after "Built-In" in the list. The category shown above is
"_My Quick Tables" which would appear before either.
- The "Save in" Template to store the Quick Table.
The dialog above shows Building Blocks,dotx which is the
default. I recommend saving it in a different template if
you want to share your quick table. See
Where can Building Blocks be stored?
* If you use the keyboard shortcut
of Alt+F3 to reach the "Create New Building Block" dialog, the
default gallery will be AutoText and the default save-in
location will be the normal template.
Naming the Quick Table
I recommend using a name that you will not normally be typing
and starting with an underscore. The underscore puts it ahead of
other entries in the list.
However, since this is, like AutoText, a building block, you
can simply type the start of the name and press Enter or F3 to
insert in your document without ever going to the menu.

See my answer in this thread:
Keeping Table Rows Together For All Tables
|
Changing the Appearance of Your Table with
Table Styles
Quick Tables give you a tool for uniformly creating
tables. However, they do not help with existing tables. For that, you
may want to be using Table Styles.
Once you have a table and your insertion point is in the
table, you can get to Table Styles under the Table Design Tab (Office
2007&2010, Design Tab under Table Tools).
(This part does not address Table Styles in
Word 2003.)
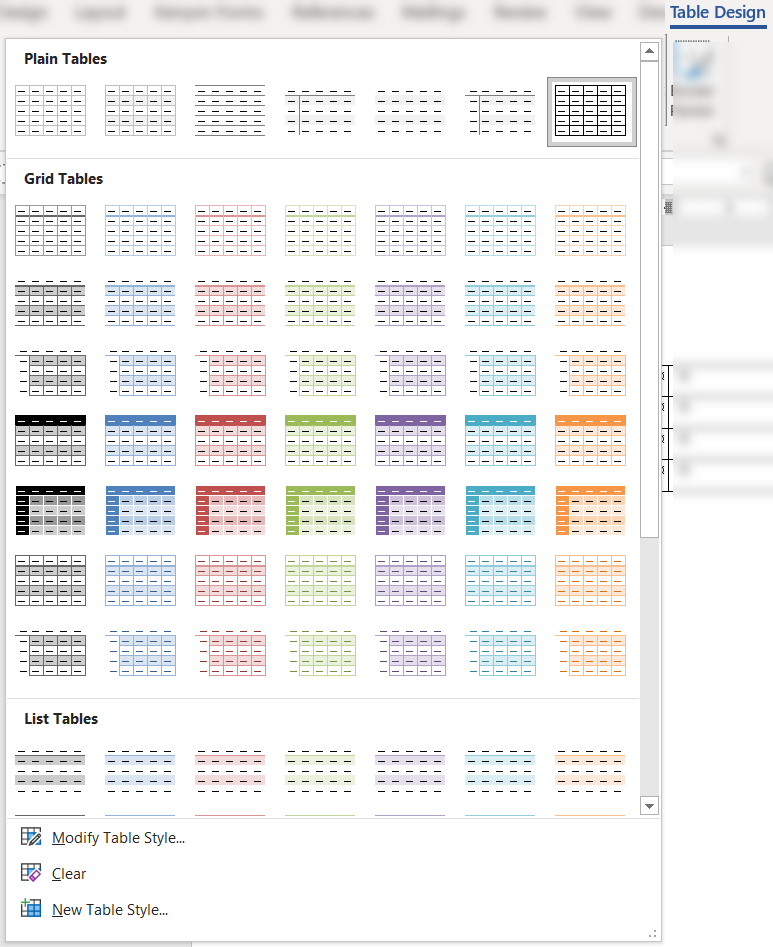
Table Styles control the appearance of a Table as a
whole. They are poorly documented. They are based on the Normal style in
Word and also rely on other settings.
Here are MVP Shauna Kelly's
articles on Table Styles.
Here is what developer and Word MVP John Korchok
says about
his method for creating a table style:
"Creating table styles is a bit of an
advanced topic. Microsoft's crummy interface doesn't help. Here's my
routine:
-
Create a table.
-
Look at the Microsoft table styles on the
Table Styles gallery for a design that is most similar to the
style you want to create. Don't select that style or apply it to
a table, but make a note of it's name.
-
At the bottom of the Table Style gallery,
choose New Table Style.
-
Give the style a name.
-
Change the Style based on
dropdown to the name of the similar style that you noted in step
2.
-
By default, the Apply
formatting to dropdown is set to Whole table.
This means that the changes you make with the controls below
that dropdown will affect all cells in the table. The first row
of controls sets font and language settings. The second row sets
borders, cell fill color and cell text alignment. Then, under
the Format button, you can set other
characteristic for the whole table.
-
After the whole table is formatting
the other choices on the Apply formatting to
dropdown create over-rides for specific areas of the table. So
you can set the header row to a different color, set the text to
be white, bold and centered over the columns.
-
When you've finished setting the
different table part formatting, OK out and apply the table to
your sample. You new style will appear in a new Custom
row above the Microsoft styles.
-
You'll probably want to tweak the style.
Right-click on the icon in the Table Styles gallery and choose
Modify Table Style. Your updates will
automatically get applied to your sample table.
-
Using the Table Style Options,
you can turn table attributes on and off, so one table style can
create a variety of looks.
Like anything else in Word, the more
you work with tables styles, the easier and more predictable they
get."
See also
How to Format Microsoft Word Tables Using Table Styles (Advantix
Learning)
Note that if you have your Styles display
set to show all styles, Table Styles will show up in the legacy
drop-down menu for styles but not in the Styles Pane.
Creating a Caption for a Table - CK Note
A "caption" is a label that appears with a Table. It can be
sequentially numbered and automatically inserted with each Table if you
wish.
Insertion of captions is covered in the
chapter on Complex Documents.
If you need the caption to repeat you would need to put
a cross-reference to it in the first row of the table and set that as a
repeating table header row. That row need not have
top or side borders. Multiple rows can be designated as header rows.
Once you insert a caption, it can appear in a
Table of Tables.
Creating a Table of Tables (or Figures or Equations)
Often a table of the tables in a document is desired
(similar to a Table of Contents). This can be done relatively easily in
Word. Insertion of such tables in covered in the
chapter on Complex Documents.
It is possible to have a table act like a graphic and have text wrap
around it. This is done through the Table Properties and the Positioning
Button. Here are two screenshots showing the controls in Word 2003 and Word
2010. (Controls are identical.) The Word 2010 screen shot shows positioning
relative to the bottom page margin.

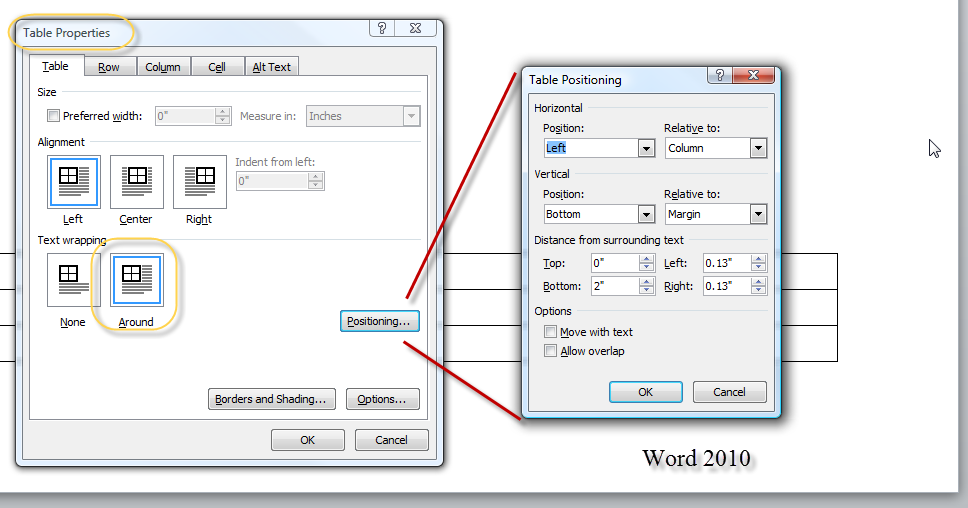
The default settings are for no text wrapping and the Table is simply
inserted at the insertion point in the document. The Word 2003 screen shot
has the default settings for the Table Positioning dialog. The table
positioning button is not active on the Table Properties unless the text
wrapping is set for "Around."
I am unsure when this floating table ability was added to Word but
suspect it came with Word 2002. It is not available in Word 97.
Note that repeating headers in tables do not work if the table is
floating rather than in the document layer.
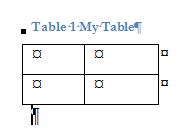
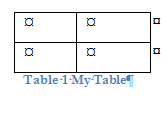
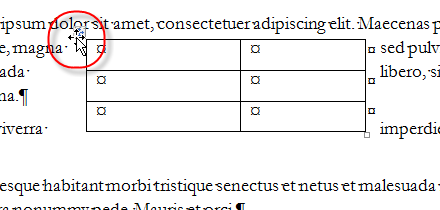
Here are some screenshots of floating tables set for text wrapping. They
essentially act much like graphics in this mode.
One table set for wrapping with the tool to move it
displayed (red circle)
Two tables, both set to wrap.

The same two tables with wrapping set, one nested
inside the other.
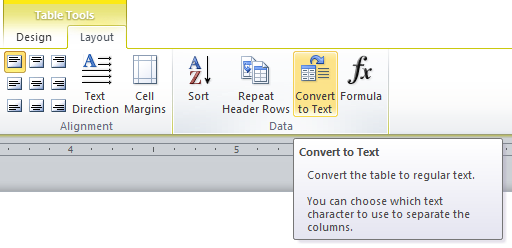
Converting Tables to Text and Text to Tables
It is relatively easy to convert a table to a similar formal
structure without a table.
In Word 2007 and later, the command for this is found on the
right side of the Table Tools Layout tab.
In earlier (menu versions) of Word the commands are found under
the Tables menu.

To convert a table to text, there must be a table and the
insertion point must be inside the table. Using the choice will give
a dialog box
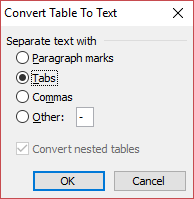
The default choice is tabs which gives a traditional tabbed table
rather than an Word table. It is certainly appropriate for many
tables. If a table cell has text that would extend beyond the tab
area, you can have something unworkable, or at least requiring more
work.
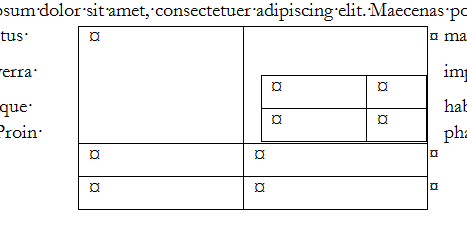
Here is a brief table:

Converted to text using the Tabs setting it does not line up.
Tabs settings for those paragraphs would need to be adjusted.

That was done in the following screenshot. However, in many
tables this would not be practical and one of the other dividers
would be needed.

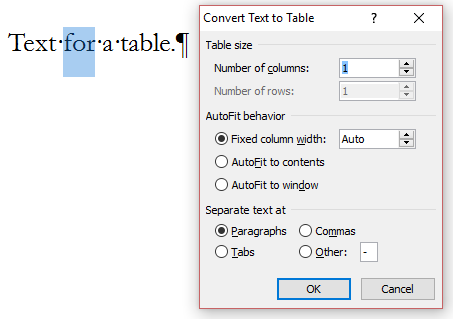
Conversely, it is possible to convert text to a table. To do
this, you need to select the text you want to convert.
The command for this in Ribbon versions of Word is found on the
Insert Tab under Table. In menu versions, it is found under Tables >
Convert. It will pop up a dialog.
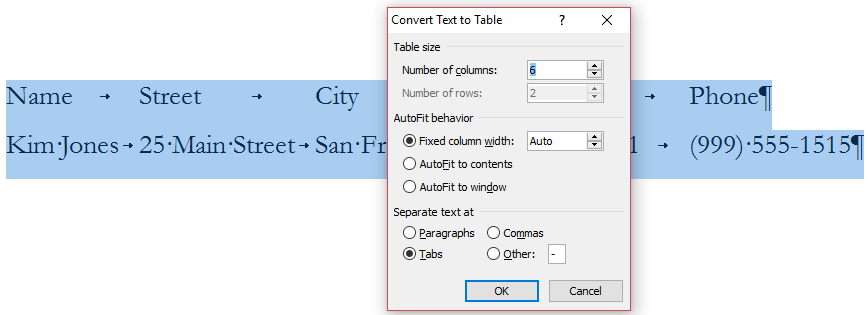
This dialog lets you adjust the number of columns, but not rows.
It lets you modify column width and pick the text separators. Note
that you do not have to have everything precisely laid out for this
to work.
In the following screenshot, a single word in a sentence is
selected.
So long as you are not changing the number of columns, you get
the same result as you would if you, instead, just inserted a table.
The selected word(s) are inserted into a single column table and
preceding and following words become their own paragraphs.

So long as the marker to separate text is not found in the
selected text, it does not matter which marker is chosen.
Examples of Use of Tables
These are ad-hoc examples.
Fax Transmittal Coversheet Word 97 - still available as
Fax (elegant)
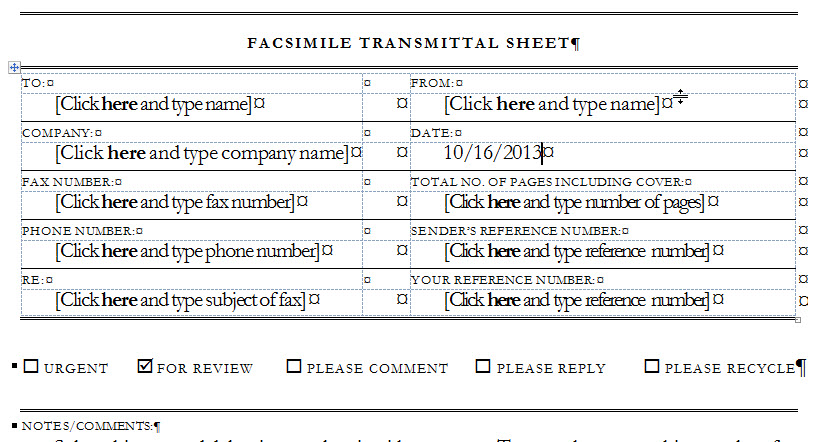
(There is more about how the prompts and checkboxes in this work under
MacroButton Fields.)
Pleading Caption Using Tables

These tables were set up originally using Word 97 with splitting and merging
cells. Gridlines are shown but do not print. The formatting of individual
cells is done using styles. (The names, addresses, and other case-specific
details are inserted using
Mail Merge.)
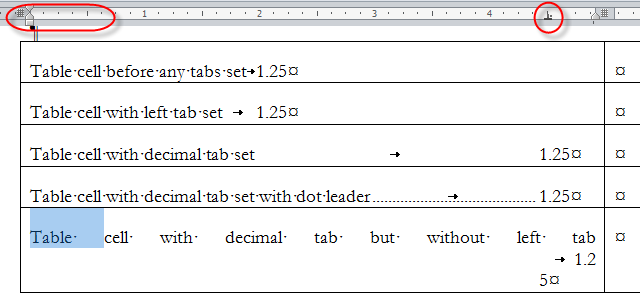
Using Tab Settings and Tabs Inside Tables
Word allows you to set your own tab stops and use
different kinds of tabs. However, you have to use Ctrl+Tab to
generate a tab inside a table; the Tab key, by itself, will simply move
you to the next cell.
decimal tabs behave a bit differently inside tables than
they do outside a table. If you have a decimal tab set and no other tab
settings, your text will immediately align to that tab, without an
actual tab character being inserted using Ctrl+Tab.
Use of a decimal tab is illustrated below. Note the
Ruler at the top of each screenshot.
Table cell with no tabs set
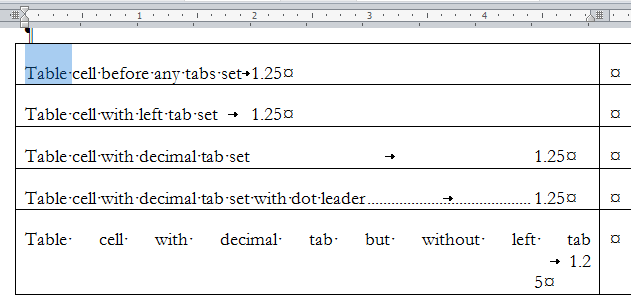
Table cell with left tab set looks the same
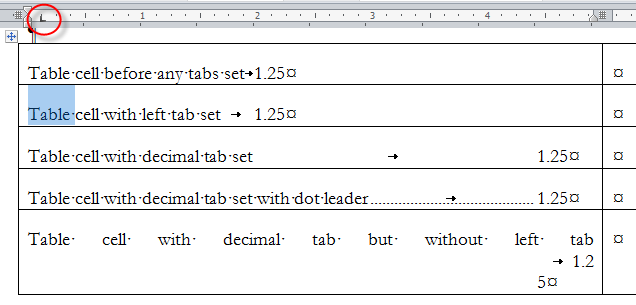
Table cell with decimal tab set uses tab to align
number to decimal
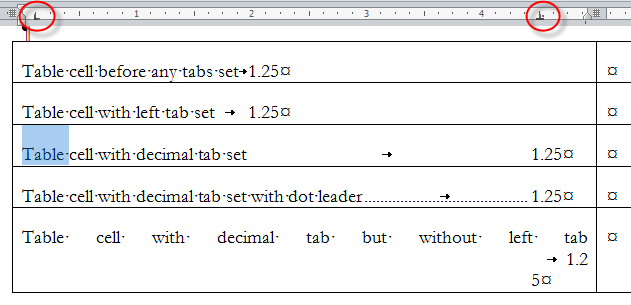
Add a "dot leader" using the tab setting dialog
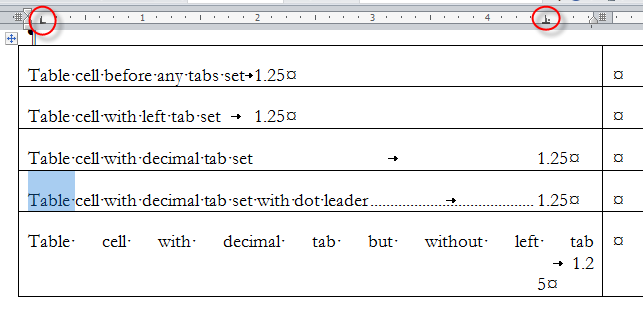
And finally, what would happen without the left tab
having been set first!
Reminders:
|
While the ruler can be used to tabs, once they have
been set you should create a
Paragraph Style to hold these settings and use that style when
you want to use them again. That way, if you later change the width
of your table cells and have to change the setting, you can do it in
all of the cells by modifying the Style. |
|
Tabs are often better set using the Tab Setting
Dialog box. The quickest way to access this dialog is to
double-click on a tab in the ruler or to use the Keyboard shortcut
Alt+O,T. |
Legal Q&A on Tables
How can I make a pleading caption in Word?
There are a couple of different methods you can use to create a
pleading caption in Word, but tables are one of the best ways to do
this.
Practice: Make a "Scalloped" Caption Using Tables
- Perform steps 1 through 5 in the "Insert a Table with Draw Table
tool" in the preceding exercise.
- At this point the bottom left border needs fixing. Click in the
left-most cell and from the Format menu, and choose Borders and
Shading. Click on the diagram on the right side of the dialog box to
have only a bottom border. Click OK.
If you have a lengthy caption (you've probably seen some that go on
for pages), you may have noticed that the scallops don't automatically
copy down the center column of the table. If you don't find this
acceptable, consider another way to make a caption where you use a
border line separating the parties from the pleading title. Many courts
now accept captions prepared this way—check your court rules to see if
you can use this type of caption.
See also the example pleading caption
(above) using Tables. Practice: Make a "Bordered" Caption Using
Tables
- In a blank document, create a table with two columns and only
one row.
- Remove the printing borders by clicking inside the table, and
then pressing ALT+CTRL+U.
- Fix the bottom left border as described in step 2 in the "Make a
"Scalloped" Caption Using Tables" example that preceded this
exercise. While you're in the Borders and Shading dialog, turn on
the printing border for the right side of the leftmost cell as well.
In this type of caption, the border automatically extends as you add
cross-complainants or type a long pleading title.
How can I get the first row to repeat at the top of each page
throughout the table?
In lengthy tables such as file or pleading indices, holdings lists,
and other legal documents, if a table spills onto subsequent pages you
can make headings repeat at the top of each new page that contains a
part of the table.
Practice: Create Table Headings
- In a blank document, from the Table menu, choose Insert Table
(Insert, then Table in Word 2000).
- Create a table with two columns and 250 rows.
- In the first cell of the first column, type Attorney.
- In the second cell of the first column, type Extension.
- Select the first row of your table, and then from the Table
menu, choose Headings (it's called Heading Rows Repeat in Word
2000).
- Go to Print Preview and view your handiwork.
- Word also allows you to have more than one row repeat at the top
of the page. Just select the rows that you want to repeat and
perform step 5 above.
How to have the word "Continued" in the
header row of multipage tables on continuation pages but not on the
first page.
There is no automatic way to do this. Several Word
MVPs have posted the following solution,
though, and it works.
Put the word "continued" in the heading line on the first page. Then
create a textbox or autoshape anchored outside the heading row
and use it to cover the word. The shape or text box should have no
border and white fill. This way, the word continued will not appear on
the first page but will appear when the row (without the textbox or
shape) is repeated on subsquent pages.
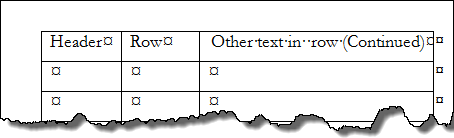
While this is less than ideal, it works. Here is an example of
using a textbox anchored in the table but outside the header row.
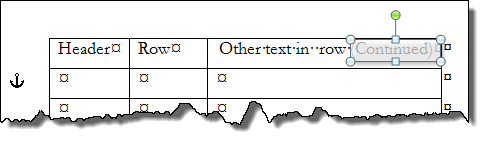
The Text Box is shown as semi-transparent for this demonstration it
would be opaque in use.
It can be anchored anywhere outside the header
row, including outside the table itself.
Note the displayed anchor in the screenshot showing the textbox
anchored in the second (non-header) row.
Note that any manipulation of the textbox is likely to move the
anchor into the first row.
You need to have the anchors displayed and
correct for this by moving the anchor.
Here is what the continuation page that does not have the occluding
textbox/shape looks like:
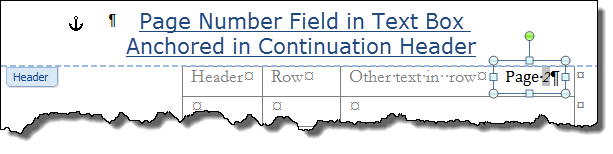
A variation of putting an occluding shape (or frame) in the page
Header is used when a page number
is needed in the table itself. This takes more fiddling than having the
occluding box on the first page because alignment is tricky.
A page number in a Header Row will repeat the number from the first
page. A page number field in a shape or TextBox in a Header/Footer will
reflect the pagination used by Word in headers and footers.
Here is what the continuation header (Section set to have a
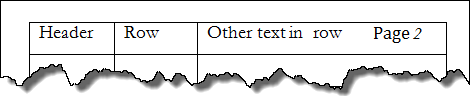
different-first-page header) looks like from the edit Header screen.
The screenshot below is from the Print Preview screen. (In print
view, the Page 2 would appear faded because it is part of the page
header; in draft or normal view, it would not appear at all.
When I have a lengthy entry in one of my cells, the text can break over
a page. Is there a way to turn on the equivalent of "Block Protect" or "Keep
Lines Together" in Word?
It's possible to have it either way in Word—you can have your cells
break over a page or not, depending on your preferences for the job at
hand. By default, the text in a table breaks across a soft page break in
both Word 97 and Word 2000. Let's explore the options in the following
exercise.
Practice: Prevent Cells from Breaking Over a Soft Page Break
- In a blank document, from the Table menu, choose Insert Table
(Insert, then Table in Word 2000).
- Create a table with 2 columns and 250 rows.
- Make sure you're in Page Layout view (Print Layout view in Word
2000).
- Go to the bottom of the first page and type in one of the cells
until you see text both above and below the Soft Page Break.
- Make sure your cursor is anywhere in the table, and then from the
Table menu, choose Cell Height and Width (Table Properties in Word
2000).
- In the Cell Height and Width dialog box, find the check box Allow
row to break across pages.
- If the option is checked, the text can break over a page. If not,
the row that contains the cell that broke over a page is moved to the
next page in its entirety.
This does not prevent cells from breaking over hard page breaks.
Also, if you have more than a page of text in a cell, a soft page break
must exist somewhere in that text, and the text breaks over a page even
though you've cleared the checkbox in step 6.
Is there an easy way to make a file index in Word? I had a macro in
WordPerfect and now I've got to make them from scratch.
The bad news is that you do have to make it all over again; the good
news is that you'll only have to create it once. Using the power of
tables together with AutoText, you'll be able to make a killer file
index that you can use repeatedly.
Practice: Create a File Index Using Tables
- Open a blank document, and from the Table menu, choose Insert Table
(Insert, then Table in Word 2000).
- Create a table with as many columns as you need (we'll use 4 in this
example) and 2 rows.
- In the first cell of the first column, type "Number".
- In the first cell of the second column, type "Document Name".
- In the first cell of the third column, type "Date Filed".
- In the first cell of the fourth column type "Description".
- Click in the second cell of the first column, and then turn on
numbering (On the Formatting toolbar, click the Numbering button).
This will give you a numbered column down the left side.
As you add rows to your table, the numbered list on the left side
increments. Try it! If you save your finished product from the exercise
above as an AutoText entry, you can retrieve it as many times as you
like in the future.
My table column resizes as I type…
Table columns in Microsoft Word 2000 automatically resize to fit text
or graphics. If you type a word that is longer than the width of the
column, the column adjusts to accommodate the text. If you don't want
your columns to resize when you type, click in the table, click Table
Properties on the Table menu, and then click the Table tab. Click
Options, and then clear the Automatically resize to fit contents check
box.
I am doing very simple math in my Word table. Is it possible to create
subtotals?
It's possible to take any value in just about any part of a Word
document (it doesn't have to be in a table) and run it through any
number of math functions against other values in other parts of a Word
document. The way to do it is to use bookmarks. An example of how this
works is shown in the next Practice exercise.
Practice: Work with Subtotals in a Word Document
- In a blank document, create three separate tables with values in the
first two cells of the first two tables.

- We're going to derive subtotals for the two tables and then a grand
total of the two subtotals in the single-cell table at the bottom. Click
in the third cell of each of the first two tables and click the AutoSum
button at the far right side of the Tables and Borders toolbar.
- Select the first sum field (it should say "1500" if you've used the
example above), making sure not to select the end-of-cell marker after
it (it kind of looks like a spider).
- After selecting the first sum field in step 3, go to the Insert menu
and choose Bookmark. For keyboard users, CTRL+SHIFT+F5 gets you to the
Bookmark dialog box.
- Give the selection a bookmark name like "Table1Total".
- Repeat steps 3-5 for the second total ("450" if you're following the
example above), calling it "Table2Total".
|
Note Names of bookmarks in Word cannot begin with a digit,
nor can they have a space in their name. |
- Having bookmarked your totals, click in the single-cell table at the
bottom. From the Table menu, choose Formula.
- In the top box labeled "Formula" you'll see an equal sign. Type the
word "SUM", then an open parenthesis "(" and choose "Table1Total" from
the Paste Bookmark drop-down list.
- Type a comma after "Table1Total" then go to the Paste Bookmark
drop-down list and choose "Table2Total".
- Type a close parenthesis after "Table2Total" in the Formula box.
Your formula should look like this:
- =SUM(Table1Total,Table2Total)
- Click OK. Confirm your total is the same as what you expect it to be
(in this example, "1950").
If you get a result which says "!Syntax Error,", try the exercise
again, making sure that you don't select the end-of-cell marker after
the number when bookmarking.
I never could understand sorting in Word tables. Is
it possible to sort dates and numbers as well as text?
It's easy to sort dates, numbers and text in a Word table. If a
simple, one-level sort is all you're after, you'll be surprised at how
easy it is. All you have to do is click in a column that has a list of
things you'd like to sort (like filing dates, for example) and click one
of the two sort buttons near the right side of the Tables and Borders
toolbar. The practice exercise below should give you an idea.
Practice: Sorting Dates in Tables
- In a table, enter an array of dates that are near each other but
have varying formats, like the following:
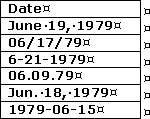
- Click anywhere in the column and click either one of the sort
buttons at the right side of the Tables and Borders toolbar. One button
sorts in Ascending order, the other in Descending order. Word
automatically converts dates in many different formats behind the scenes
so it can sort them correctly.
|
Note When you use either of the Sorting buttons on the
Tables and Borders toolbar, Word assumes you have a header row. If
you don't, you have to sort by going to the Table menu and choosing
Sort. |
Part of the text is hidden inside a table cell…
You've probably set an exact row height that's smaller than the text
you are trying to display. Click in the cell. On the Table menu, click
Table Properties, and then click the Row tab. In the Row height is box,
click At least.
Can I insert an Excel worksheet into Word?
One of the reasons Microsoft Office is so popular is how all of the
programs work together. Excel is a spreadsheet program that makes number
crunching, organizing and presenting data very easy — even for the
mathematically challenged.
Menu Versions Word 2000-2004
To insert an Excel worksheet into a Word document, click the Insert
Microsoft Excel Worksheet toolbar button on the Standard toolbar.
Double-click to activate the Excel worksheet. Now you have the full
functionality of Excel without leaving the Word window.
 Ribbon Versions - Office 2007 and later
In Ribbon versions, under Insert > Table, you can choose to insert an
Excel spreadsheet.
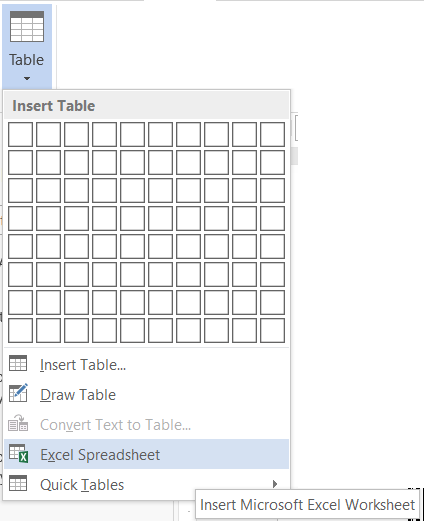
|
Note If the data already exists in an Excel spreadsheet,
open the spreadsheet, select and copy the text, switch to Word, and
choose paste the copied text. Word converts the data into a table
format. |
Labels in Microsoft Word
Labels in Microsoft Word are Tables, usually set up using the Labels
button on the Mailings Tab (Word 2007 and later) or the Envelope and
Labels wizard or the Mailmerge wizard (Word 2004 and earlier). Once the
labels are set up, you can manipulate the them using any of the
techniques given here for tables.
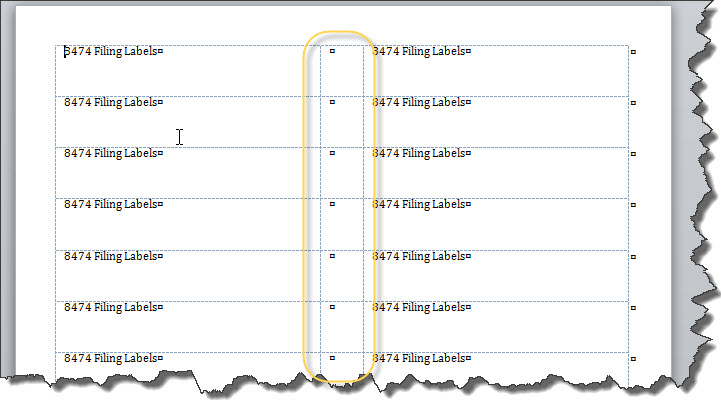
In the screenshot above, you can see the table layout with blank
spacing cells that will not print on the labels. Display of
gridlines is especially helpful with labels. You can also use the
Table Layout tab's tools to align text in your labels.
See Graham Mayor's
Insert logos /graphics on business cards and mailing labels for
step-by-step instructions on inserting graphics on tables for labels and
business cards.
See
Create and Print Labels on Microsoft Support.
The Label tools create a slightly different document than you would
get just adding an equivalent table to a Word document according to
MVP Jay Freedman.
"For one thing, it overrides the minimum margin settings that come from
the printer driver and it ignores the usual header and footer heights."
Any text in the normal.dotm template including headers or footers
will interfere with proper creation of labels.
See also: Troubleshooting
See also:
Table Causes Document File Size to Increase (Word 2000 +)
Tables can become corrupted.
Ideas (from Paul Edstein) to fix a corrupted table:
| Convert the table to text and back
again. |
| Cutting the table and pasting in a new document. Save that
document to RTF, close it, reopen it and save in .docx format, then
copy table back to original document. |
| Save the original document as RTF, close, reopen and save as
.docx. |
Paul notes that some tables can only be recovered using the first
method.
Resize all cells in a table to be the same.
Here is a short macro I developed in response to a request. (The macro
recorder does not record much of table manipulation.) The measurements are
in inches.
Sub ChangeCells()
' Resizes all cells in active document to one size (in inches)
Dim oTable As Table, oCell As Cell
For Each oTable In ActiveDocument.Tables
    For Each oCell In oTable.Range.Cells
      oCell.Width = InchesToPoints(2.3)
      oCell.Height = InchesToPoints(1.5)
    Next oCell
Next oTable
End Sub
Here is a
link to a different version (Jay Freedman's) that changes the entire
table rather than going cell-by-cell. If you haven't worked with vba
directly before, you may want to read:
Installing Macros by Graham Mayor.
It is far easier to manipulate tables if you are viewing the table
gridlines. It is important to realize that Word uses the term
"gridlines" for two very distinct features. The first is a graphics
layout gridline applied to an entire page. You do not want to be using
that feature for tables!
To view gridlines for tables in Word 97-2003 you would select "Show
Gridlines" under the Table menu. (The toggle command is "Hide
Gridlines.")
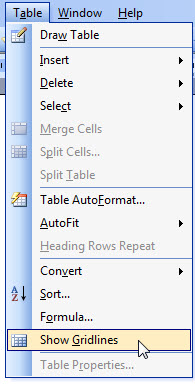
In Word 2007 - 2024 you would click on the View Gridlines button on
Layout tab of the Table Tools. (You can also get to this on the Design
tab under the Borders menu.)
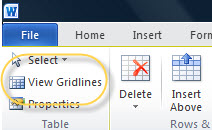
To distinguish this, to see the drawing gridlines in Word 97-2003 you
would click on that button on the Drawing toolbar. In Word 2007-2024,
you would click on the Gridlines button on the View menu.
All of these view gridlines options are toggles - you click them once
to turn the view on and again to turn it off.
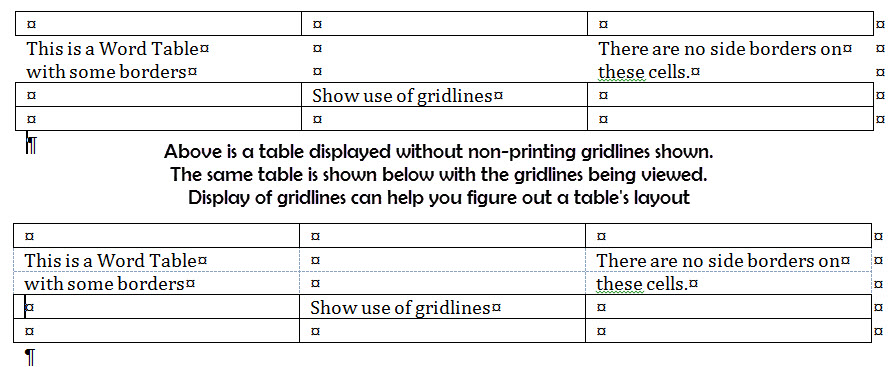
Notice that what appear to be single, wrapped
sentences in the view without the gridlines showing are really in
separate cells. These would be treated by Word as being separate
paragraphs as well.
|
| This chapter from original Legal Users Guide to Microsoft Word 2002 -
document in zip format |
Original
Chapter on Microsoft Website
 views since 13 April 2004
 Copyright 2000, Microsoft Corporation. Copyright 2000, Microsoft Corporation.
Copyright 2000-2002, 2004-2006, 2010-2026
Charles
Kyle Kenyon
See information about copy permission.
Search Intermediate Users Guide to Microsoft Word Using Google My office page as a
Madison,
Wisconsin Criminal Defense Lawyer.
Original Legal Users Guide to Microsoft Word 2002 - Documents in Zip Format
A note about link exchanges. This site does not participate in
link exchanges to build web presence. If you have a link that you think would be
of use to people reading this page, please send it to the webmaster with the url
of the page where you think it should appear and it will be considered. Your
placing a link to this site will not affect the decision on whether to add your
link, though.
|
