Mirrored Margins with Landscape Sections
This page starts from the observations of Cindy Meister at Mirror margins don't work in multisection document with mixed orientation. If you have a document with both landscape and portrait orientations in different sections, mirrored margins will not work properly.
They certainly do not work if the document is to be printed duplex and bound along the long edge of the paper.
In Word 97-2013 mirrored margins will give you the inside (binding) margin at the top of each page in a landscape section inserted into a portrait-oriented document.
The first workaround would be to print all landscape pages as one-sided. This
is not very satisfactory and can be a lot of work. However, it will give you the
binding edge.
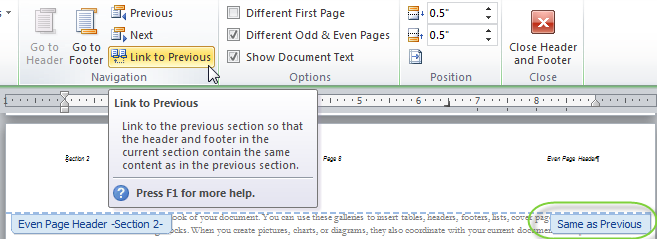
A second set of workarounds is to use different even and odd headers/footers and use the
spacing in the headers and footers for even and odd pages to mimic mirrored
margins. This is ideally done using either space-before/space-after paragraph
formatting and or a blank borderless textbox or frame that takes up space even
though you don't see it.
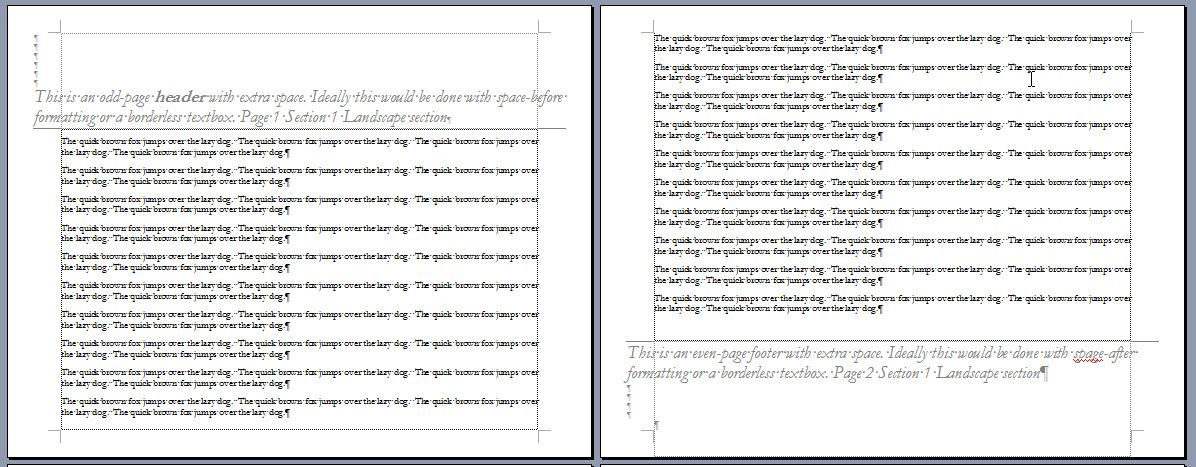
The screenshot above is from Word 2003 but the technique will work in any version of Word that uses different odd and even headers/footers. See Sections - Headers and Footers in Word 2007-2013 for more on headers and footers. The document in the screenshot is simply using blank paragraphs for the spacing, but that is a very bad idea.
Discussion
(or skip the talk-talk and get to the workarounds)
You will get different results depending on how you start your document.
Completely Landscape Document. If you start a document and make its orientation landscape for the entire document and then add your margins and make them mirrored, you will get traditional mirrored margins but your binding edge will be on the short side of the page, the left side, rather than the top and bottom. That may be what you want.
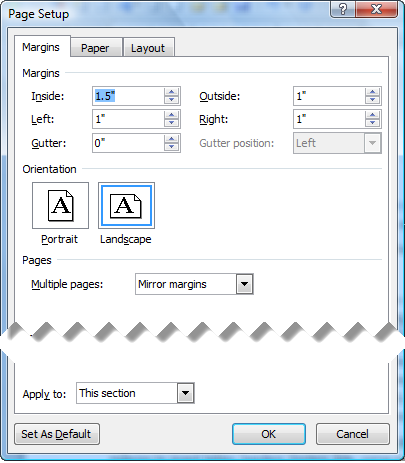
Landscape inserted in Portrait document. If you start a document in portrait orientation and add a section that has landscape orientation, the Inside Margin will remain labeled as the Inside Margin in the Page Layout Dialog but replaces the Top Margin spot on that dialog. It functions as the Top Margin, though. The margin setting for Outside Margin acts as if were the setting for Bottom Margin and mirrored margins is turned off.
(Screenshot of Landscape Page margins when inserted in a Portrait document.)
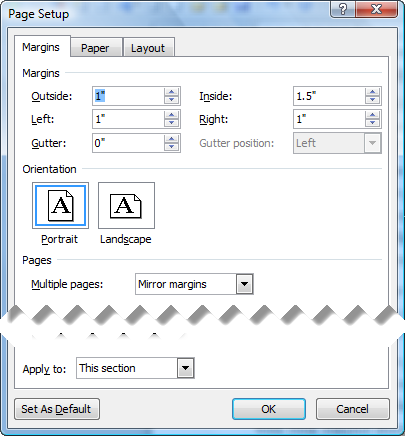
Portrait Section Inserted in Landscape Document. If you start a document in landscape orientation and add a section that has portrait orientation, the Inside Margin will remain labeled as Inside Margin in the Page Layout Dialog but replaces the Bottom Margin spot on that dialog.
(Screenshot of Portrait Page margins when inserted in a Landscape document.)
Since this has been in roughly the same shape since Word was first marketed as a part of Office, I see no reason to expect a change when Word 2016(?) is introduced. Let's look at the workarounds that involve using even and odd headers/footers to mimic mirrored margins. They aren't great but they will do the job better than adding and subtracting space at the beginning or end of individual pages.
Workarounds to Mimic Mirrored Margins
This involves changing the header / footer settings for the landscape pages so that they are different on even or odd pages. I am using Ribbon version commands in discussing this. If you have an earlier version, the same options are available. See Sections - Headers and Footers in Word for details on using the Menus and Toolbars in Word 97-2003 to accomplish the same things.
Caveat - Warning
These steps make your document much more complex and harder to edit. They should be done on a document just before you print it, not in the initial stages. I would recommend working with a copy of your document until you have it the way you want it. If you have multiple Landscape Sections and Portrait Sections, use the space-before/after workaround and use Styles to hold the formatting; adjusting multiple blank textboxes would be a real bother.
Initial Setup
The initial setup is required for either workaround. There are four steps to the initial setup.
-
Set margins in the landscape section to be the same on all sides.
-
Set the document to have different even and odd headers and footers.
-
You may have just doubled the number of your headers and footers. Make sure that the text you want in each of them is set the way you want.
-
Unlink all headers and footers in the landscape section and any portrait section that follows.
Step 1 - equalize margins
First we get rid of the false mirrored margin (wide top margin) in the Landscape Section. Edit your margins so they are set to all be equal. (You may want to tinker with these later, but start with equal.) So, you want the Inside, Outside, Left and Right margins to be equal.
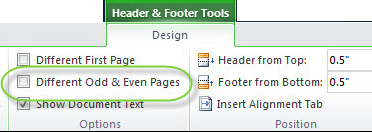
Step 2 - Different Even and Odd Headers and Footers
With your insertion point in the Landscape Section the Insert Tab, select Header and choose to Edit the Header. This brings up the Header & Footer Tools Tab.
Select Different Odd and Even Pages in your Header Footer Tools. Note that this selection applies to the entire document, not just header or footers, and not just to the current section.
Step 3 - Make sure you have the content you want in each header and footer.
When you checked that box if you didn't already have it checked, you may have doubled the number of your headers and footers showing. If this wasn't checked before, the new headers and footers are all blank. I would advise putting in the headers and footers you want for your portrait sections at this time. If you are using tabs to center or right-align material, remember to use an Alignment Tab to position that material.
Step 4 - unlinking all of the headers and footers in each Landscape Section and the following sections.
Now, we are going to make changes in the headers and footers. Before we do that, we need to unlink each header and footer from the previous header footer in both this section and the following (portrait) section. The default setting for headers and footers is for them to be linked to the previous section. This means they use the same header in both sections.
You would click on Link to Previous if that is showing. (Note the cue on the header says "Same as Previous."). If you do not see "Same as Previous" or something similar, do not click on the button. (If you click on the button and it asks you if you want to delete a header or footer, cancel out; you are already unlinked.)
The unlinking must be done for both headers and footers and for each header or footer in a section. (Each section has three headers and three footers, even if they are not used or seen. The third kind of header/footer is the First-Page Header/Footer.) Linking is independent for each type of header and each type of footer. So for one section you will need to unlink between four and six times.
Space-Before/After Workaround -- Textbox Workaround
Space-Before and Space-After Workaround.
This gets us to the point where we can start applying the space-before and space-after workaround. I believe it is easier than using Textboxes and when multiple sections are involved, the use of Styles really makes modifying multiple sections at once far easier.
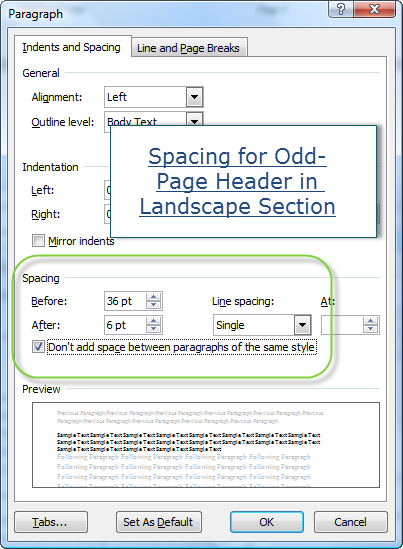
The basic idea is to use the Space-Before and Space-After paragraph formatting for the text in the headers and footers to mimic mirror margins. This means extra space before the odd-page header and extra space after the even page footer.
Go back to the point where you are editing the odd-page header in your Landscape Section. Put your insertion point (cursor) in the text of the header. Click on the Home tab and launch the paragraph formatting dialog box. (The launcher is a small arrow at the bottom-right of the Paragraph Group on the Home Tab ribbon.) (Non-Ribbon versions: Format > Paragraph)
Set the space before for the odd-page header text to 36 points for a 1/2 inch extra space and 6 points space after. The space after is because we will be going outside the space allotted for the header and this keeps the header from overwriting the body text.
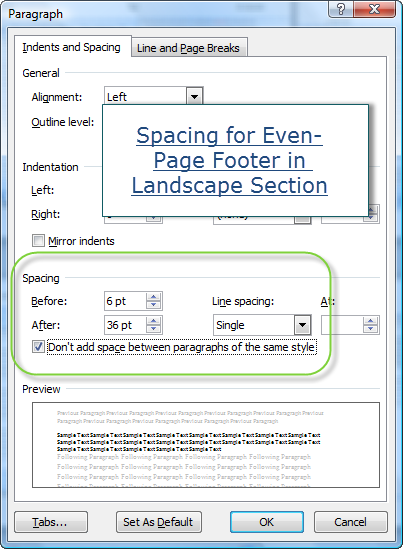
Then go to the even-page footer and give that text 6 pts before and 36 pts after.
Then fiddle with the settings until you have what you want. The screen shot below is from a landscape section with 1-inch margins on all sides.
Pointers
- If there are multiple lines in a header or footer, the spacing before/after can apply to all lines in a header or footer if they are the same style. Note the checkbox to not apply this spacing between paragraphs in the same style must be checked.
- If you are going to be formatting multiple sections or doing this often, you should create some custom Paragraph Styles that have the spacing you need. Apply those styles to the headers / footers that need the spacing. Make any changes to the Styles to change everything with that Style at once.
- The point values are not written in stone.
- You could make the differences more extreme using higher point settings.
- You do not really need to unlink the odd-page footer and the even-page header. The directions call for doing so for simplicity.
- In Word 97-2003 the alignment tab is not available. Those may require changes to not only the paragraph spacing but the left and right Indents and the settings for center and right tabs. Again, Styles are your friend.
- If you also have a Different First Page Header/Footer setting in your Landscape Section you will need to add the space for an Odd-Page Header to that. Typically the first page has nothing in the header, though. In that case you can use text formatted as white to hold the paragraphs space-before/after formatting.
- At least one thing that should be considered is changing the page size but not the orientation. That is, if working with letter-size 8-1/2 x 11 paper consider formatting it as 11 x 8-1/2. That will still not allow mirroring without some workaround but may be easier to work with than different orientations.
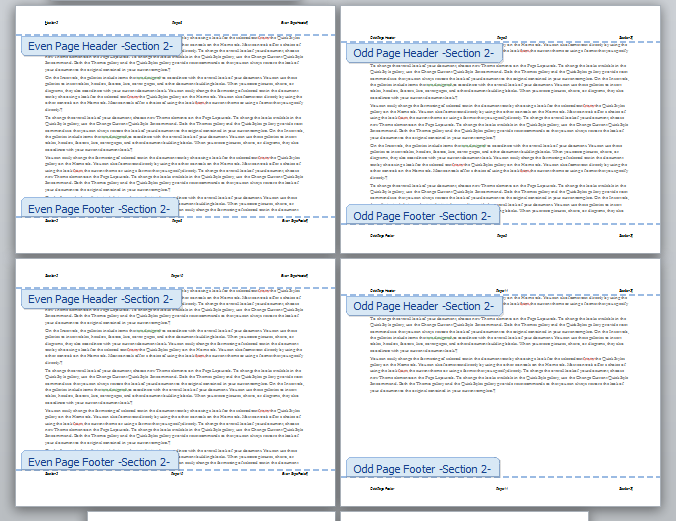
Here is a sample document in Landscape Orientation with simulated mirror margins along the long edge of the paper. This contains two versions (.docx and .doc) each showing styles being used in different even and odd headers/footers to mimic mirror margins.
Textbox Workaround
I may give step-by-step for a Textbox Workaround but it is best demonstrated with an example. You can download an example from Downloads.
Remember that you have to do the four steps of the Initial Setup for this method as well. The basic idea is to use white, blank, textboxes to take up space in the odd-page header and the even-page footer instead of the space-before/after formatting. This is a technique used to mimic different first-page margins in letterhead.
What if I want to also have portrait-oriented headers/footers on my Landscape pages?
This can be done, using textboxes or tables inside frames. It is similar to what we are doing for spacing but the textbox or frame goes on the side of the page with the text oriented at 90 degrees to form the headers and footers.
See How to Put a Portrait Page Number on a Landscape Page by Bill Coan, Suzanne Barnhill, and Dave Rado. The part about complete headers and footers starts about half way down the page, but I would recommend reading it all so you have the context.