|
| |
Understanding Styles in Microsoft Word
Last edited by Charles Kenyon on
Friday 24 April 2026
What You Will Learn
After completing this lesson, you will be able to:
Additional Written (and Web) Resources
 |
Word for Law Firms by
Payne
Consulting Group:
|
|
Display, Use, and Manage Styles in Word by Suzanne Barnhill, MVP
|
|
|
Tips for Understanding Styles in Word by Shauna Kelly, MVP |
|
|
How Styles in Microsoft Word Cascade by Shauna Kelly, MVP |
|
|
Here is a much shorter
list of links about Styles
I prepared in January 2025 for a presentation on Styles. It is a
2-page pdf. |
|
|
Restrict Formatting to Certain Styles - Microsoft |
|
|
Themes and Style Sets - What's the Difference? Veriti Labs |
|
|
Change a theme and make it the default in Word or Excel |
|
|
Understanding Themes (and Style Sets) at Last! in Microsoft Word by
Faithe Wempen |
|
|
Customize or Create New Styles in Word - Microsoft |
|
|
Working With Styles by Tony Jollans, MVP |
|
|
Word Styles from the Beginning - Office Watch |
|
|
Where are all the Style Controls - Office Watch |
|
|
Style Basics in Word 2007 (& 2010) - Microsoft |
|
|
Seven Laws of Styles (Word of Law) by Bob Blacksberg |
|
|
Styles
in a Networked Environment - newsgroup discussion |
|
|
Create
a Template Part 2, John McGhie, MVP. |
|
|
Template Basics in Microsoft Word
by Charles Kenyon |
|
|
What is the difference between the normal style and the Body Text style?,
Suzanne Barnhill, MVP |
|
|
Yet Another "Use Styles" Verbal Beating! by Dian Chapman, MVP |
|
|
Getting Started with Styles by Dian Chapman, MVP - Word 97-2003 |
|
|
Headers?
Headings? What is the difference? |
|
|
How to
safely update a document's styles from its template without using
the Organizer (and how to make the Tools + Templates and Add-ins
dialog safe) by Dave Rado, MVP and Beth Melton, MVP |
|
|
Using Styles in Dissertations - University of Michigan Library |
|
|
Letterhead
System - styles used to format letters and letterhead |
|
|
Letterhead
Textboxes and Styles Tutorial - two-page template download that
demonstrates use of
| Styles that are based on each other and use the style for
following paragraph feature |
| Use of the StyleRef field to insert information from the body of
a letter into the continuation page headers automatically |
| The AutoText list restricted by styles for the salutation and
closing. |
| Textboxes in headers and footers to reserve space for preprinted
letterhead |
| Insertion of a date
automatically that will not change when you open the document at a
later date |
| Insertion of the typist's name as signer automatically by
accessing the Author document property. |
|
|
|
StyleRef Field
Tutorial by Charles Kenyon |
|
|
IncludeText
Field Tutorial - 2 documents with IncludeText links demonstrating
switches, interaction of styles, and use of hidden Page field for continuous
page numbering of separate documents. |
|
|
AutoText
Sampler - styles used to organize AutoText - see also... |
|
|
Why does text change format when I copy it into another document?
by Shauna Kelly, MVP |
|
|
What happens when I send my document to someone else, will the
formatting change? by Shauna Kelly, MVP |
|
|
Tying numbering to Styles - How to create numbered headings or
outline numbering in Word 2007 and Word 2010 by Shauna Kelly,
MVP |
|
|
Customize Styles in Word for the Mac - Microsoft Support |
|
|
How Templates, Styles, and Building Blocks Relate to One Another in
Microsoft Word by legal office guru Deborah Savadra (video) |
|
|
How
to add pop-up lists to any Word document by Bill Coan, MVP.
|
|
|
A Global StyleSheet in Microsoft Word?
by Charles Kyle Kenyon |
|
|
[Quick] Style Sets and Themes in Microsoft Word by Charles Kenyon |
|
|
Microsoft Word Styles and Why You Should Use Them (hint: you
already are!) by legal office guru Deborah Savadra |
| |
Consistent Headings Using Styles by legal office guru Deborah
Savadra |
| |
Six Secret Word Style Settings You Should Be Using by legal
office guru Deborah Savadra |
| |
Get one-click access to formatting with Styles by legal office
guru Deborah Savadra |
|
|
Word
is always making changes I don't expect. How can I get more control
over my formatting? by Suzanne S. Barnhill, MVP, and Dave Rado,
MVP. |
|
|
So You
Want to Write a Book Using Microsoft Word - extensive tutorial
by MVP Daiya Mitchell with overview of Styles,
Templates and
Sections and the interactions among these tool/features.
Excellent! Not just for those who want to write books! |
|
|
Word Tips about Styles from Allen Wyatt - Note, most tips have
versions for Ribbon versions of Word (2007+) and pre-ribbon
versions. A few of the tips are listed below.
|
|
|
How to Use Styles in Microsoft Word video by Kevin Stratvert |
|
|
Creating Documents with Style - Jonathan Bailor - blog |
|
|
Behind the Curtains: Styles' Order of Operation - Jonathan
Bailor - Microsoft blog - five
types of styles, how styles relate to one another and document
defaults, |
|
|
Behind the Curtain (II) - Styles, Doc Defaults, Style Sets, and
Themes - Jonathan Bailor - Microsoft blog - How do document defaults relate to the
Normal style? How do Style Sets relate to Styles? How do Themes
relate to Styles? |
|
|
Behind the Scenes with Document Themes by Stephanie Krieger |
|
|
(Advanced) How
to safely update a document's styles from its template without using
the Organizer (and how to make the Tools + Templates and Add-ins
dialog safe) by Dave Rado, Margaret Aldis, Ian Sharpe and Beth
Melton. |
|
|
How
to Apply a Style in Microsoft Word by Shauna Kelly |
|
|
How
to Modify a Style in Microsoft Word by Shauna Kelly |
|
|
How to Control the
[Quick] Styles Gallery on the Home Tab by
Shauna Kelly (Word 2007-2013 (365)) |
|
|
Customize Your [Quick] Styles Gallery by Debora Savadra (video) |
|
|
Applying and Modifying Styles - A tutorial with video and
practice document |
|
|
Creating and Sharing Custom Microsoft Word Styles by Deborah
Savadrah - especially good on creating new Style Sets and sharing
them in ribbon versions of Word |
|
|
Why
Does Text Change Format When I Copy It Into a Different Document?
by Shauna Kelly |
|
|
How
Styles in Word Cascade by Shauna Kelly |
|
|
Table Styles Not Useful by Shauna Kelly |
|
|
Formatting applied to one paragraph affects entire document by
Suzanne S. Barnhill, MVP |
|
|
Useful StyleRef Field Tricks by Suzanne S. Barnhill, MVP |
|
|
Char and Char Char Char Styles - a Bug and fixes |
|
|
How to Control Bullets in Microsoft Word by Shauna Kelly, MVP.
Bullets and outline numbering are very much related in Word. You use
styles to implement either in a reliable way. |
|
|
OutlineNumbering
by Shauna Kelly, MVP (see note above) |
|
|
Changing the formatting rules with compatibility options - these
can change how Word treats formatting in styles. |
|
|
Styles Order of Operations Microsoft Blog |
|
|
Microsoft Word 2010 Bible by Herb Tyson,
MVP |
|
|
Default Paragraph Font Explained by Suzanne Barnhill, MVP |
|
|
Why Use Styles - part of Lynda.com Video tutorials on Word |
|
|
Using the Navigation Pane in Word 2010 |
|
|
Style Report - An Add-In to view styles in use and delete unused
styles by Greg Maxey and Klaus Linke |
|
|
Styles
Copier Application by Paul Edstein, MVP (macropod),
document or
Add-In - a variation of the Style Organizer |
|
|
Tutorial: Format text with styles in Word 2011 (Mac) |
|
|
Style Basics in Word (2007-2024) Microsoft |
|
|
Word Styles from the Beginning - Woody's Office Watch |
|
|
XML Hacking: Managing Styles (Ribbon Versions) - John Korchok |
|
|
Complete List of Built-In Styles in Word - Better Solutions |
|
|
vba - List of Style Names and Constants in Multiple Languages -
DocTools |
|
|
Online Tutorials on Proofing and Copy Editing - Writers and Editors |
|
|
The style guide is “dead”: long live the dynamic style guide! |
|
|
Create a List of Local (Language) Names for Built-In Styles by
Lene Fredborg, MVP |
|
|
An
Alternative to the Styles Organizer by Paul Edstein (macropod)
MVP |
|
|
Create Custom Design Elements - LinkedIn Learning video |
|
|
Using
the Navigation Pane in Word 2010 and Later by Charles Kenyon |
|
|
A Deep
Dive into Styles in Microsoft Word by Greg Maxey (video) |
|
|
How Styles, Templates, and [Quick] Parts relate to one another
(video) by Deborah Savadra |
|
|
Introduction to Styles - Affinity Group video (37 min.) |
| |
Advanced Styles - Affinity Group video (37 min.) |
| |
How Can I Better Use Styles - Affinity Group video (37 min.) |
|
|
Word Styles 101 - video by Scott Hanselman |
|
|
How to Copy
Styles from One Document to Another video by Robin Lindbeck |
|
|
How to Use Microsoft Word Styles Like a Pro - video by Jason Morrell
(20 min) |
|
|
Styles, Style Sets & Style Themes - video by San Diego
Schools Office Skills
(31 min.) |
|
|
Creating a wide border in a paragraph style using XML |
| |
Renaming Word Styles Using VBA - Stack Overflow |
|
|
All About the Basics of Styles - Office Watch -updated Sept.
2024 - parts below |
| |
What
is a Style?
Paragraph
and Character styles
Linked
styles
Style
Inheritance
Style
Inspector and Reveal Formatting
Table
and List styles |
|
|
What does Word style 'Automatically update' really mean? -
Office Watch |
|
|
Word Style inheritance made clear and simple - Office Watch |
|
|
Why choose Body Text vs Normal style in Word?s - Office Watch |
| |
Modifying
Body Text style in Microsoft Word
Two
ways to make Body Text style appear in Microsoft Word |
|
|
All 14 separate Style lists and settings in Word - Office Watch |
|
|
Make the Style Gallery work better for you in Word - Office
Watch |
|
|
Putting Style buttons on Word's Quick Access Toolbar - Office
Watch |
| |
See
also:
Styles QAT Add-In (gives you access to many style features
regardless of which ribbon tab is displayed) |
|
|
Where are Word styles saved - document or template? - Office
Watch |
|
|
Show a Word style marked 'Hide until used' - Office Watch |
|
|
Change Word style reliably to match current paragraph - Office
Watch |
|
|
Great Word style renaming and alias tricks - Office Watch |
|
 
(this guide table of contents) ------- (MS
Word New Users FAQ)
Styles are arguably the most important feature in Microsoft Word. Why?
Because everything that you do in Word has a style attached. The
definition of a style is two-fold. First, you can think of a style as a
set of pre-defined formatting instructions that you can use repeatedly
throughout the document. Let's say each heading in a document must be
centered, uppercase, bold, and a slightly larger font size. Each time you
need to apply formatting to the heading, you have to go through the entire
process to get the text the way you want it. If you store the formatting
commands in a style, you can apply that style any time you need it without
having to do all of the reformatting.
Possibly more important however is that styles are used to "tag" or
identify parts of a document. An example of this is whether text is part
of a heading, a footnote, a hyperlink, or body text. These are all
examples of styles in Word.
If you're concerned about whether or not you need to learn styles, we
can put it rather simply: you do. Styles are the architecture upon which
Word is based. Just about everything in Word is style-driven. In fact,
many people in the industry refer to Word as a "style-driven" program.
Allen Wyatt uses an elegant metaphor about styles:
"Styles are nothing more than a named definition of how text
should appear. You can best understand this by comparing your text to
water (this is your content). The appearance of the water depends on the
attributes of the container in which it is placed. If you place it in a
glass it will look one way; if you place it in a pitcher, it looks a
different way. The relationship between text and styles is no different;
if you change the style that has been applied to text, then the
appearance of the text automatically changes."
Understanding Styles
Styles allow for quick formatting modifications throughout the document
and can be tied into numbering to make working with outline numbered lists
easier. See Outline View in Microsoft Word
"While the [quick] styles gallery has been available on the Word home tab
since Word 2007, some people just assume styles are meant for people who
want big blue text.

"As it turns out, that’s not true. I’m here to tell you that
Styles are handy, and if you use them to format your text as you write
your document, you’ll be able to take full advantage of the improvements
in Word 2013 that we’ve outlined below."
-- Caitlin Ashley-Rollman, Microsoft
Program Manager for Word 2013 in
blog on using styles
The dialog drop-down arrow on the bottom-right corner of the [Quick]
Styles Gallery will launch the legacy Styles Pane. See
more on the Styles Task Pane.
|

|
For long documents,
documents that are likely to be heavily edited, and documents that may
form the basis for other documents, follow the basic rule that to change
formatting use Format => Styles... Do not apply direct formatting.
In Ribbon versions of Word (2007+) this is even easier, click on
your style from the [Quick] Styles Gallery on the Home Tab!
You
will save yourself, and others, untold hours of hair-tearing. For shorter
one-use documents, direct formatting is OK; you'll only regret not using
styles about one time in six, on the other five out of the six, you'll
save a bit of time. If you create document templates
with direct formatting, you deserve what will happen to you when someone
finds out (and it won't be nice). In my opinion, using direct formatting
in document templates intended for use by others rates the words malicious
and/or incompetent. If the templates are for your own use,
you deserve the loss of days, months, even years from your life that
you'll spend fighting with Word and trying to figure out why your
documents look so bad.
Trying to use Word without understanding and using styles is like
pushing on a string. I resisted learning and using styles for years
and now regret every day of those years because although that string
was still very hard to push, it kept getting longer and longer, and
had some very important projects tied to it!
Once you understand
styles and the Word concept of organizing things into nested Russian
dolls
everything falls into place and instead of pushing a string, you can
push a button that turns on the very powerful text processing
machine known as Microsoft Word and it will start doing your work
for you instead of running around behind you trying to undo what you
thought you just did.  These statements should be even stronger for
those using Word 2007-19 because styles are even easier to use in
the ribbon versions of Word. |
I just had occasion to edit a 100-page document that
was created without using styles. It was formatted completely with
direct formatting. Each page ended with a page break.
Each time it had to be saved, the save took more than 60
seconds, during which time Word was frozen.
A similar-sized document
formatted using Styles takes less than 3 seconds for me to save.
When a page break must be forced, instead of using a manual page
break, the paragraph to begin the new page is formatted using a
style that has "page break before" paragraph formatting.
This difference was due entirely to the document being directly
formatted - a much higher level of complexity. Each paragraph mark
in a directly-formatted paragraph carries with it up to fifty
different formatting commands. When formatted using a style, that
paragraph mark will carry with it one command - use this style!
--CKK 1 Feb 2012
See
an example of a document formatted using styles for two
virtually identical documents, one formatted using Styles, the
other mostly not using Styles. Both have the same number of
words and pages. One is 34K; the other is 48K.
--CKK 6 Jan 2016
In this
Word Forum thread, the poster was having a very sluggish
response from Word. I advised changing formatting from direct
formatting to style-based. Problem solved!
--CKK 30 Oct 2019 |
Yet Another "Use Styles" Verbal Beating! by Dian Chapman, MVP
Why Use Styles? - Lynda.com (4.5 min. video that may save you
months of work.)
There are several reasons for using styles in a document:
| Consistency — When you use styles to format your
document, each section is formatted the same and therefore, provides a
professional, clean-looking document. |
| Easier to Modify — If you use styles in your document
consistently, you only need to update a given style once if you want to
change the characteristics of all text formatted in that style. |
| Efficiency — You can create a style once, and then apply
it to any section in the document without having to format each section
individually. |
| Table of Contents — Styles can be used to generate a
table of contents quickly. |
| Faster Navigation — Using styles lets you quickly move
to different sections in a document using the Navigation Pane
(formerly Document Map) feature.
Navigation Pane in
Microsoft Word |
| Working in Outline View — Styles allow you to outline
and organize your document's main topics with ease. See
Outlining in Microsoft Word |
| Legal Outline Numbering – Numbering, when linked to styles,
allows you to generate and update consistent outline numbering in legal
documents, even ones with complicated numbering schemes like municipal
law, tax law, and mergers and acquisitions documents. |
| Efficiency of Word — Files which are predominantly
manually formatted are less efficient than those which have formatting
that has been imposed by styles: manually formatted files, such a
converted documents which have been File, Opened, are bloated in file
size (bytes) and do not render to the screen efficiently when you scroll
through them. This is because Word is a styles-based application: it
first reads the attributes of the underlying style, then has to
broadcast anything contrary (e.g. manually formatted on top of that). As
such, a lengthy document that has been predominantly manually formatted,
will behave sluggishly because Word has to work harder at managing it.
Additionally, the print formatting processes are equally labored as
opposed to using styles. |
| HTML AND XML — What lies ahead? A fully structured,
styled document will move into HTML and XML incredibly well. |
Styles are an essential part of Microsoft Word. In fact, everything you
type into a document has a style attached to it, whether you design the
style or not.
When you start Microsoft Word, the new blank document is based on the
Normal template, and text that you type uses the Normal style. This means
that when you start typing, Word uses the font name, font size, line
spacing, indentation, text alignment, and other formats currently defined
for the Normal style. The Normal style is the base style for the Normal
template, meaning that it's a building block for other styles in the
template. Whenever you start typing in a new document, unless you specify
otherwise, you are typing in the Normal style.
| "Avoiding styles is a hobby for some Word users. They go through 35
mouse clicks in 12 formatting dialog boxes, just to avoid using a
style."
Getting Started with Styles by
Dian Chapman |
Paragraph vs. Character Styles vs. Linked
Styles
There are two basic types of styles in Microsoft Word;
character and paragraph. Paragraph styles are
used more frequently than character styles, and they are easier to create.
It's important to understand both, however.
Linked styles (Word 2007 and later) are a blending of these two that I
avoid. I urge you to avoid them as well. You can do so by checking
the box to "Disable Linked Styles" at the bottom of the Styles Pane.
|
Note: In Word 2002, there
was also a hybrid
"character and paragraph" style that isn't discussed in
this article.
Also introduced with Word 2002 are Table Styles. I
don't use them and haven't found them helpful. For a discussion of
their shortcomings, see
Shauna Kelly's article. Any discussion of them will be in
the
Tables chapter. Note that if you have your Styles display set to
show all styles, Table Styles will show up in the legacy drop-down
menu for styles but not in the Styles Pane.
Word 2007 introduced linked styles which can be used as either.
It also introduced a checkbox at the bottom of the Styles Pane which
allows them to be disabled. I usually keep this checked.
|
Character styles can be applied to individual words — even (you
guessed it) single characters. Character formatting is built from the
formatting options available from the Format menu, by selecting Font;
settings from the Tools menu, by selecting Language, and then selecting
Set Language; and in certain cases from the Format menu by selecting
Borders and Shading, and looking on the Borders and Shading tabs of the
Borders and Shading dialog box. The following table shows the formatting
that can be in a style.
A paragraph style contains both font and paragraph formatting which
makes it more flexible than a character style. When you apply a paragraph
style the formatting affects the entire paragraph. For example, when you
center text, you cannot center a single word. Instead, the entire
paragraph is centered. Other types of paragraph-level formats that styles
control are line spacing (single-space, double-space, etc.), text
alignment, bullets, numbers,
frames, indents, tabs and borders.
| Formatting |
Character Style |
Paragraph Style |
| Font |
Yes |
Yes |
| Tabs |
No |
Yes |
| Border |
Yes |
Yes |
| Spacing |
No |
Yes |
| Alignment |
No |
Yes |
| Indents |
No |
Yes |
| Shading |
Yes |
Yes |
| Language |
Yes |
Yes |
| Numbering |
No |
Yes |
| Frame |
No |
Yes |
| Word 2002 and Word 2003 |
There are actually four style types in
Word. Each has an icon that appears next to it in the
Styles and Formatting task pane. When you use
the New Style dialog box to create a new
style, the types are available on the Style type
list.
| Paragraph: Applies to all the text within the end paragraph mark of
where your pointer is positioned. |
| Character: Applies at the character level—to blocks of words and
letters. |
| List: Provides a consistent look to lists. |
| Table: Provides a consistent look to tables. |
|
| Word 2007 - 2024 |
Word 2007 introduced
linked styles
 which can be used for paragraph formatting or character
formatting. When used on particular text within a paragraph,
linked styles act as character styles, when applied to a
paragraph, they act as character styles. When used on text at
the beginning of a paragraph, linked heading styles can be a
source for a Table of Contents.
which can be used for paragraph formatting or character
formatting. When used on particular text within a paragraph,
linked styles act as character styles, when applied to a
paragraph, they act as character styles. When used on text at
the beginning of a paragraph, linked heading styles can be a
source for a Table of Contents.
The Styles Pane has a
checkbox to disable these, which I usually keep checked.
Here are
MVP John McGhie's thoughts on them. I recommend that anyone
contemplating use of Linked Styles for important work read those
comments.
 It is common to have Headings applied to something
other than a whole paragraph not show up in the Navigation Pane.
This is because they have been applied as "Linked Styles." Here
is a link to my article on this:
Headings that do not show up in the Navigation Pane or in a
Table of Contents.
Here is a link to a short demonstration document.
Linked Styles Demo |
I have three character styles in most of my pleading documents. Two
replace Bold and Italic formatting. The third is for citations. The first
two are built-in character styles of "Strong" and "Emphasis." I started
using these before Word had a replace formatting feature. I'm not sure they
are needed. They provide a simple way of changing how I emphasize something
throughout a document by simply changing the style. It starts out that
"Strong" is bold and "Emphasis" is Italicized.
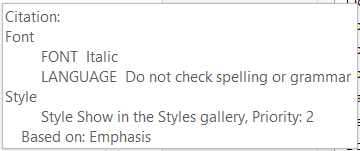 The third, though, has proved its worth through time. It is the Citation
character style. I set it to Italic and set the language formatting to "no
proofing." This means that case citations with it will not alert the spell
checker. (Of course, this also means you better have the correct spelling.)
It also disables automatic hyphenation. To set this up, you would create a new character style and use the
formatting drop-down to add the Italic and "no-proofing" formatting. The
Italic formatting comes through the font formatting dialog, and the
"no-proofing" comes through the language dialog. In later versions
of Word "no-proofing" is known as "Do not check spelling or grammar." The third, though, has proved its worth through time. It is the Citation
character style. I set it to Italic and set the language formatting to "no
proofing." This means that case citations with it will not alert the spell
checker. (Of course, this also means you better have the correct spelling.)
It also disables automatic hyphenation. To set this up, you would create a new character style and use the
formatting drop-down to add the Italic and "no-proofing" formatting. The
Italic formatting comes through the font formatting dialog, and the
"no-proofing" comes through the language dialog. In later versions
of Word "no-proofing" is known as "Do not check spelling or grammar."
Character styles can also be used as targets for the
StyleRef field. This field gives very quick automatic updating. A
character style is much less fragile than is a bookmark when used to
mark text that may be edited. I will often use character styles that
apply to only one word or phrase in a document that I want to repeat
elsewhere, instead of a bookmark. Then a
StyleRef Field is used instead of a Ref field to repeat it
elsewhere.
A Demonstration of
Application of Character
Styles to Directly Formatted text with different paragraph styles.
Here is a
demonstration of Character Style (like
Emphasis) being applied to two paragraphs with different
underlying paragraph styles and then having the typeface and font size changed
with direct formatting..
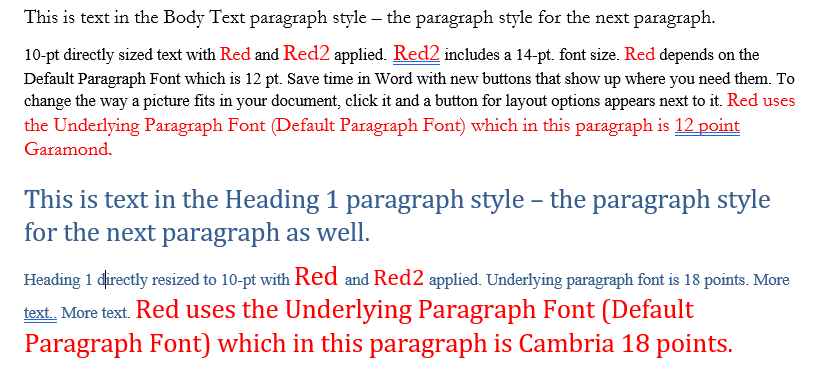
There are two custom character
styles. The first,
Red, has the
color added to the underlying paragraph font. The second,
Red2,
also specifies a font size of 14 pts. These are applied to two
paragraphs, both with 10-pt. text. The second paragraph is in my
Body Text paragraph style set at Garamond 12-points. The third and
fourth paragraphs are in the
Heading 1 style (which uses 18 point Cambria font in blue). The font defined in the
paragraph style for the first and second paragraphs is
Garamond 12 points. In the two last paragraphs, Cambria 18 points.
The second and fourth paragraphs were then set to 10 points using the
sizing in the ribbon. This is "direct formatting." Then
the character styles were applied.
Notice, in the second paragraph,
the
Red
character style, ends up with Garamond 12-pt type and in the fourth, it ends
up with Cambria 18-pt type. The Red character style has no
typeface or font size defined
and takes the size from the size set in the paragraph style. The
Red2
style has a font size as well as color defined and it does not care what the font
size in the paragraph style is; it keeps the typeface. Neither cares what font
size or typeface was set through direct formatting!
They both look to the settings in the paragraph style. Those are the
settings also known as the "Default Paragraph Font."
The Heading Styles -
Special or Magic Styles
The built in heading styles in Word have special
properties that make them almost magical. There are keyboard shortcuts
for the top three. They can appear without any customization in a Table
of Contents generated by Word, you can link and navigate to them with
cross-referencing features, and more. See
Why use Microsoft Word’s built-in heading styles? by Shauna Kelly,
MVP, for sixteen reasons to use these styles. In Word 2007 and later,
the Heading Styles are Linked Styles by
default.
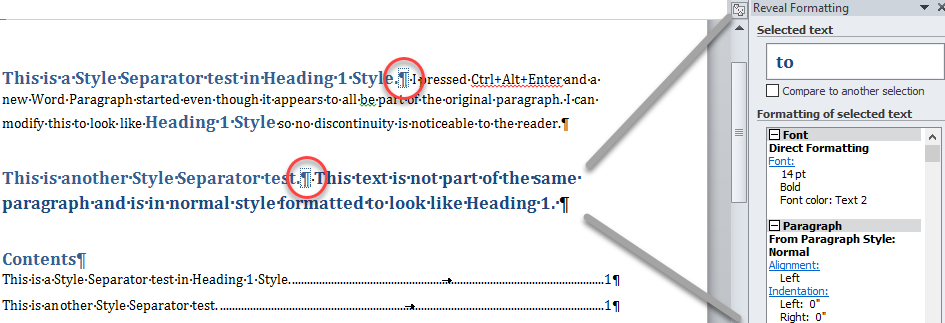
Use a Style Separator to
Put Different Paragraph Styles in the Same Printed Paragraph - (Ctrl+Alt+Enter)
- CK Note
 The primary reason to do this is when you want a
snippet from the beginning of a particular heading to appear in a
Table of Contents but don't want the entire heading in the Table
of Contents. The primary reason to do this is when you want a
snippet from the beginning of a particular heading to appear in a
Table of Contents but don't want the entire heading in the Table
of Contents.
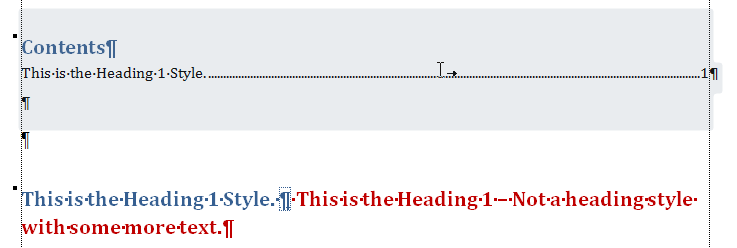
The screenshot above, with non-printing formatting
marks displayed, shows two different paragraph styles used in one
logical printed
paragraph. Note the pillcrow (paragraph mark) with the dots around it separating the
two. The colors of the styles here are different. The usual use of
this, though, would be for the styles to look the same. This was
used in automatically generating the Table of Contents. The second
part of the paragraph, in the non-heading style did not get picked
up in the Table of Contents.
You would not want to base the second style
on the heading style though, because then it would also be a heading
style. This is, instead, based on the Body Text style and formatted
using the same font and size as the Heading 1 Style.
You can add a Style Separator to the end of
the first
paragraph using the Ctrl+Alt+Enter Keyboard Shortcut. The
second paragraph will be incorporated into the first logical
paragraph, but will in the Word sense, remain a different paragraph
with its own syle.
Here is another screenshot:
If you delete a Style Separator, the entire
paragraph will take on the formatting of the text preceding the
Separator. See
this thread on the Microsoft Answers forum for more.
See also:
Finding the Style Separator feature for Word TOC's - Office
Watch
As of this writing (November, 2024), the Style
Separator does not exist on the Macintosh versions of Word.
You can create your own by simply pressing Enter at the end of the
first part of your text (style 1) and creating your following text
in Style 2 in the new paragraph. Then go back and select the
paragraph mark at the end of the first paragraph and mark it as
Hidden text (Cmd+Shift+H). This method works on Windows
versions as well (Ctrl+Shift+H).
Macintosh users can also download the
following from my downloads page:
Style Separator as AutoText Add-In for the Mac - Macro-free - it
holds an AutoText entry with a Style Separator that will work on a
Mac. The current keyboard shortcut is Ctrl+Alt+Return, which is the
same as the Windows version shortcut. I do not know whether the
shortcut will work on the Mac but users can assign a different
shortcut if they wish, perhaps Cmd+Opt+Return.
See also
Creating
Run-in Sideheads by Suzanne Barnhill.
Here is a
link to a template with two Style Separators.
When you add a style separator, the insertion point
and the style separator will both be at the end of the Word
paragraph. If you have a paragraph already written and you wish to
separate part of it out, place your insertion point where you want
the separation to occur. Instead of pressing Ctrl+Alt+Enter,
simply press the Enter key. This creates a new Word
paragraph.
Format that new paragraph using a style that will
not be picked up in the Table of Contents. Then go to the paragraph
that you want to show up in the Table of Contents and press
Ctrl+Alt+Enter.
This will rejoin the two paragraphs, with a Style
Separator between them.
The Style Separator is formatted as "hidden."
If you turn on the option to view hidden text, you will see it. If
you use the pillcrow on the Home Tab's paragraph group to toggle
non-printing formatting marks you will see it with a dotted line
square around it. If you only view hidden text it will appear with a
dotted line underneath, like other hidden text.

See also the Extended version of this to have a
button for the Style Separator on the QAT.
Styles QAT Add-In (gives you access to many style features
regardless of which ribbon tab is displayed)
Potential
bug:
In versions after 2019 it has been reported that
putting a style separator in a blank document results in hidden
text. Also putting two in a row or at the end of a document will
crash Word. See
this thread on the Microsoft's Q&A site.
Workaround to avoid this bug.
|
Only insert a style separator in the first of
two paragraphs that are in a different style. This is the
expected use, and works. |
|
Do not insert a style separator and attempt to
type after it. |
|
Do not insert a style separator at the end of a
document. |
You should not use the Style Separator to try to
combine two automatically numbered paragraphs. If you do, the
numbering will disappear in the text but may still appear as a
separate line in the Table of Contents! The numbering will still
count, and the next paragraph will act like it is there but the
reader will not see it.
The paragraph with the additional text should not be
in a style that is designated to appear in a Table of Contents. For
examinations of these problems, look at this Stack Overflow
question and my answer here:
Delete Blank Space When Using Macro to Insert Style Separator.
If numbering is needed for the joined paragraph, I recommend using SEQ Field numbering insteand of list
numbering.
Numbering in Microsoft Word. That way,
the numbers will appear in the text. That joined paragraph should
not be in a style that appears in the Table of Contents.
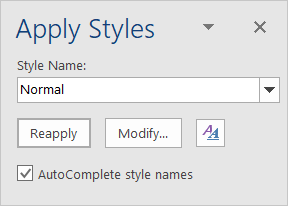
Styles are listed in several places: the Style drop-down box on the
Formatting toolbar and from the Format menu by choosing Style. You can
also open the Styles Pane.
In Word 2007-2024 (365) they are found in the [Quick] Styles Gallery of the Home Ribbon,
in the Styles Pane, and in the Apply Styles dialog. The
Apply Styles Dialog can be reached
in the Windows Version of Word with the keyboard shortcut
Shift+Ctrl+S.
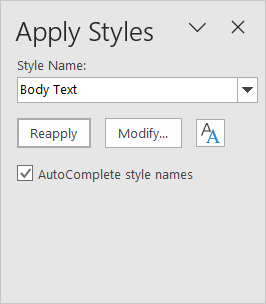
This dialog lets you type in the name of a style to apply it quickly, or
select the style from the drop down box. It has been available since, I
believe, Word 97. It also has buttons to let you Modify the listed
style, or Reapply the style to the selected text, or (button on the
right) call up the Styles Pane. The Styles
Pane can list all the Styles in your document, depending
on its options. You can toggle its display with the keyboard shortcut
Shift+Ctrl+Alt+S. Here it is in its short floating form.
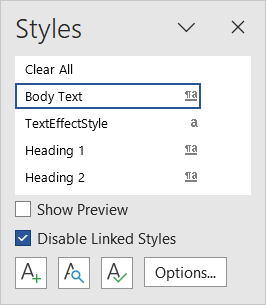
It is usually used docked on the right side. You can dock it by
double-clicking on the top border of the dialog. The [Quick] Styles
Gallery on the Home Tab
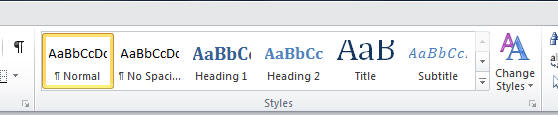
see below about these different views
This Gallery can be added to the Quick Access Toolbar (QAT).
See
Modifying the Quick Access Toolbar (QAT) in Microsoft Word and
Styles QAT Add-In.
View Styles with the Style Box (Legacy Styles Menu)
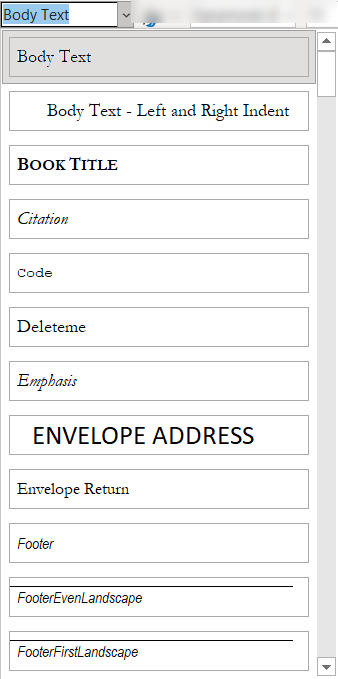
In Word 97-2003, the Style box is the button at the far-left side of the Formatting
toolbar. It can be activated by clicking the drop-down arrow to the right
of the words in the box, or by pressing Ctrl+Shift+S on the keyboard (Word
97-2003). (In Word 2007 and later, this shortcut brings up the
Apply
Styles floating dialog.) See Legacy Drop-Down Styles Menu
below for more.
 |
CK Note In Word 2007-2024 (365)
you can add
this Style Dialog to your QAT. It is under Commands Not In the Ribbon
and is the Style (Style Gallery Classic). It is included in the
Styles QAT Add-In you can download from this website. Word 2003
introduced the Styles and Formatting Pane shown below. It appears if
you select Format -> Styles.
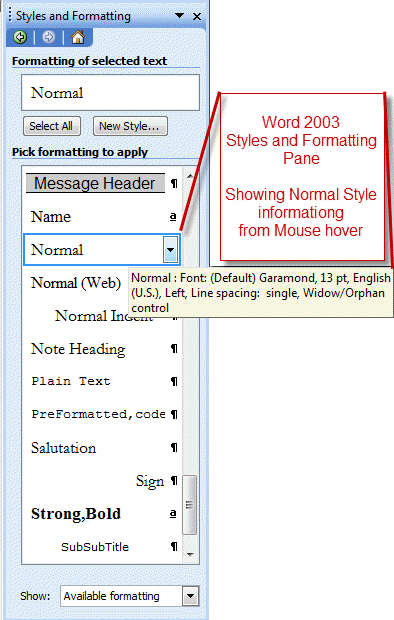
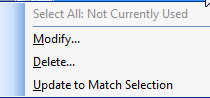
If instead of hovering with the mouse you right-click, you get the
options of modifying or deleting the style (except for built-in
styles which cannot be deleted.) The third option is to modify the
style to match the current selection.
The Styles Pane can also be accessed in Word 2007-2019 (365) by
clicking in the bottom right corner of the styles group on the Home
tab or by pressing the keyboard shortcut Ctrl+Alt+Shift+S
(Mac Cmd+Opt+Shift+S).

The resulting dialog is similar to the Styles and Formatting Pane and provides more information about the style when you
hover.
As with Word 2003, right-clicking on the style name give options to
modify or delete the style.
By default this appears as a floating dialog. This dialog can be
anchored to the right side of the page making it appear much like
the Styles and Formatting Pane in the menu versions of Word.
|
| |
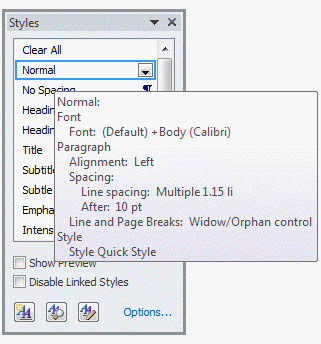
In Word 2007 and later there are two checkboxes, three buttons and the Options...
choice at the bottom of this pane. The checkboxes allow you to see a
preview of the Style in the Styles Pane and to disable Linked Styles
(recommended). The first button lets you define
a new style. The second gives you the Style Inspector.
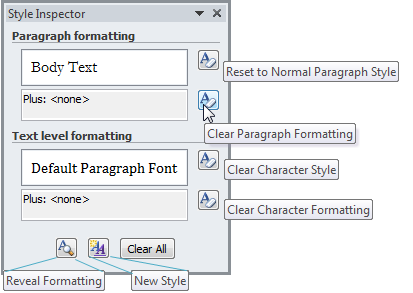
The Style Inspector is a floating dialog that lets you type in
your document and click to a different spot in the document to see
what is going on with Styles there.
There are no keyboard commands equivalent to the Clear Character
Formatting or Clear Character Style buttons. See
(Ctrl + Space) Does Not Work as Expected for Microsoft 365.
|
| |
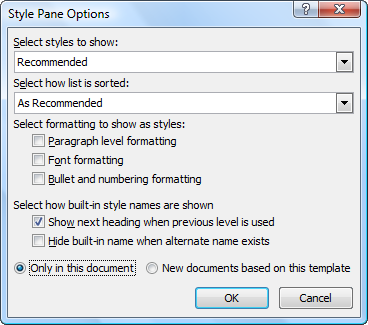
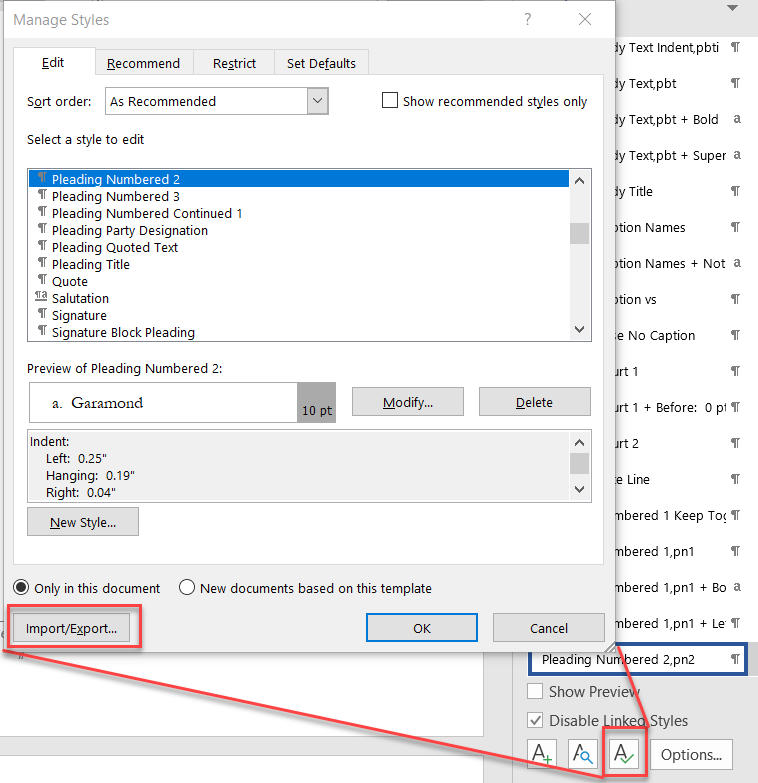
The third button gives you the control to "Manage Styles:"
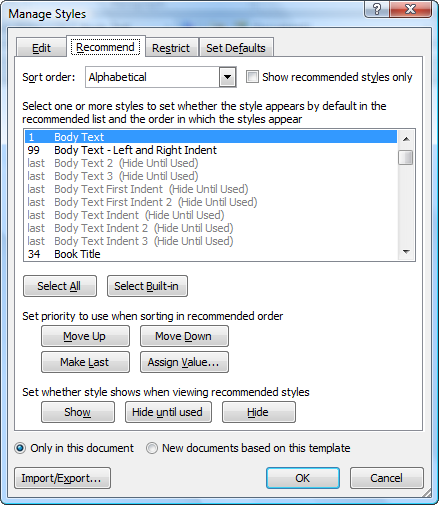
This control has four tabs at the top and is too complex for
discussion here. Shown to the left is the Recommend tab which lets
you assign recommendation values. Those values determine where
styles show up in the [Quick] Styles gallery and the order if you
display styles "as recommended."
It also lets you hide styles from various views either until used
or always.
Note the options to have changes only apply to the current
document or to new documents based on the template.
|
| |
Finally, you can also change your style pane's display options.
|
|
|
Note If you're using Word 2000, the default is
for the Standard and Formatting toolbars to share one row. For this
chapter, you may find it helpful to turn off this feature. From the
Tools menu, choose Customize and select the Options tab. Uncheck
Standard and Formatting toolbars share one row and click
OK. |
Clear All / Clear Formatting is not a Style, it is a Command!
Since at least Word 2003, at the top of the Styles Pane's list of
styles there is a command to Clear All (Clear Formatting in
Word 2003). This is not a style;
it is a command. It will appear at the top of the pane no matter how
you decide to display or order your styles.
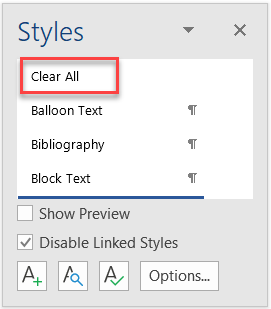
What this does is return the selected text to the normal style. It strips
out any other character or paragraph level formatting. It is the
equivalent of selecting the text and pressing Ctrl+Spacebar
(clear font-level formatting), then Ctrl+Q (clear
paragraph-level formatting other than the paragraph style), then
Ctrl+Shift+N (apply the Normal paragraph style).
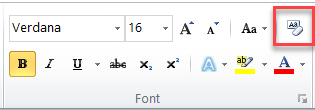
This is the same as the Clear All Formatting button in the
Font Group of the Home Tab in ribbon versions of Word.

If the command is missing, see this
troubleshooting tip.
In Ribbon versions of Word you can access this dialog using the
keyboard shortcut Ctrl+Shift+S. The drop-down menu will give you
a list of styles (including Table Styles). The button on the right side
of the dialog will toggle display of the Styles Pane.
This dialog is a quick way to access or even modify a style. The
style currently in use at the insertion point will be displayed but you
can choose a different style to apply.
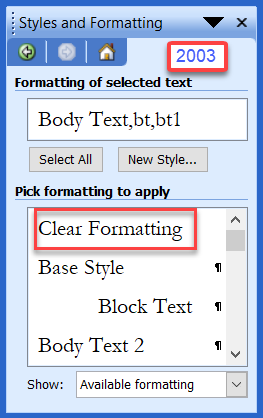
This is the primary Styles display in the menu versions of Word (Word
97-2004). In those versions it is in the Formatting Toolbar. It can be
added to the QAT in versions 2007-2024 (365).
It has a display similar to the Styles Pane but without the added
features. It is shown below as the QAT addition:
I find it primarily useful in that it displays the name of the
currently applied style in the toolbar or QAT. If you know the name of a
different style you want to use, you can simply type it in. Using the
dropdown is a bit tedious because all Table Styles may be included in the
list.
In the menu versions, there is an option to turn the preview on/off.
See
Modifying the Quick Access Toolbar (QAT) in Microsoft Word and
Styles QAT Add-In.
Practice: View a List of Styles
- Create a new blank document.
- Locate the Style box on the Formatting toolbar. If the toolbar is
not visible, alternate-click any toolbar and choose Formatting.
|
|
Note In Word 2000, styles are listed in
alphabetical order. In Word 97 styles listed in the drop-down list
are not displayed in alphabetical order. Word 97 lists styles in the
following order in the Style Box list:
| Heading styles |
| Normal style |
| User-defined styles in alphabetical order |
| Body Text styles |
| List styles |
| All other styles listed alphabetically. |
|
- Click the Style box drop-down arrow to the right of the button. A
list of styles available in the active document displays.
While only a few styles show in this list by default, later you'll
learn how to access all available styles.
The list and quantity of styles that displays in the Style list depends
on which template you used to create the active document. If you click the
New button on the Standard toolbar, you get a blank document based on
Word's default template, Normal.dot. Different types of documents need
different styles. What works in a pleading may not be useful in a letter,
fax or memo.
Styles can also share the same name in various templates but have
different attributes. For example, in a pleading the Body Text style may
be double-spaced, where in a letter, Body Text may be single-spaced.
Another way to see the styles available in the current template is by
selecting the Format menu, and then choosing Style. The Style dialog box
is shown in the following figure.
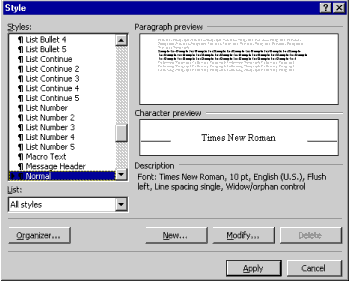
Styles list in Word 97-2000. When you select a Style from the list on the left side of the Style
box, you see a preview and description of the style formatting on the
right.
Practice: Access the Style Dialog Box
- From the Format menu, choose Style.
- Change the List to display All Styles if necessary.
- Select a style from the list and view the Character preview,
Paragraph preview, and Description.
- Click Cancel or press ESC to close the Style dialog box.
Lists of styles available in this template or all open templates are
shown in the Style dialog box.
Listing All of the Styles
When you click the Style button's drop-down arrow, only the styles in
use in the current template displays in the list of styles. If you wish to
see a list of all of the styles that are available to you in Word, you can
do so in one of two different ways. Hold SHIFT and click the style
drop-down arrow. This displays all styles available. There are
approximately 125 styles to choose from, excluding any user-defined
styles. It's also possible to list all styles by selecting All Styles from
the Style dialog box's List control in the bottom left corner.
Practice: View All Styles
- Create a new blank document.
- Click the Style drop-down arrow. Notice how many styles are
available.
- Click with the mouse in the document to deselect the Style drop-down
list.
- Hold SHIFT and click the Style drop-down arrow again.
- More styles are available when you hold down the SHIFT key.
The same rules that apply to direct formatting of text apply to style
formatting of text. If you want to apply a text attribute to a single
word, you can click anywhere in the word and select a formatting option
such as bold, italics or underline — Word applies the selected format
to the entire word. Similarly, if you want to format multiple words you
must first select the multiple words. The same is true for applying
character styles. To apply a character style, you can click in the middle
of any word and select the character style to format the entire word. If
you want to change a group of words you must first select the text before
applying the character style.
Applying formatting to paragraphs is a little different. Just click
anywhere in a paragraph and apply direct formats such as dragging the
ruler to change indentation — since paragraph formats affect an
entire paragraph, you don't have to select the paragraph. If you want to
affect multiple paragraphs, you must first select the multiple paragraphs.
And, similar to applying text formatting and character styles, to apply a
paragraph style, click within the paragraph and apply the paragraph style.
Or, select multiple paragraphs to apply the same style to each of the
selected paragraphs.
|
|
CK
Note: As of Word 2002
(and later) if you attempt to apply a paragraph style to selected
text within a paragraph, you get a new character style with the same
name. The character formatting from the paragraph style is applied,
but not the paragraph formatting. A new hybrid character style
with the same name but with "char" appended is created. To
apply a paragraph style to a single paragraph, click within the
paragraph without selecting text. |
Practice: Apply Styles
- Type the following text into a new document.
Profitability
Report
Entire Firm
Individual Departments
Bankruptcy
Corporate
Health Care
Immigration
Trust and Estate
- Click anywhere within the first line, Profitability Report.
- Click the Style drop-down arrow and select Heading 1.
- Select the two paragraphs: Entire Firm and Individual Departments.
- Apply Heading 2 style to the selected text.
- Apply Heading 3 style to the department names.
There are several keyboard shortcuts that are useful in applying
styles:
| Keyboard Shortcut |
Style Name |
| CTRL+ALT+1 |
Heading 1 |
| CTRL+ALT+2 |
Heading 2 |
| CTRL+ALT+3 |
Heading 3 |
| CTRL+SHIFT+L |
List Bullet |
| CTRL+SHIFT+N |
Normal |
| CTRL+SHIFT+S |
Activates the Style Drop-Down List |
|
Tip The above shortcut keys are standard in
Word documents. You can also assign a shortcut key combination to
any other styles that you use regularly. This topic is covered in
the section
Assign a Keyboard Shortcut To a
Style. |
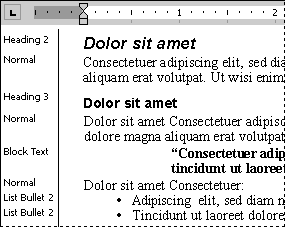
Display Paragraph Style Names in Draft (Normal) View
Sometimes it's useful to see what style has been applied to text within
a document. You can turn on Word's Style Area feature to see what
paragraph styles have been applied throughout the document. The Style Area
is a re-sizeable pane on the left side of the window that lists the
paragraph style applied to each paragraph. It is only available in Draft (Normal)
View.
Practice: Display Applied Paragraph Style Names
- From the View menu, choose Normal (Word 97-2003).
- From the Tools menu, choose Options and select the View tab.
- Locate the Style area width box.
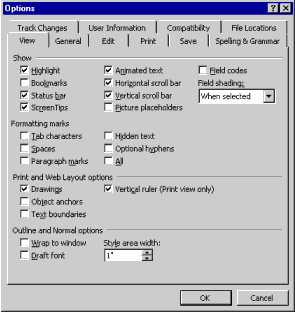
- Click the up spin box arrow until it's set to 1.0, or type 1.0 in
the box.
- Click OK to close the Options dialog box.
In Word 2007-2024 this is done under the Word Options > Advanced >
Display
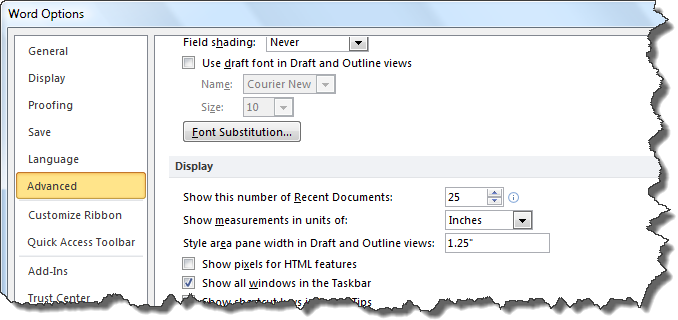
|
Tip To make the Style area width larger or
smaller without redisplaying the Options dialog box, click and drag
the line that separates the style name from the text of the
document. |
- From the Tools menu, choose Options, and select the View tab and set
the Style area width back to 0.
- Click OK.
(What you get. - CK
Note)
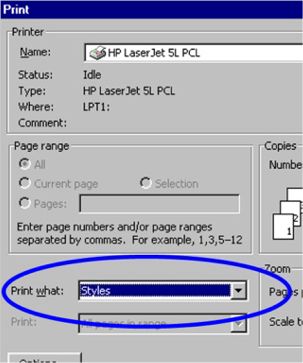
Printing a List of Styles and their Formatting (CK
Addition)
You can print a list of the styles in use in a document along with the
formatting that goes into that style by selecting "Styles" in the "Print What"
box on the Print Dialog Box instead of printing the document.
Let's say you just finished applying styles to a long agreement only to
find that you applied the Heading 2 style where you should have applied
the Heading 1 style. This can easily be remedied by using Word's Find and
Replace feature. Instead of searching for text, however, you can tell Word
to search and replace text formatted with a specific style.
Practice: Find and Replace Styles
- From the Edit menu, choose Replace. If you prefer keyboard
shortcuts, press CTRL+H.
- Click More on the Replace tab, if necessary, to display additional
options along the bottom portion of the dialog box. If a button says
Less, the window is already expanded.
- Delete any text, if necessary, that may appear in the Find what and
Replace with boxes.
- Click in the Find what box and click Format.
- Select Style.
- Select Heading 2 in the Find what style list and click OK.
- Click in the Replace with box and click Format.
- Select Style.
- Select Heading 1 and click OK. Note that while there is no text
within each edit box (Find and Replace), just below each box is a
message that Word will find and replace styles that are applied to text
within the document.
- Click Replace All, then click OK, and finally, click Close.
If you try to use the Find and Replace feature again, make sure to
click within each box (Find and Replace) and click No Formatting to reset
what Word is to search for.
Create, Modify and Locate Your Own Styles
Now that you understand what a style is and what it can do, it's time
to create some styles of your own. Not only can you create your own
styles, you can modify existing styles to achieve the result you need.
Create a New Style
The easiest way to create a new style is to format text with the
attributes that you want to apply to the style. It doesn't matter what you
type, only what type of paragraph and character formatting that you have
applied to the text. Formatting is the only thing that is applied when you
apply a style. Although you can create styles that have more advanced
attributes such as being followed by an entirely different style, the
following exercise shows you just how easy the process can be.
Practice: Create a Style
- Type your first name on a separate line in a document.
- Select your name and make the font Blue.
- Change the font size to 24-points.
- Apply Bold and Underline formatting to the text.
- Center the paragraph.
- From the Formatting toolbar, click in the Styles box (where the
style name Normal is usually displayed).
- Type your first name.
- Press ENTER. This step is important. If you do not press ENTER your
style is not created.
- Click the Style drop-down list. You should see your newly created
style.
- Test this by typing "This is a test" and applying the new
style.
You can use the Style dialog box to create or modify a style. Another
option for creating and modifying styles is shown in the following
exercise. You create a new style by typing text and formatting it, and
then from the Format menu, choose Style.
Practice: Create a Style Using The Style Dialog Box
- Type the following text:
Styles help users in law firms master Microsoft Word. (press
ENTER)
Everything in Word is based on a style.
- Select the text "Styles help users in law firms master Microsoft Word."
and the paragraph mark (
 )
that follows. )
that follows.
- Center the paragraph and apply a 14-point font.
- From the Format menu, choose Style.
- Click New.
- Type My Style as the Name.
- Click OK, and then click Apply.
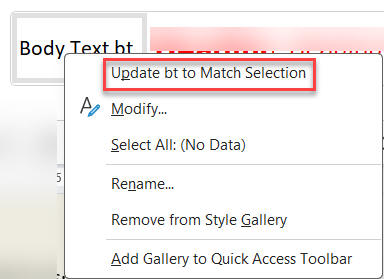
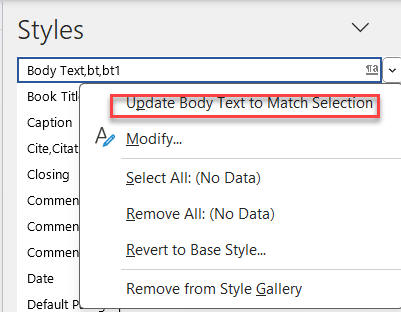
There are three ways to modify an existing style. One of these methods
is through the Styles Pane, a second is through the button on the Apply
Styles dialog. However, an easier method is by changing the
style by example: (1) Click in text in the style that has been formatted
the way you want (different from the style) and then right-clicking on
the style name in the Styles Pane or the [Quick] Styles Gallery. You can
select the choice to Update the style to match the selection.
 If this
you have not reformatted text in the style,
styles can be changed using the Modify Style dialog box.
Practice: Two Methods to Modifying a Style
- Add several paragraphs to the document from the previous exercise.
- Apply the style that you created to the new text.
- Select the text Styles help users in law firms master Microsoft
Word.
- From the Format menu, choose Style.
- Click Modify.
- Click Format, and then select Font.
- Change the font color to Blue and the font size to 20-points.
- Close the dialog box and apply the changes that you've made by
clicking Apply. Notice that all text formatted with My Style updates to
show the recent change.
- Select the text Microsoft Word.
- Change the font size to 36.
- Click on the style name in the white part of the Style toolbar
button (not the drop-down arrow) and press ENTER. It's important to
press ENTER and not move the mouse up or down the list of style names.
This tells Word that you are working with the current style where the
mouse is active. If this step was done correctly, the following Modify
Style dialog box should display.

- You can either choose to Update the style to reflect recent changes,
or Reapply the formatting of the style to the selection (go back to the
original style format). Choose Update the style to reflect recent
changes? And click OK.
|
|
CK
Note: This behavior
changed in Word 2002. You can modify Word to go back to the previous
behavior. Check the box for "Prompt to update style" on the Edit tab
of Tools > Options.
Do
not ever check the box to automatically update the style from
now on. This is the equivalent of giving a chain saw to an
8-year-old without supervision. Nothing good will come of it! |
|
Tip A keyboard shortcut is to press
CTRL+SHIFT+S (to put you in the style drop down box), and then press
ENTER, which will bring up the above dialog. |
The style is changed to reflect the formatting of the selected text and
this method is referred to as modifying by example. Notice how all
paragraphs with the style are updated automatically.
 |
Warning We do not recommend selecting the
Automatically update the style box especially in a legal environment
where multiple users work on the same document. This feature will
update the style each time you make a formatting change in a
paragraph that has a style attached. | Using the
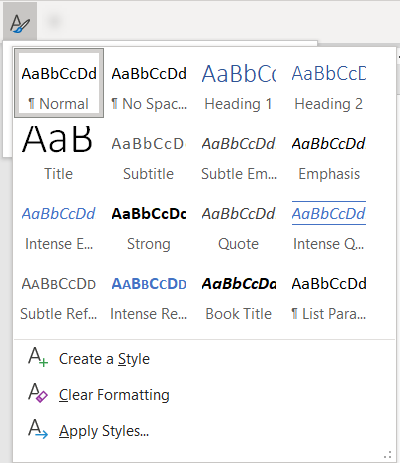
[Quick] Styles Gallery (Word
2007-2024 (365) - unfinished -
Quick Styles Gallery - Word 2013
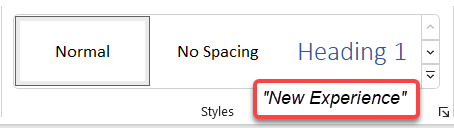
[Quick] Styles Gallery - Word 2021-2024 New Experience
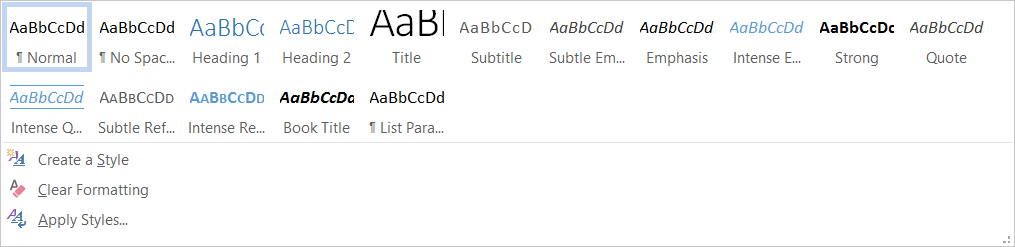
[Quick] Styles Gallery - Word 2013 - Expanded
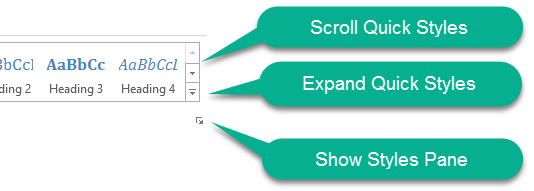
Buttons on Right End of [Quick] Styles Gallery

Scrolled [Quick] Styles Gallery showing second row of
styles (custom)
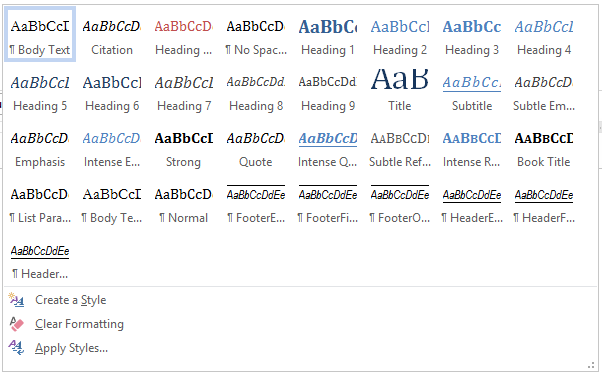
Quick Styles Gallery - Expanded (custom)
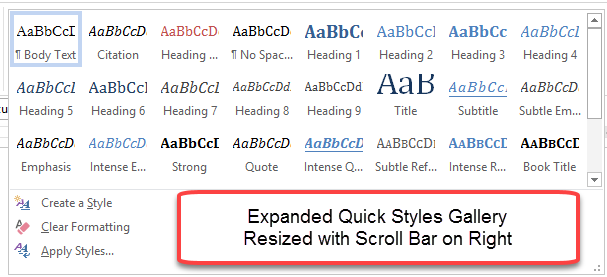
Quick Styles Gallery - Expanded and Resized - custom

Quick Styles Gallery - custom
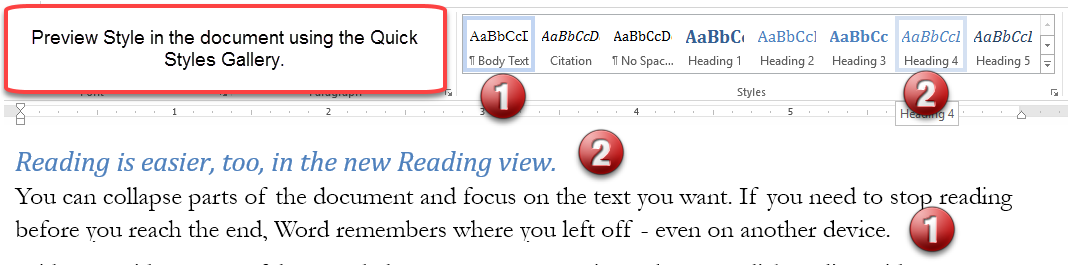
Use of the [Quick] Styles Gallery to Preview in a
Document shown above
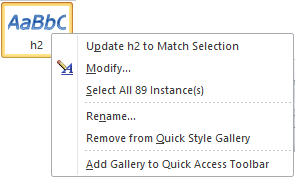
Right-Click on a Style in the [Quick] Styles Gallery for
this Drop-Down menu
(above images are for future work on Styles Gallery)
If your Styles Gallery looks like the one below (or you would like
it to look like the one below) see more in troubleshooting
below.

A lot of confusion can come from not knowing where styles are stored
and when they are available in documents. When new documents are created,
the new documents are based on templates. The styles contained within
these templates are copied to the new document. Changes made to styles in
the document as well as new styles that you create only affect that one
new document by default. If you want the change or addition to be added to
the template, you have to tell Word to do so.
If a style is modified or created in a template, those changes are
propogated to new documents based on the template, but do not change
existing documents based on the template, absent something updating
them.
Practice: Add it to the Template
- From the Format menu, choose Style.
- Click Modify.
- Check the option to Add to template. This makes the style available
for any new documents that are based on that template.
The style is added to the currently open template.
|
|
Note Documents that have previously been
created based on this template are not affected when you add a style
to the template. To automatically update style changes in templates
and files previously created based on the same template, from the
Tools menu, choose Templates and Add-Ins. Select the option to
Automatically update document styles and click OK. We recommend not
checking this option. It can produce unexpected results, especially
in legal documents that must conform to court
rules.
CK
Note:
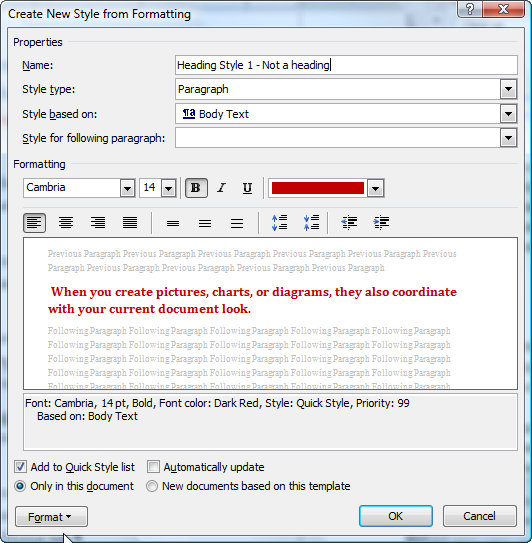
Automating Styles: For an excellent tutorial on styles and a methodical look at basing styles
on one another and reasons not to base styles on normal, see John McGhie's
Create
a Template Part 2. For a sample demonstrating styles based on
one another, use of the style for following paragraph feature, and the
AutoTextList field restricted by styles download the Letterhead
Textboxes and Styles Tutorial by Charles Kenyon.
----- What it means to have a style (style B) based on another
style (style A) is that changes in Style A, the underlying style,
will be reflected in styles based on it (style B) unless the new
style has deviated from Style A on the feature being changed.
Style A Arial Bold 20 pt Indented .5 inches
Style B Arial Bold 18 pt Indented .5 inches based on Style A
Change Style A to Comic Sans font and Style B will also be Comic
Sans
Change Style A to 24 pt - no change to Style B
Change Style A to not Bold - Style B also becomes not bold See
How Styles in Microsoft Word Cascade by Shauna Kelly, MVP
If when you try to create a new style you get an error message that
it is based on too many styles, see
here.
|
When you save a style to the template, if that template is the normal
template, the style will be available in all new documents.
Space-Before and Space-After Settings in
Paragraph Styles
Paragraph formatting allows for space before and space after a
paragraph. This is normally expressed in points. An exact number can be
typed into either of these boxes. If you press the up and down arrows,
the number will be either 0 or a multiple of 6.
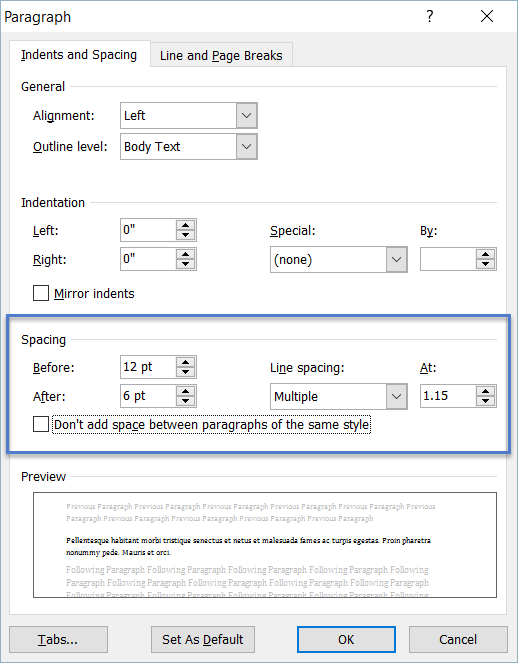
The dialog shown above is available in Modify Style for Word 2002 and
higher. It is also the one shown for a the direct Paragraph formatting
in Word 2003 and higher.
Spacing Before is the space that applies when the paragraph follows
another paragraph. The Spacing After is space that is given before the
next paragraph.
Note that the numbers here are different. B=12, A=6. If two
paragraphs with these settings follow one another, the spacing, by
default will be 12 (the higher of the two numbers). It will not, since
Word 2002, be 18, the total of the two. Here are some screen shots
showing how these settings act.
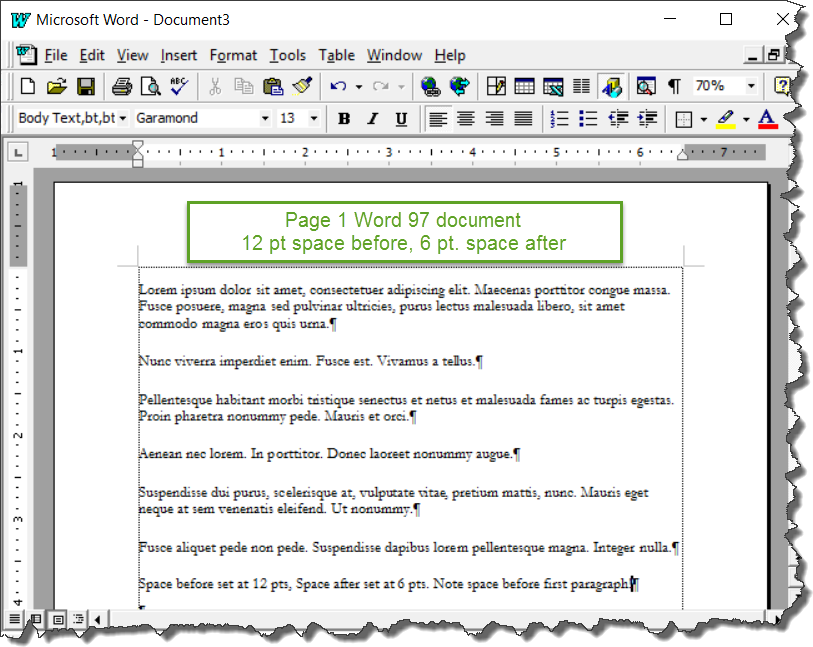
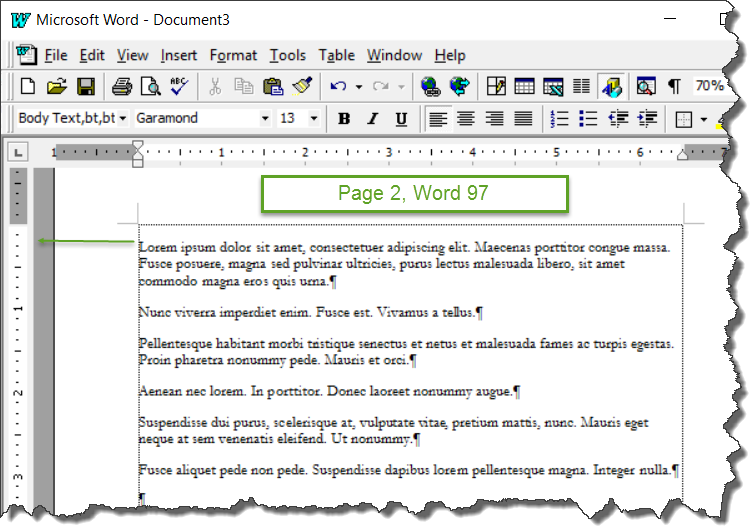
The above screen shots from Word 97 show that the space before and
space after settings are added together. Compare them with the following
screen shots of the same text with the same formatting from Word 2010.
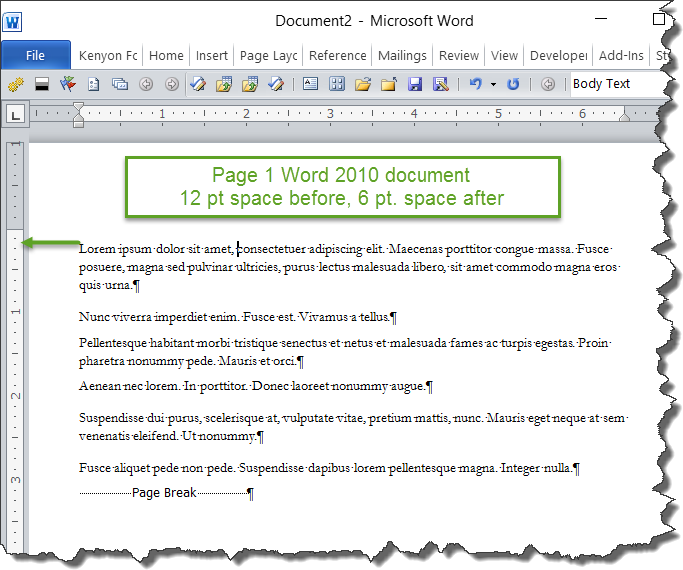
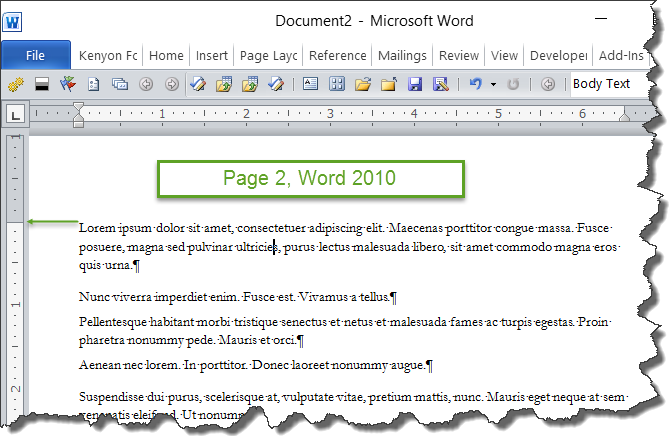
Beginning with Word 2002 the higher of the space-after setting for
the preceding paragraph and the space-after setting for the current
paragraph were used. They are not added together.
Note that at beginning with Word 2007, the space-before setting for
paragraphs starting on pages other than the first page of a section is
ignored.
If the checkbox for "Don't add space between paragraphs of the same
style" is checked then despite the before and after settings there will
be no extra space between paragraphs of the same style. It will be like
both settings were "0." Although this is a style definition setting, it
can be applied to selected paragraphs without changing the style
beginning with Word 2007.
Assign a Keyboard Shortcut To a Style
If you create your own styles, it's especially helpful to assign a
keyboard shortcut to them to make them easier to apply. You can also apply
shortcuts to commonly used styles.
Practice: Assign a Keyboard Shortcut to The Quotation Style
| Ribbon Versions of Word |
- In a blank line on your document, change the left indent to 1", and
the right- indent to 5".
- Enter some text.
- Click somewhere within the indented paragraph. You will create a
quote style that is very common in most law firms.
- If it is not already open, open the
Styles Pane.
- In the the Styles Pane click on the button at the
bottom left to create a new style.
- In the Name box, type Quotation
(Quote style already exists).
- As Style type, select Paragraph.
- Based on should be your default style, likely Normal.
 -
The
Style for Following Paragraph will be set to be your new style by
default. In the example, I changed that to Normal.
- Decide
whether or not to have it appear in the
[Quick] Styles Gallery.
- Decide whether or not to have the style be
available in all new documents based on the template being used for the
current document. (likely Normal.dotm)
- Click OK to close the
dialog. This creates the style in your document. (If you clicked the
option have it for new documents, when you close the document, you
should be asked if you want to save changes to the template.
Answer "yes" to that query.)
- To assign a
keyboard shortcut in the Ribbon
versions of Word you need to access the Customize the Ribbon Dialog and
then, in that dialog, click on the button to Customize the keyboard. That brings up a
separated dialog. You can do this by right-clicking in any Ribbon tab
and choosing "Customize the Ribbon." Alternatively, you can choose this under File > Options (Windows versions) or Word > Preferences (Mac
versions). Once you click on the button to Customize the Keyboard,
separate dialog appears:
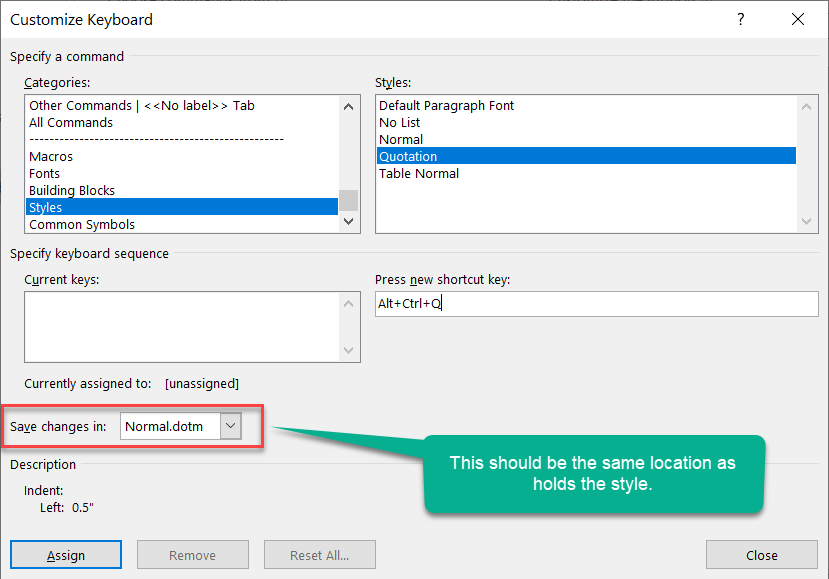 -
Click in the box for the new shortcut key and press the key combination
that you want to use. If it is already assigned to something it will show
that it is currently assigned and to what it is assigned. If it is
already assigned, decide if you want to overwrite that. If not, delete
the shortcut you entered and choose a different one.
- Click on Assign,
then Close.
- Click on OK in the Customize the Ribbon menu.
- Now if
you want to apply the Quotation Style to text, you can press Ctrl+Alt+Q
and that style will be applied.
- Even if you do not assign a keyboard
shortcut, the style will be available in the Styles Pane and optionally
the [Quick] Styles Gallery.
See also:
Assigning Keyboard Shortcuts in Microsoft Word 2007-2024 (365)
| Menu versions of Word (Word 97-2003) |
- In a blank line on your document, change the left indent to 1", and
the right- indent to 5".
- Enter some text.
- Click somewhere within the indented paragraph. You will create a
quotation style that is very common in most law firms.
- From the Format menu, choose Style.
- Click New.
- In the Name box, type Quotation (Quote style may already exist
depending on Word version).
- As Style type, select Paragraph.
- Based on should be Normal (your default style).
- Click Shortcut Key.
- In the Press new shortcut key box, press the keyboard combination
Ctrl+Alt+Q. (Always make sure that the shortcut key you have chosen is not in
use somewhere else.)
- Click Assign.
- Click OK, and then click Close.
- Click anywhere within your document and press Ctrl+Alt+Q. The Quotation
paragraph style is applied.
Now you can apply the Quote style using Ctrl+Alt+Q or through the Style
menu.
|
|
Note If you want to add a shortcut key to a
style that already exists, Word lets you do that, too. From the
Format menu, choose Style. Select the style to which you want to add
a shortcut key and click Modify. Click Shortcut Key and follow the
steps from the above exercise. |
Following a Style with Another Style
If you apply a paragraph format in Word, it keeps that format until
another one is chosen. This can be true for styles as well.
When you create a new style, the default setting is to follow a
paragraph in that style with another paragraph in the same style. If you use the "My
Style" style (created in the previous exercise), Word continues to use
that style each time you begin a new paragraph until another style is
chosen.
Sometimes the style is only needed for one paragraph at a time
(for example a heading style). To cut down the amount of times the user
needs to use the Style menu; you can choose which style should be used in
the paragraph that follows the new style. For example, after the Heading
style, when you press ENTER, you can have the next paragraph automatically
formatted with a Body Text style.
Many paragraph styles in Word are set to be followed by the Normal
style by default. For instance, the TOC 1, TOC 2, etc. styles are set to
be followed by the Normal style by default.
Practice: Follow a Style With Another Style
(Save Users Time & Frustration)
Ribbon versions - Word 2007 and later
- If the style is in the [Quick] Styles Gallery, right-click on it there
and choose Modify.
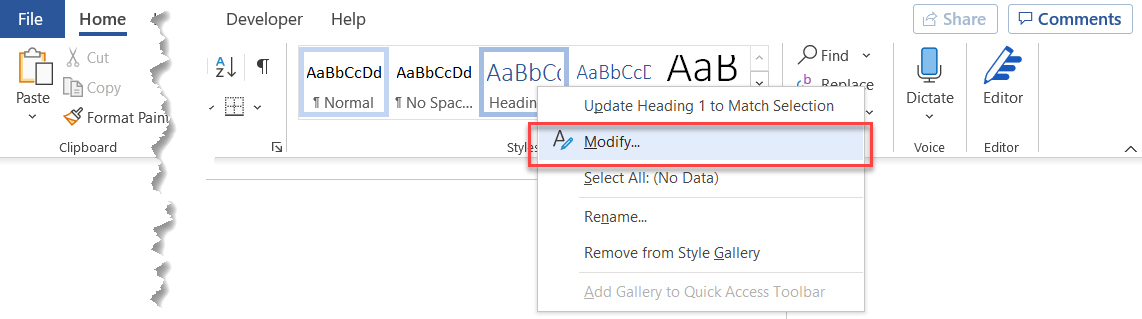 -
Select Normal style from the Style for following paragraph list.
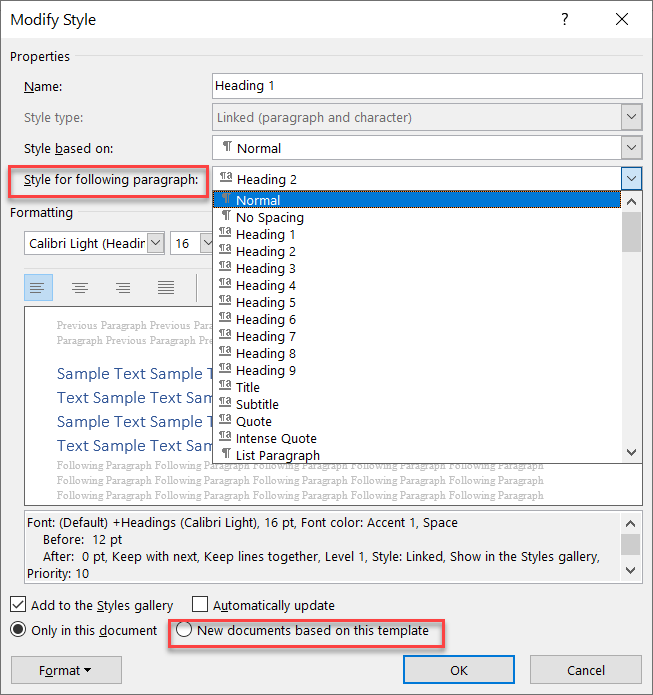 -
If you want the change to be there in new documents, click the radio
button for New document based on this template.
- Click OK.
Menu versions (Word 2003 and earlier)
- From the Format menu, choose Style.
- Select Quote style from the list of styles.
- Click Modify.
- Select Normal style from the Style for following paragraph list.
- Click OK, and then click Close.
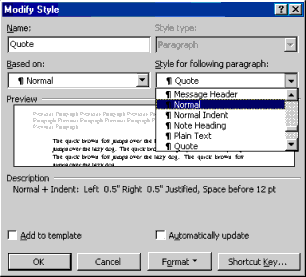
Notice the style of the new paragraph automatically changes to the
Normal style when you press enter after a paragraph formatted with the
"quote" style.
CK Note: See Letterhead
Textboxes and Styles Tutorial for an example of styles that use
the "Style for following paragraph" feature to good effect.
See also:
Using the Organizer to Copy Styles
You can copy styles between documents or templates. One of the most
effective ways to do this is through the Organizer. The Organizer is a
tool built into Word that allows you to quickly copy Styles and Macros. If you have a group of styles that you want to have
work together, in ribbon versions of Word, look into
[Quick] Style Sets. The Organizer can
copy not only Paragraph and Character Styles but also List Styles and
Table Styles. These last two are not discussed in this chapter.
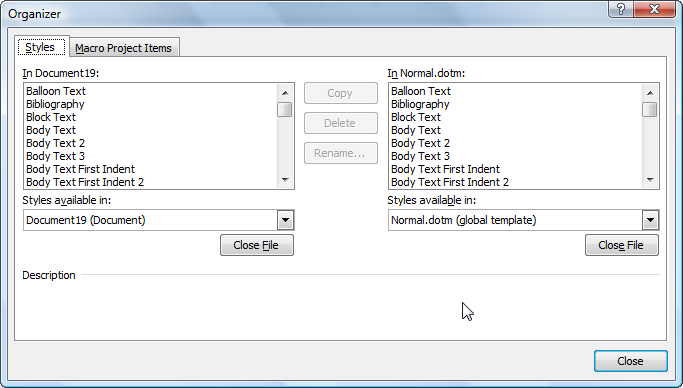 Word 2010 (2007, 2013-24 the same) Styles Organizer.
No Toolbars or AutoText tabs.
To get to the organizer in Word
2007 and later you can click on the Import/Export button on the
Manage Styles Dialog Box (bottom left corner). (It is also available on
the Templates and Add-Ins dialog on the
Developer Tab.)
Word for the Mac According to Word guru
John Korchok, one way to access the Organizer on versions of Word for
the Mac is:
- Choose Tools>Templates and Add-ins.
- Click on the Organizer button.
This is similar to the methods in Windows.
In Word 2003 and earlier, you access the Organizer in one of two ways: from
the Format menu, choose Style and click Organizer; or from the Tools menu,
choose Templates and Add-Ins and click Organizer.
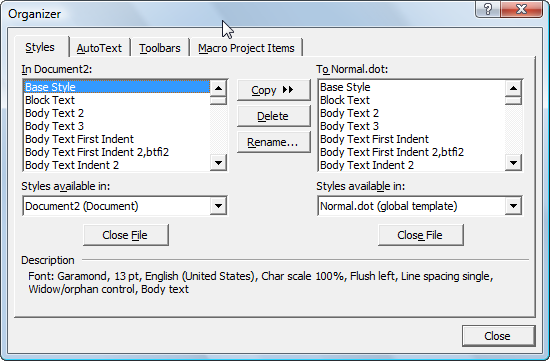
Word 97 Styles Organizer (above) - note AutoText and Toolbars tabs!
Word 2003 is the same.
See also:
Styles Copier
Application by Paul Edstein, MVP (macropod),
document or
Add-In - a variation of the Styles Organizer
"I developed STYLE COPIER to improve on what I
consider to be two disadvantages of the Word Organizer: One, that the
Organizer always defaults its Open dialog boxes (“Styles available in”) to
all Word templates in the Templates folder, and Two, that it can copy
multiple styles but to only one document at a time.
STYLE COPIER’s Open dialog boxes default to any
Word document type, including but not limited to templates, and default only
to either the current folder or the last folder accessed using the utility."
For a video on using
the Organizer, see
How to Copy Word Word Styles Between Documents (The Bit They Don't Tell You)
by Jason Morrell (Although he says you can't copy from another document,
that is incorrect.)
See also:
How to Copy Styles
from One Document to Another video by Robin Lindbeck
You can also use
the Organizer to delete Styles from your document, its template, or even
another document or template.
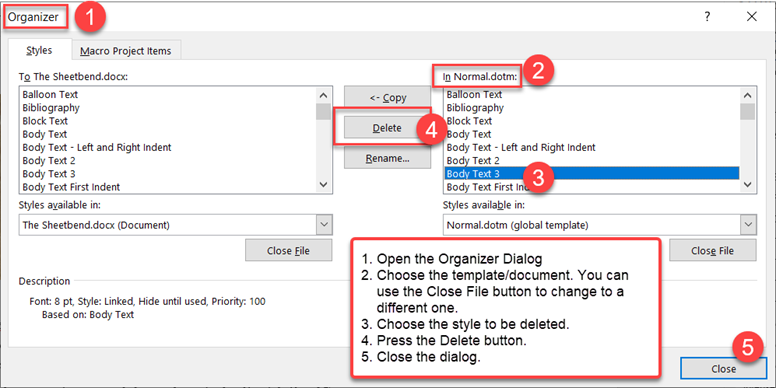
You can use the Close File button on the Organizer
dialog to switch to a different document or template. When you close one
file, the button switches to an Open button and lets you choose.
If you make changes to an underlying template,
including the
Normal.dotm template, when you close Word, you likely will be asked
if you want to save changes to the template. Answer "yes" in response to
the question.
You cannot really delete any of the Built-In
styles from a document or template. Even if it looks like you do,
Word will rebuild it. You can use the
Manage Styles dialog to hide styles or change the order of display.
Restrict Formatting to Certain Styles In Ribbon versions of Word you can remove styles from the
[Quick] Styles Gallery on the Home
tab.
Practice: Copy Styles Using the Organizer
- From the Tools menu, choose Templates and Add-Ins.
- Click Organizer.
- Select the appropriate tab for items that you want to copy. For
example, to copy styles from one document or template to another select
the Styles tab.
- To copy styles from your current document to the Normal.dot template
which makes the style available each time you start Word, select the
styles and click Copy.
- Click Close.
|
|
Note If a style name that you are copying
already exists, you are asked if you want to replace
it.
Charles
Kenyon Note
I have found it best when copying styles using the organizer to copy
them three times if any of the styles is based on other styles or is
followed by other styles. I'm not sure why this makes a
difference, but I've found that clicking on that copy button three
times means that these relationships continue in the destination
template. I know that when I copy them only once, they do not and
the styles are then followed by the Normal style. See this
Knowledge
Base article
Q113106
for possible explanation.
Since at least Word 2003, the Organizer will not necessarily show
all of the styles in the Normal template. See
below in troubleshooting.
You can use a global template as a stylesheet if you include a
macro to copy the styles into your document. See A Global StyleSheet in Microsoft Word?
for an example of such a macro.
See also
An
Alternative to the Styles Organizer by Paul Edstein (macropod),
MVP. It lets you copy to multiple documents at once.
If you have defined one of the built-in styles just the way you
want but would prefer to be using a style of your own for this
purpose, copying the formatting to your new style without it being
based on the existing style. If you are comfortable editing vba
macros, you can record a macro that calls up the style modification
dialog and goes through each of the various format dialogs and
closes them. Then create your new style and edit the macro to refect
the name of your new style rather than the one in which it was
recorded. Run the macro and the new style should match your original
one.
|
Another way to copy styles is to simply copy and paste paragraphs
created in another document containing the style you're looking for. All
paragraph formatting is contained in the paragraph mark at the end of
each paragraph. Make sure when you select and copy the paragraph text
that you include the paragraph marker at the end of the selected
paragraph. Then, when you paste it into the target document, the
selected paragraph formatting and paragraph style are added to your
target document.
|
|
CK
Note:
If you use Autotext
or other Building Blocks
entries contained in a global template that
are formatted using a style in that global template, those styles will
be copied as well. (For this to work with paragraph styles a paragraph
marker in the style must be a part of the autotext entry.) This
method of copying styles by copying text with a paragraph marker
only works if the style being copied in is not already "in use"
in the document receiving the copied text. Otherwise the style
definition in the target document governs. |
If you do this
and the style already exists in the new receiving document, the existing
style in the receiving document is used, not modified. This makes it
much easier to maintain consistency within a document but can lead to
real headaches if the people who formatted the documents weren't
conscious of style use.
In this case if you wanted to copy the
style you would want to use the Organizer. Character styles are
also copied this way. This gets complex. Sorry about that. Despite this
complexity, use of styles for formatting is the key to using Word.
If you have text in two different documents that you want to
combine, and you want to retain the formatting from each rather than
having one style system format the text from both documents, you can.
You can use Paste Special ... as Word Document
Object. This creates a
document within a document, with its own set of styles.
Otherwise, if you just want to copy the text, you will need to make some changes to one of the documents before you
do the insertion, though. The thing is that if your styles have
different names in the two documents, then the formatting will be
retained when the text is inserted. So, you'll want to rename the
styles in one (or both) of your documents.
None of the built-in styles can be renamed, though.
If you have problems with copying formatted text from one document
to another, take a look at the troubleshooting
section below. If you have other formatting problems such as
columns, orientation, headers and footers
or page numbering to worry about, take a look at Sections,
Header and Footers.
Reorganizing a Document Using Heading
Styles and the Navigation Pane or Outline View
These pages give directions on how you can use Heading Styles in
outlining and in reorganizing your documents. Again, the styles are
the key.
If you apply heading styles, you can use the Vertical Scroll Bar in
Word to move quickly to different parts of your document. To do this,
click and drag the box (elevator car) in the vertical scrollbar and move
it up or down. You will see tip-text next to it that tells you which
section (heading) of your document you are in.
Navigating with the Navigation Pane (Document Map)
See Using the
Navigation Pane in Word 2010 and Later. If you apply heading styles, you can use the Navigation Pane
(formerly Document Map) feature in
Word to quickly move to different parts of your document. This is a real
time-saver when working with long documents.
See warning below!
Practice: Navigate Using Document Map - but SEE
WARNING FIRST
- Create or open a long document formatted with heading styles.
- Click the Document Map button on the Standard toolbar, or from the
View menu, choose Document Map.
- Click on a heading within the document map to move to that section
in the document.
- Click on a different heading in the document map to move to
another section within the document.
To turn off the document map feature, click the Document Map button
on the Standard toolbar. The button works as a toggle.
|
|
CK
Note -
Warning:
"While it's true that Microsoft put a Document Map
feature into Word 97, the whole thing was so badly botched that
only a masochist would live with it. Here's the primary
problem: Word 97 takes it upon itself to scan every document as
it's opened and assign heading levels to all the paragraphs.
By doing so, any heading levels you've assigned are thrown
away--and there's nothing you can do about it.
"So here's a word of advice. If you use DocMap
on a particular Word document, don't let anybody with Word 97
(or any earlier version of Word, for that matter) open the
document. As soon as your carefully DocMapped Word 2000
document is opened in Word 97, all the level formatting will be
irretrievably lost."
Quote from Woody Leonard Teaches Office 2000.
The Document Map feature causes problems in all
versions of Word up through Word 2007. Do not use it to
reorganize your document.
In
Word 2010 it was replaced with the Navigation Pane which works
nicely.
The Navigation Pane displays three levels by default. This
default setting cannot be changed but ou can change it within a
particular document for that Word session.
The simplest way to get something to show up in the Navigation
Pane is to use Word's built-in Heading Styles.
Why use Microsoft Word’s built-in heading styles? by Shauna
Kelly
In the screenshot shown above, the paragraph has been assigned
the Outline level of one. This screenshot also demonstrates that
collapsing outline levels in the document is separate from
collapsing them in the Navigation Pane. (Collapsing in the
document body applies only in Word 2013 and later.)
|
Some Special Uses of Built-In Character Styles
This discusses the Emphasis, Strong,
Hyperlink and
FollowedHyperlink styles. These are set in Style Sets
is versions of Word that use them (Word 2007 and later). It also
looks at the use of a character style to skip Spelling and Grammar
checking on certain words.
I use the Emphasis and Strong styles instead of
direct formatting using Italics and Bold. This is so that if I
change the document style set, they will follow the set rather than
the direct formatting. This is a good reason to use styles, period,
but tends to be neglected where these two attributes are involved.
Greg Maxey created a macro that changes the buttons on the home
tab to apply these styles. You can find a discussion of that
here.
Two others that are a part of [Quick] Style Sets are the
Hyperlink and
FollowedHyperlink styles. These are hidden until used
by default. The Hyperlink style is used by Word whenever a hyperlink
is inserted. The FollowedHyperlink style is used whenever a
hyperlink within the document is followed. Since these are styles,
they can be modified and you can change the visibility of them using
the Manage Styles dialog.
You can mark text to be proofed in a particular language or to not check spelling or grammar in specific
words using a character style that changes the language attribute.
For more on this see
Using Styles for Proofing Language Settings,
Creating "No proofing" styles in Microsoft Word - No Spell Check
character style and Code paragraph style - keep text from being
checked for spelling or grammar , and
Mastering the Spelling Checker.
Four features that depend on use of styles in a document
are:
AutoText lists are an implementation of the AutoTextList field. They
are found on the Header and Footer Toolbar and the AutoText toolbar.
They are also in a number of the templates supplied with Word. A
non-apparent factor with their use is that they are sensitive to styles.
AutoText entries are organized by Word according to the style in which
they were created. Often only AutoText entries saved in a particular
style will show up in an AutoText list field. When such a list is
missing entries, the first thing to check is whether the insertion point
(cursor) is in the expected style.
See the Web Resources
page for more on AutoText. See
How
to add pop-up lists to any Word document for more on the AutoTextList
field.
See the Letterhead
Textboxes and Styles Tutorial for an example using some of
Microsoft's default AutoText entries for letters.
For many purposes, the AutoTextList field has bee supplanted by the
Building Blocks Gallery Content Control in Word 2007 and later. That
control does not function in the Mac versions, though; the AutoTextList
field does.
You can download a
document which demonstrates both and compares them from
my Downloads page.
Tables of Contents
Tables of Contents are very easily generated in Word if you use
heading styles to mark your headings. See
Complex Documents
for more on how to do this. Creating a Table of Contents without
using styles is a painful experience, although it can be done.
Likewise, Tables of Figures or Illustrations build on particular
styles being used in captions.
The StyleRef field is used primarily in headers and footers. If
you have something like a directory or a phone book document you can
have dynamic content in your header/footer like:
Allen - Brady
With a properly set up letterhead template the StyleRef field can
be used to put information about the addressee and subject into the
continuation page header automatically. See the Letterhead
Textboxes and Styles Tutorial for a detailed example. See
my StyleRef Field
Tutorial,
Using Fields in Microsoft Word,
and
Useful StyleRef Field Tricks for
more on the StyleRef field. The StyleRef field is especially handy
because it updates instantly without any user intervention.
Notes:
| There are potential problems if the document will be opened
on systems with
different Language settings. Built-in Style names change with
the language version of Word. |
| The StyleRef field will not reference text in headers or footers.
It will not reference text in TextBoxes but will reference text in
Frames. |
The Vertical Scroll bar
This was covered earlier.
Word 2007-2019 (365) Styles terminology
(jargon)
A style is a collection of formatting characteristics, such as
font name, size and color; and paragraph alignment and spacing. As
before, you can have paragraph, character, and
linked styles.
A [Quick] Style Set is a collection of styles that are designed to
work well together. The built-in [Quick] Style Sets in Word 2007-2019 are
called Distinctive, Elegant, Fancy, etc. You can also create your own
style sets. If you read something about Word style sets, it is talking
about [Quick] style sets. Here I use the full name of [Quick] Style Sets to
emphasize the linkage between the [Quick] Styles Gallery and the [Quick]
Style Sets. (Stylistic Sets are
something completely different from [Quick] Style Sets.)
Here are two screenshots of the same [Quick] Styles with different
[Quick] Style Sets applied:

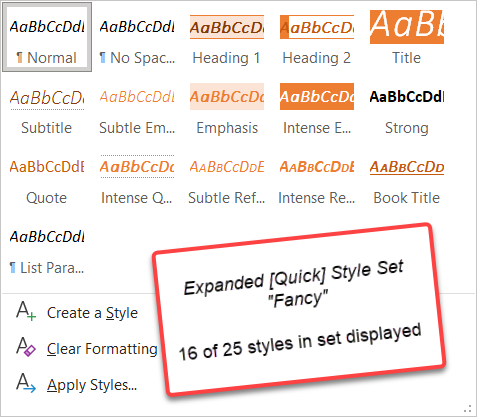
The [Quick] Style Sets distributed with Word have the following
twenty-five
styles in them:
| Normal |
| Headings 1-9 (Only 1 & 2 shown in gallery until one above is
used) |
| TOC Heading (but not TOC 1-9) (not shown until used) |
| Title and Subtitle |
| Quote and Intense Quote |
| List Paragraph |
| Strong (character) |
| Emphasis, Intense Emphasis and Subtle Emphasis (character) |
| Intense Reference and Subtle Reference (character) |
| Book Title (character) |
| Caption (paragraph) |
| No Spacing (paragraph) |
Each style in a [Quick] Style Set is called a [Quick] Style. Most styles
are not part of a [Quick] style set and are not in the [Quick] Styles
Gallery. All that distinguishes
a [Quick] style is its placement in the [Quick] Styles Gallery. On my
computer, the maximum number of styles that can be displayed in the
[Quick] Styles Gallery appears to be 35. They can be included in a
[Quick] Style Set, though, even though not displayed in the Gallery. I
have done up to 63.
[Quick] Style Sets
are templates that have certain styles in the [Quick] Styles
Gallery. While the standard set has the 25 styles listed above, a custom
set can have more or less.
If you are going to be using a custom set with a Table of Contents, I
would recommend including the TOC 1 - TOC 9 styles.
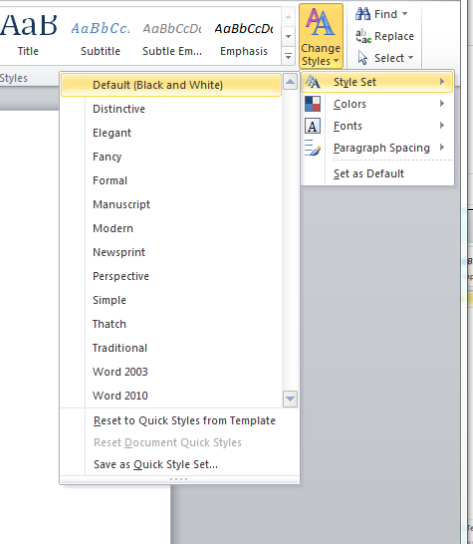
The Home tab of the ribbon includes the Styles group. The
Styles group includes the [Quick] Styles Gallery and the Change Styles
button (Word 2007-2010) which gives access to the [Quick] style sets. When you choose a
[Quick] style set for your document, the
individual styles in the [Quick] Style Set appear in the [Quick] Style
Gallery. The styles in the document that are part of a [Quick] Style Set
will change when you change sets to the definitions in the new set.
In Word 2013 and later the [Quick] Styles are found on the Design tab in
their own gallery.
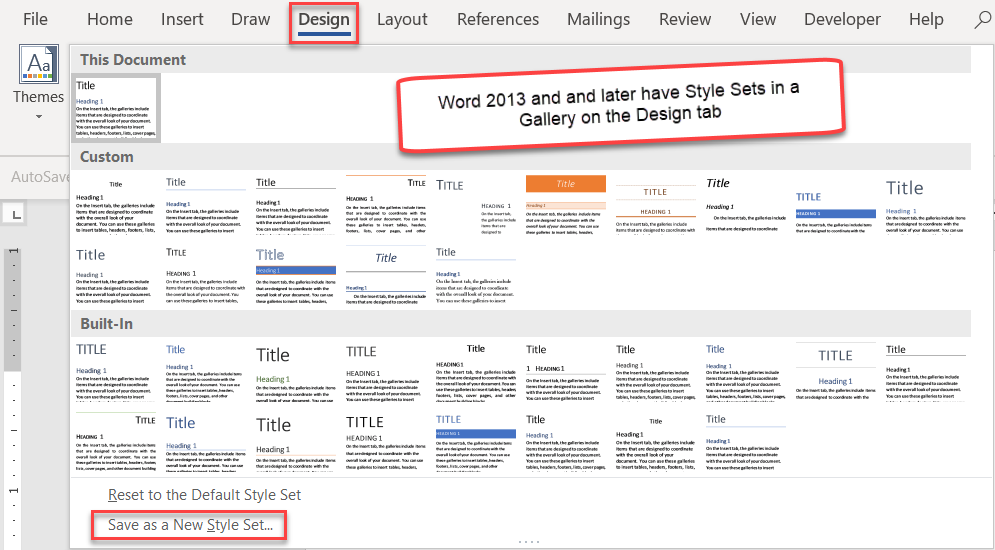
To see another representation of the [Quick] styles shown in the
[Quick]
Style Gallery - one that will be familiar to someone who has worked with
Word 2003 and earlier - click on the sloping arrow in the lower right
corner of the Styles group (or press Ctrl+Alt+Shift+S (Mac
Cmd+Opt+Shift+S)) to open the
Styles Task Pane. This also shows styles that are not [Quick] Styles,
though. That is, you get access to all styles (or can if your options
are set to display not only recommended styles or styles in use, but all
styles).

[Quick] Style Sets can only be used in Word 2007 and later. If you are
trying to save your own [Quick] Style Set, make sure that the styles you
want to include are set to display in the [Quick] Style Gallery. [Quick]
Style Sets are .dotx files and can be directly edited. When
creating/editing them, you want to have only the styles you want
to import as part of that style set set to display in the [Quick] Styles
Gallery.
Location: The English-language built-in [Quick]
style sets for Word 2007 should be in the folder:
C:\Program Files (x86)\Microsoft Office\Office12\1033\QuickStyles
("1033" refers to US English). Word 2010: Office14
instead of Office12. Word 2013: Office15 instead of
Office12. Office 16+:
C:\Program Files (x86)\Microsoft Office\root\Office16\1033\QuickStyles
If you are running 64 bit Office on 64 bit Windows (or 32 bit
Office on 32 bit Windows), the program files folder will be
called Program Files (without "(x86)").Your
custom [Quick] style sets (those you create) are located in
a completely different location. That folder will depend on your
operating system.
These custom files are in the following
folders:
Windows XP Location:
c:\Documents and Settings\{your username}\Application
Data\Microsoft\QuickStyles\
Windows Vista & 7-11 Location:
c:\Users\{your username}\AppData\Roaming\Microsoft\QuickStyles\
These are hidden system folders. If your Start menu has a search function
searching for %APPDATA% will lead you toward the correct folder.
In all
versions of Word, cascading styles are available, though, where various
styles are based upon one another and a change to one style can ripple
through others. See
How
styles in Microsoft Word cascade. This can give you some of the
advantages of Style Sets in any version, but are a bit more work.
Quick Style Sets only include Styles in the [Quick] Styles Gallery
That means they do not include List styles nor Table Styles. See
What are the limitations on [Quick] Style Sets?
You can look at what the styles in a [Quick] Style Set look like in
a document by holding your mouse pointer over that style set in the
gallery.
I have prepared a macro-free document that shows the twenty-five
styles that come in distributed [Quick] Style Sets that you can
download from
my downloads page.
This is a companion to the
Themes Sampler document
mentioned below.
See A Global
Stylesheet in Microsoft Word? for another way to import groups of
styles. A [Quick] Style Set with nine levels of outline numbering is
distributed as a part of the
Outline Heading Styles Global Stylesheet
package on my downloads page. The "Black & White (Numbered)" set
that comes with recent versions of Word does bring in numbering.
This was prepared using the following procedures:
Creating a [Quick] Style Set
- You can have any styles you want in a custom [Quick] Style
Set.
- I recommend including all
twenty-five
of the ones that come with the distributed [Quick] Style Sets.
If you do not want any of these in your custom [Quick] Styles
set, remove them from the [Quick] Styles Gallery.
- The distributed [Quick] Style Sets use Theme
Fonts and
Colors. Unless you have a reason to not use these, I
recommend using them.
- You can modify the built-in styles to be in your custom
[Quick] Style Set. You can add additional styles to your
custom set by including them in the [Quick] Styles Gallery. (How
to control the [Quick] Styles gallery on the Home tab in Word
by Shauna Kelly)
See also
[Quick] Style Sets and Themes in Microsoft Word - my shorter article
on the Microsoft website
Macro to show styles that are in the [Quick] Style Set for the current
document.
Here is a short macro that will create a new document that shows all
of the [Quick] Styles in the current document.
Stylistic Sets are OpenType font characteristics or features.
These have nothing to do with [Quick]
Style Sets but rather have to do with font charcacteristics.
Their only relationship to Styles is that they can be part of
styles, like other font characteristics.
As far as I know, they can
only be used with OpenType fonts. They are accessed in Word in the
Font dialog on the Advanced tab or through the Text Effects drop
down..
Selecting All Text Formatted in a Particular
Style (and only that text)
The [Quick] Styles Gallery and Styles Pane also allows the user to select the text
formatted with a particular style, and only text formatted with that
style. You do this by right-clicking on the Style name in the [Quick]
Style Gallery or the Styles Pane as shown below.
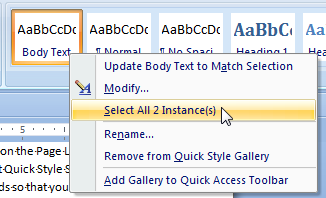
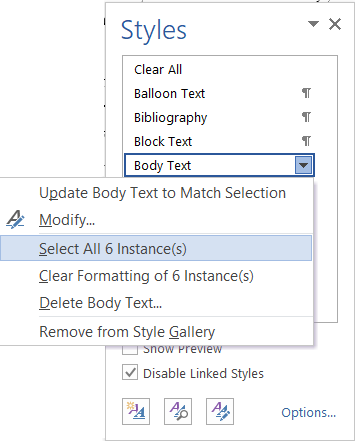
Once you have done this all instances of text in that style (and not
instances of text in a style based on that style or other styles) will
be selected in your document. A word count of the selection will appear
in the status bar.
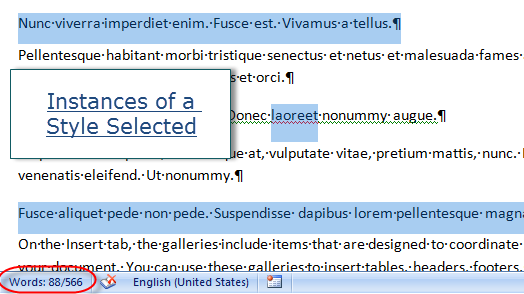
The screenshot shows the result for a linked
style which has been used as both a paragraph and a character style.
I generally keep linked
styles disabled.
Using Office Themes in Microsoft Word
Office Themes were introduced in Word 2007 to allow dramatic changes
in the appearance of documents that work together. "One way
to think about themes is as design elements that affect the
aesthetic appearance of a document. Styles, on the other hand, are
geared more to the formatting of text and paragraphs." Herb
Tyson, MVP,
Microsoft Word 2010 Bible
p. 157
Recent versions of Office also have Display Themes
like Colorful and Dark; that is a different feature. Here we are
discussing themes that make changes in your document, itself.
The Office Themes being described here change the printed
document, not just the way it looks on the screen.
Word Online does not seem to use Office or Word Themes, exactly, but does
seem to use something close to [Quick] Style Sets without Theme
connections.
See
[Quick] Style Sets and Themes in Microsoft Word - my shorter
article on the Microsoft website that deals with the Designer menu
in Word Online.
Themes are in a Gallery that lets you preview the effect of a
Theme change on text.
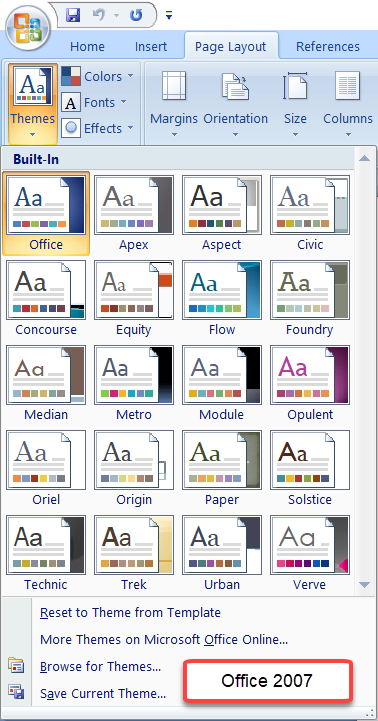
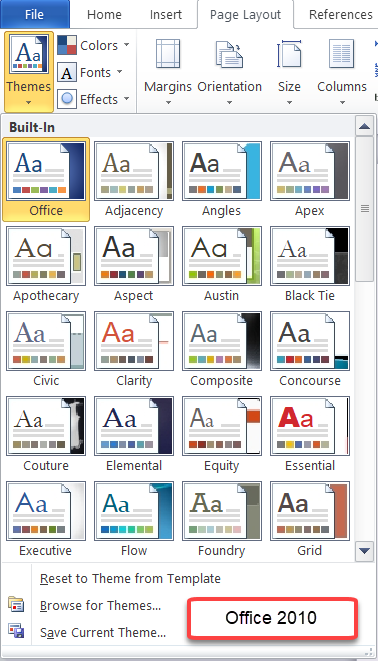
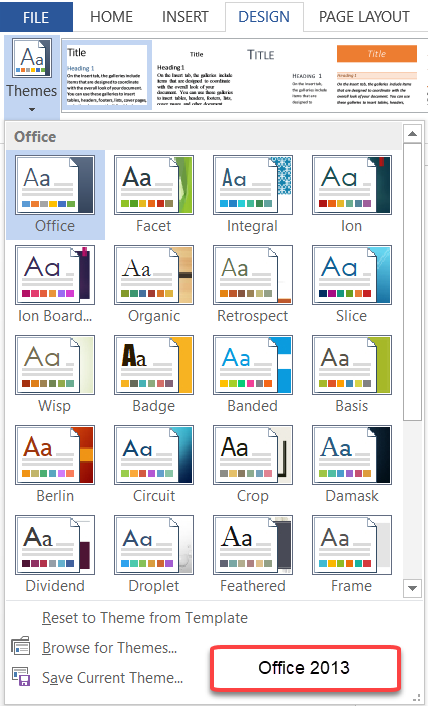
I believe the themes offered with Office 2016-2019 are
identical to those from Office 2013. MVP Doug Robbins has posted the
theme sets shown above on his OneDrive.
Word Themes - OneDrive . (That appears to be inactive, here is
my mirror)
I am unsure when Microsoft added some more, but here
are the Themes found in Office 2021.

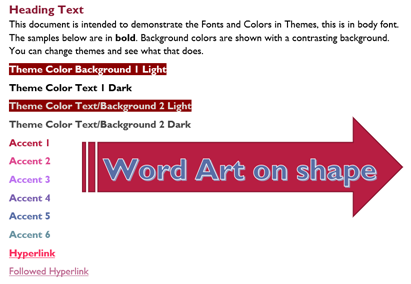
Every Office Theme defines
two
fonts — one for headings and one for body text. They
can be the same font (used everywhere) or two different
fonts. . . In addition, [Quick] Style Galleries
for text and WordArt use
these same Theme fonts .
All of the styles in the
[Quick] Style
Sets distributed with Word use the Theme fonts and often the
Theme colors and
effects.
Themes also
incorporate Theme Effects. As far as I can tell, these
are primarily about Shapes. Unlike Theme Fonts, and Theme
Colors, you cannot create your own.
You can use the
Themes Sampler document to explore them, though.
By default, custom Themes are stored in:
C:\Users\%UserName%\AppData\Roaming\Microsoft\Templates\Document
Themes
C:\Users\%UserName%\AppData\Roaming\Microsoft\Templates\LiveContent\Managed\Document
Themes (old location)
If your user Templates are
stored elsewhere, the Custom Themes will be in a Document Themes
folder in the
User
Templates Folder.
Suzanne Barnhill shed light on the
subject in a
post in a forum:
"The font for many styles in Word (unless you change it
to a specific font) is defined as being either the Body
font or the Heading font. This is determined by the
theme. If, instead of assigning a specific font to a
style, you choose Body or Heading, then if you apply a
different theme that uses different Body and Heading
fonts, your styles will change automatically. You still
define the font size and other properties (Bold, Italic)
in the paragraph style, but the font itself can be
variable. If you want only specific fonts for the styles
(and this would especially be true in a template that
used more than two fonts), then you can define them in
the template styles; they would then not change if you
applied a different
theme (though some other elements, such as colors,
might).
"You can see how this works (with Live Preview) by
selecting a document that has both headings and body
text in it and then hovering over the various theme font
sets" ...
In Word, the main component of Themes other than the two Theme fonts is
Theme colors. I have observed that the first four colors
Text/Background seem to be the same in all of the Themes distributed
by Microsoft.
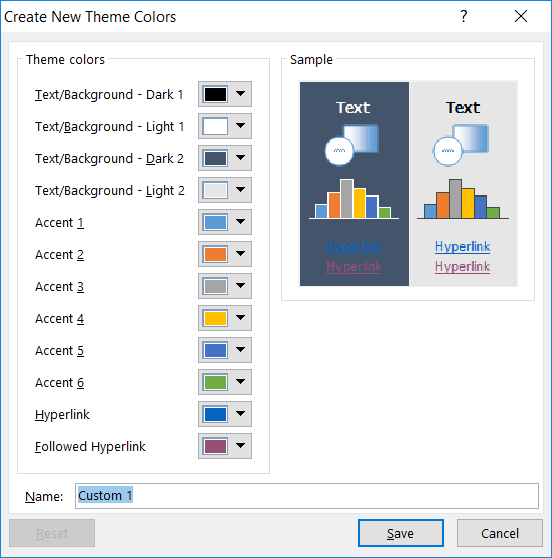
Here are the Word 2013 [Quick] Style Sets with three different
Themes applied:
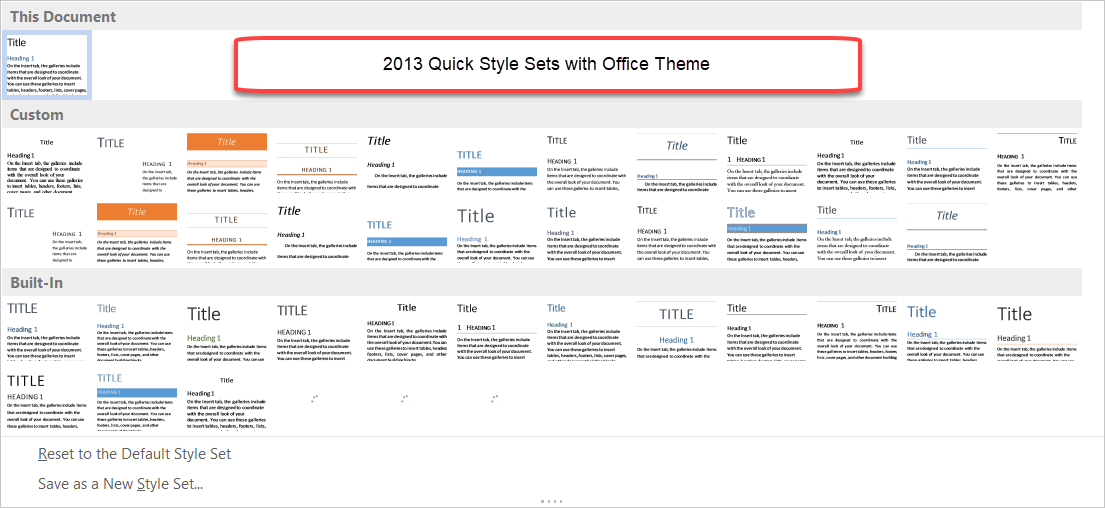

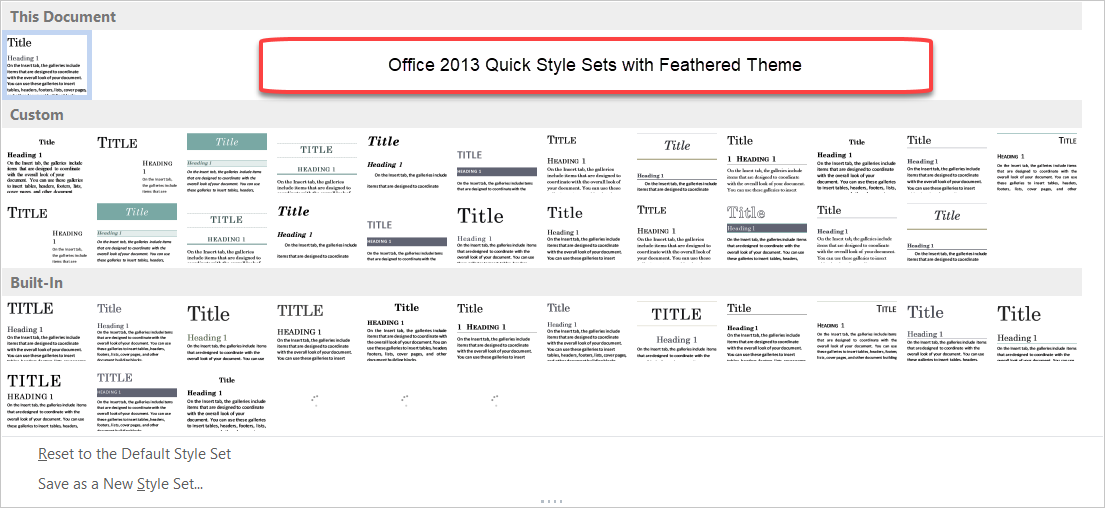
You can set your own Theme Colors. On the Design Tab, under Colors,
choose Customize Colors to get the following dialog:
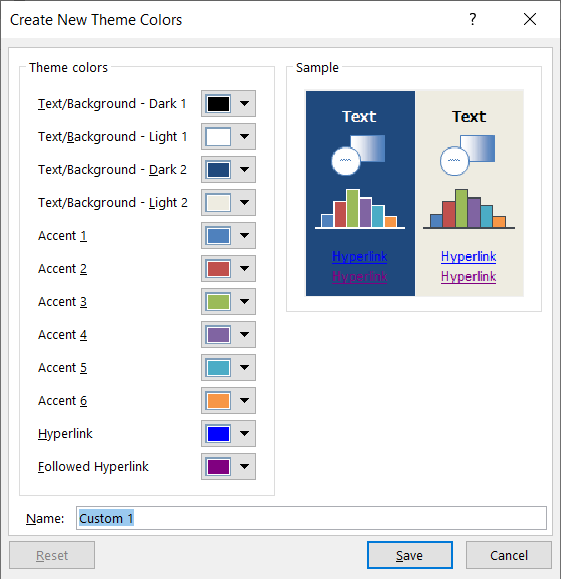
That dialog changes the color palette you see when trying to
change any color in the document. You can change the ten colors in
the first row. The five rows beneath are gradations or alterations
to the ten colors in the top row. The bottom Standard Colors are not
changed by the Theme.
My
Theme Sampler can be used to show these changes when you
mouse-over a Theme. I recommend keeping the first four
(Text/Background) colors the same across Themes.
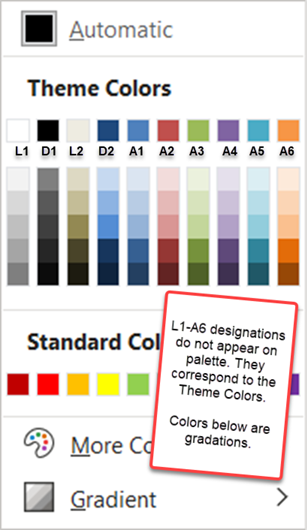
I've noticed that modern WordArt gallery offerings have a
combination of Theme and Standard Colors so the WordArt may change
when you change the Theme. The WordArt generally uses Theme fonts
and may get its fonts from the paragraph Style in which it is
created. Classic WordArt used a small varietly of Fonts including
Times New Roman, Arial Black, and Impact.
I have created a document that uses all of the theme colors,
shows the Color palette, and has
a shape to demonstrate any theme effects, and shows the Heading+ and
Body+ fonts applied. You can download it
here.
Troubleshooting Styles — Issues To Watch Out For
While styles are an integral part of using Word in a law firm or any
environment, there are a few things that cause users difficulty. This
doesn't mean that you should not create your own styles; you just need
to know how to solve some common problems and understand how you can
avoid them in the future.
A style has changed unexpectedly
| Check to see if automatic updating is turned on for the style. With
automatic updating, a style is updated automatically when you make
additional changes to the style, meaning that every paragraph in your
document assigned to that style will change automatically. To turn off
this feature, click the Format menu, and choose Style. Select the style
in the Styles box, and then click Modify. If the Automatically update
check box is selected, clear it.
|
| Your style may have been based on another style that has changed.
Changes to a base style affect other styles in the document that are
based on it. For example, if you change the font in Normal to the Arial
font, Word changes the font for the styles used in footnotes, headers,
footers, page numbers, and other text. If you don't want a certain style
to change when you change the base style, make certain your style is not
based on another style. On the Format menu, click Style. In the Styles
box, click the style you want to modify, click Modify, and then click
(no style) in the Based on box. See
How styles in Microsoft Word cascade by Shauna Kelly. |
CK Note: See also
Word
is always making changes I don't expect. How can I get more control over
my formatting? by Suzanne S. Barnhill, MVP, and Dave Rado, MVP. and
Formatting applied to one paragraph affects entire document by
Suzanne S. Barnhill, MVP
In Ribbon versions of Word the XML for Automatically
Update Styles is found in word\settings.xml file of
<w:linkStyles/>
(Thank you Doug Robbins, MVP, for the
XML information.)
|
|
|
Warning When you base a style on No Style, you
will need to set the Language because the default will be No
Proofing.
Charles Kenyon note: I recommend
that you not base any styles on normal and that you change the
built-in styles so that they are not based on normal. This is
particularly true for any styles that are involved in paragraph
numbering. (But, I have been told by someone whose
opinion I respect that my reluctance to use the normal style is
based on an urban myth.)
|
If you change the styles in a template and then reopen a document based
on that template, styles in the current document may be updated, based on
their new definitions in the template. If you don't want the styles in
documents based on a particular template to update when you open the
documents, click Templates and Add-Ins on the Tools menu, and then clear
the Automatically update document styles check box.
Charles Kenyon note: I recommend that
you keep the Automatically update styles check box unchecked. Especially
if you will be sharing your documents with others, leaving it checked
can result in truly bizarre formatting and make your documents ugly or
even unusable. This is true even if you are using a custom template and
not normal.dot because...
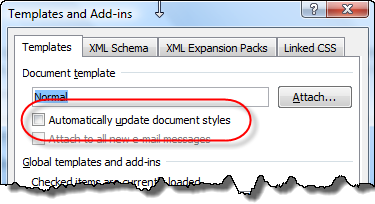
if the template that contains the style definitions is missing or
damaged, styles in the current document use the style definitions from the
Normal template.
Applying a style turns off bold, italic, or underlining
Sometimes when you apply a style that has specific formatting
attributes to text already formatted this way, the reverse formatting may
occur. For example, when you apply a style that contains bold formatting
to a paragraph that contains some bold text, the bold text may lose its
bold formatting. This problem will not occur if you apply character
formatting— either through a character style or direct formatting — after
you apply a paragraph style. Apply the style first, and then select the
words to have other formatting and apply the formatting directly.
|
Tip To make sure that no direct formatting has
been applied to the text, first select the text completely and then
press Ctrl+Q followed by Ctrl+Spacebar. This removes manually applied formatting
(including, unfortunately, character styles). Now
when a style is applied, there is no reversing situation to
occur. |
Paragraphs with the same style applied look different.
Often a style will be applied within a document, and later, specific
text in the document is selected and additional formatting is
applied-without updating the style. This is called direct formatting.
While direct formatting may be your intention, if you share documents with
others, it can be confusing because text formatted differently can have
the same style name.
To remove direct formatting and character-style formatting, select the paragraph, including the
paragraph mark, and then press Ctrl+Spacebar to remove character
formatting and CTRL+Q to remove paragraph formatting.
Practice: Remove Direct Formatting & Return the Style to the
Original Definition
- Apply a style such as Heading 1 to text.
- Apply formatting such as Bold, Italic, and Underline to this text.
- In the same document, apply the same style to different text and
note that the text displays the same style name but appears with
different formatting.
- Select the Heading 1 text that has the directly applied character
formatting applied in step 2.
- Press Ctrl+Spacebar to remove the directly applied character
formatting, including character styles.
- Indent and center the text so that paragraph formatting is now
directly applied on top of the style.
- Press Ctrl+Q to remove the directly applied paragraph formatting.
Both paragraphs should now look the same.-
|
CK
Note:
The following is not in the original chapter. |
Copying text formatted with a style from
one document to another.
First, think about using Paste Special... As Word Document Object. This
may do what you want without your having to do a lot of work to otherwise
understand how your styles are working. If it doesn't, read on...
When you copy text formatted in one style to a different document,
different things will happen depending on whether that style is already in
use in the original document. If the style is based on a different style,
it will also matter whether or not that style is in use. The basic rule is
that if the style is in use in both documents, the formatting of the style
in the target document governs. If the style is not "in use"
then the formatting of the style from the source document will be carried
into the target document and override a style definition for that (unused)
style in the target document. Direct formatting can also cause problems.
When you run into a problem with this, first undo and close your
documents. Make some copies and work with the copies. Try first clearing
any direct formatting in the source
document text. Then copy and paste again. If your problem still pops up,
then try using Edit => Paste Special... => Unformatted Text. You may
have to reapply the appropriate styles to the pasted text. The pasted text
will pick up the paragraph format of the paragraph into which it is being
pasted (even if the pasted text contains multiple paragraphs).
To see something of how styles interact when copied from one document
to another, take a look at the
IncludeText
Field Tutorial. It shows what happens with styles that are (1) in both
documents, (2) only in the source document but based on a style in the target
document, and (3) only in the source document and not based on any style in the
target document.
Changes I make to my default styles don't stick!
Changes to styles are changes to the normal template (normal.dot or
normal.dotm). When you tell Word you want a style modification to apply
to all new documents based on this template, you are making such a change.
A number of "Add-Ins" prevent these changes from sticking because of
poor programming. There are three methods to get around this.
- The most comprehensive is to talk to the people who wrote the
Add-In and get them to fix the problem they are causing you. See
Add-Ins in Microsoft Word - Helper
files that can cause problems.
- The next is to disable the Add-In.
Enable or disable add-ins in Office programs - Support - Office.com
- The third is to open the normal template directly - as a
document - make your changes, and save that. You do not want to
put any text, including headers or footers, in the normal template!
How to find or open the normal template in Word. See also
Numbering Style Changes Won't Stick!
Style Organizer Not Showing All of
the Styles in the Normal Template
Beginning at least with Word 2003 there is an apparent bug in which
the styles displayed for the normal template may be a short list. See
below:

Word 2003 Organizer (safe mode)
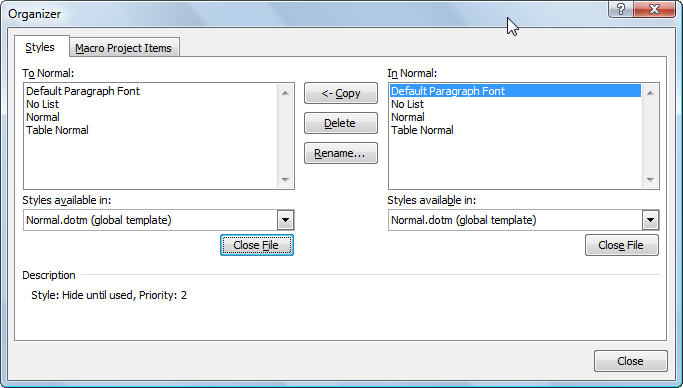
Word 2010 Styles Organizer - not showing all styles in
normal template
As of this writing (Nov 2013) I have no explanation for this. In Word
2010 (but not Word 2007) changing the styles viewed in the Styles Pane
expands the list of styles shown in the Organizer (but not necessarily
to showing all styles).
Note that it is rare to use the Organizer to
copy styles from the
normal template; I can't think of any reason to do this. You can copy
all of the styles from the normal template (or any other template) by
attaching the template to the current document with the option checked
to update styles from the template. You do not want to leave this option
checked, though!
Here is a macro that will do this.
Sub RefreshNormalStyles()
'
' RefreshNormalStyles Macro
' Written 2013-11-09 by Charles Kyle Kenyon
'
' Applies stored styles in normal template to current document.
'
' Note, this macro does not care where your user templates
' and normal template are stored.
' Word already knows that.
' This macro should work in any version of Word from
' Word 97 on but I've only tested it with Word 2010-2019.
'
Dim strNormal As String

			Dim strMyTemplate as String
strNormal = Application.NormalTemplate.FullName

			strMyTemplate = ActiveDocument.AttachedTemplate.FullName
With ActiveDocument
.UpdateStylesOnOpen = True
.AttachedTemplate = strNormal
.UpdateStylesOnOpen = False

			.AttachedTemplate = strMyTemplate
End With
End Sub
Word MVP Hans Vogelar proposed something much simpler:
Sub CopyNormalStyles()
' Copies styles from normal template
' 2019-12-01 Hans Vogelar
ActiveDocument.CopyStylesFromTemplate (NormalTemplate.FullName)
End Sub
Here is one that will copy all of the styles from a global template
other than the Normal template. See
A Global StyleSheet?
for more on this and a safer implementation.
Sub CopyAllStylesGlobal ()
' Copies all styles from Global Template
' 2020-01-12 Charles Kenyon
ActiveDocument.CopyStylesFromTemplate (ThisDocument.FullName)
End Sub
Here is a macro developed with Hans Vogelar that copies a named style
from the Normal template upon opening any document.
Sub AutoOpen() ' PLACE IN NORMAL TEMPLATE
'   Charles Kenyon and Hans Vogelar  23 March 2021
'   Optionally copies a particular style from the normal template into an existing document.
    Const strSTYLENAME As String = "MyStyle"    '  Replace "MyStyle" with the name of the Style you want to copy
    '
    Dim msgResponse As VbMsgBoxResult
    Dim blnChecked As Boolean
    '
    '   CHECK TO SEE WHETHER OR NOT THE DOCUMENT BEING OPENED HAS ALREADY BEEN UPDATED
    On Error Resume Next
    blnChecked = ActiveDocument.Variables("Checked")
    On Error GoTo Oops
    If Not blnChecked Then
        '
        '   ASK WHETHER USER WANTS TO ADD STYLE
        msgResponse = MsgBox(Prompt:="Do you want to copy the style " & strSTYLENAME & " to this document?", _
            Title:="Copy " & strSTYLENAME & " Style?", _
            Buttons:=vbYesNo)
        If msgResponse = vbYes Then
            Application.OrganizerCopy Source:=ThisDocument.FullName, _
                Destination:=ActiveDocument, _
                Name:=strSTYLENAME, _
                Object:=wdOrganizerObjectStyles
            ActiveDocument.Variables("Checked") = True
        End If
    End If
    Exit Sub
Oops:
    MsgBox Prompt:="The Style " & strSTYLENAME & " does not exist in this template.", Buttons:=vbCritical
End Sub
See
Installing Macros by Graham Mayor for instructions on what to do
with a macro listing if you don't know.
Automatically Update Styles - three controls/options with the same name spell
trouble!
Word has three places where you can control automatic updating of
styles. Each controls something a little different, two should be left
turned off as a rule, the third should always be turned on.
The first is in the style definition itself. The dialog box below is
from Word 97, but the checkbox is in the style modification / definition
dialog for all versions of Word thereafter. Leave it unchecked! (I do
keep it checked for TOC styles only.)
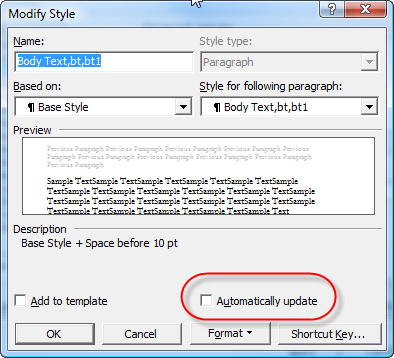
The second big one is in the document template dialog,
also called the Templates and Add-Ins dialog box. Directly under the
name of the attached template is a choice to automatically update
styles. Leave it unchecked! Again, basically unchanged through the
versions:
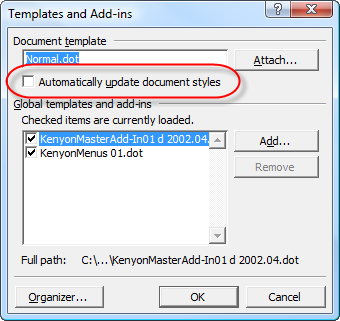
Finally, Word has had an option since Word 2002 to be
prompted for a style update. This was the default in earlier versions of
Word. Leave that one CHECKED.
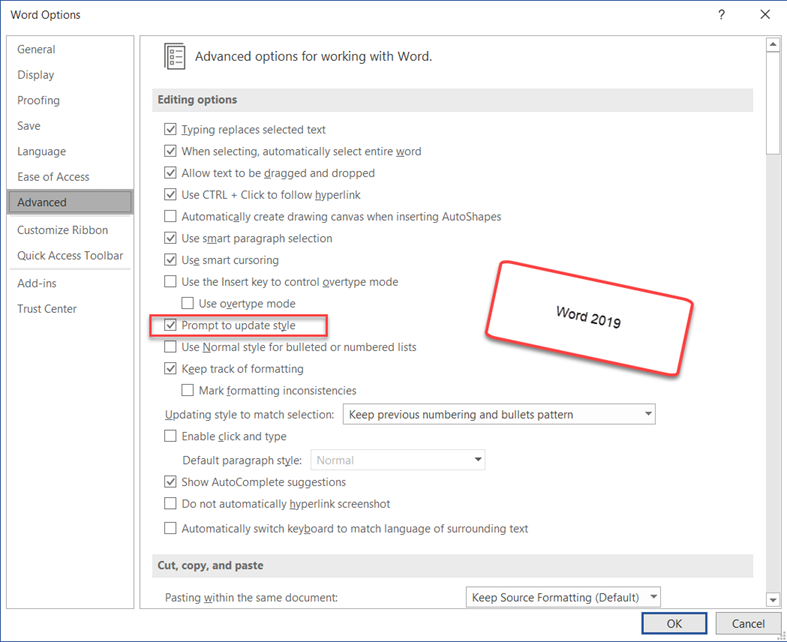
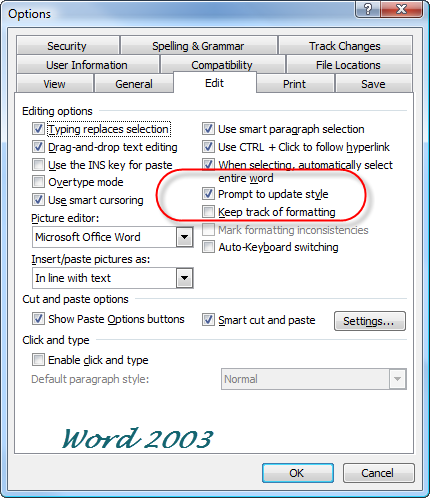
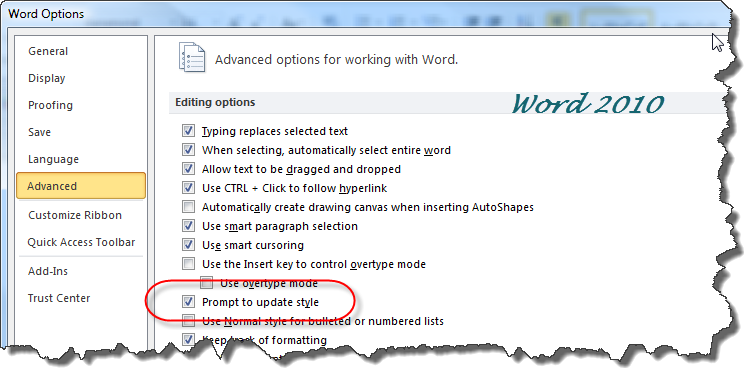
The maximum depth for style nesting is ten levels. That
is, you can have Style01 based on no style, Style02 based on Style01,
Style03, based on Style02, ... Style11 based on Style10. When the
insertion point is in Style11, if you try to create a new style, Word
assumes you want to base it on Style11 and gives you the following
message:
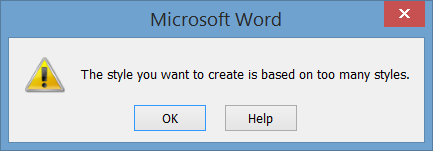
That is because, with Style11 you have already reached
the maximum level of nesting. If you get this message, try applying the
normal style to your text and then creating a new style. if you still
get the error message when starting from the normal style, you may have
document corruption.
Maximum Number of Style Definitions
The maximum number of styles in word 2007 and later is
4,079. See
Operating Parameter Limitations.
I have no idea why anyone would want so many.
Highlighting in Styles - Use Shading
Instead
Highlighting is apparently a "poor relation" to the
other formatting options. It does not show up on the font dialog and
cannot be a part of a Style. However, font shading can be part of a
Style. It is accessed through the borders and shading dialog.
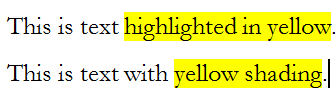 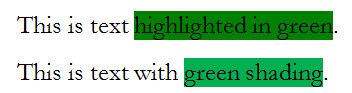
The colors on the palette will not necessarily be
identical. If need be, custom colors can be used.
In the Syle modification dialog, this is reached under
the Formatting button by selecting Borders.
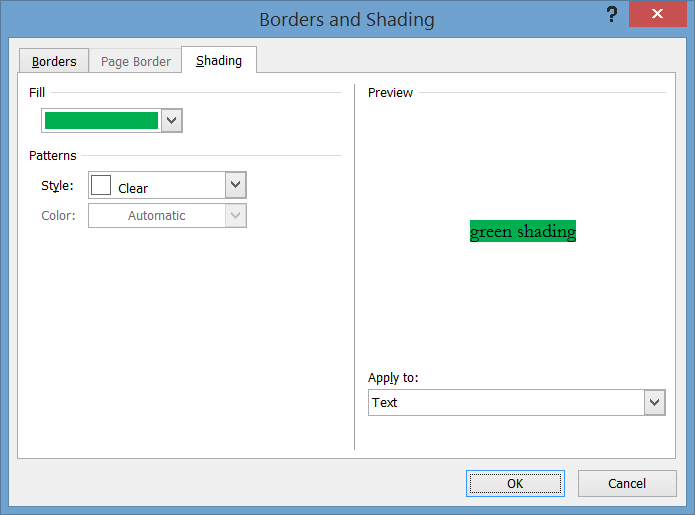
Note in the above dialog, Apply to: is set for text,
not paragraph.
In the Styles Pane if you have display of all styles
turned on, you will see something called the Default Paragraph Font
listed as a character style. This is not a style and you cannot directly
modify it!
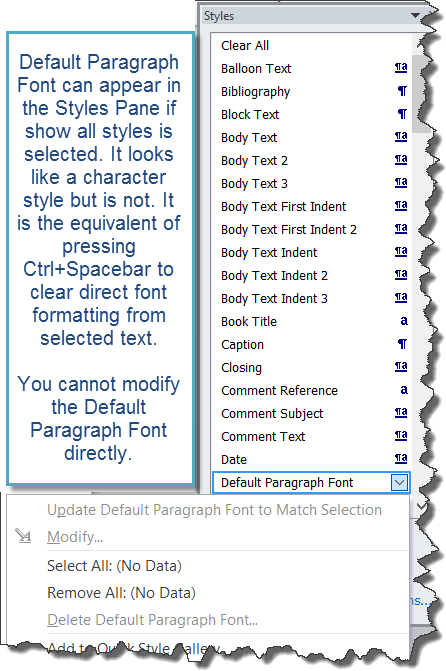
See
Default Paragraph Font Explained by Suzanne Barnhill for as much
sense as anyone has made of this. It is the font of the underlying
paragraph style. If you change the underlying paragraph style, you
change the Default Paragraph Font for paragraphs that use that style.
As is explained in the article, for most purposes
applying Default Paragraph Font is the same as pressing Ctrl+Spacebar to
clear direct formatting. It can be useful with the Replace dialog to
replace all instances of certain direct formatting without changing the
same formatting when it comes from the paragraph style.
It can also be useful when defining a new character
style where you do not want to define the font or typeface. The
Emphasis and Strong character styles are based on the Default
Paragraph Font. I regularly use a Citation character style which is
based on Emphasis and adds the proofing language characteristic to not
check spelling or grammar.
This can be modified through vba, but it is unwise to do
so. You can't return it to the underlying paragraph font once you do.
Hierarchy of Formatting and Styles
According to Jonathan Bailor's blog "Behind
the Curtain: Styles' Order of Operation", the hierarchy of
formatting and Styles in a Word document is as follows:
- document defaults are the base (found on the Set Defaults tab of the Manage
Styles dialog box) control unless one or more of the following are
applied
-
list style
unless one or more of the following are applied
- table style unless one of the following are applied
- paragraph style unless one or more of the following are applied
- character style unless direct formatting is applied
- direct formatting
These pile on top of one another. Remember that attributes like Bold,
Underlining, and Italics are toggle attributes. They can be turned on in
one level. Applying them in the next level toggles the setting. That
is: If the paragraph style applies bold formatting and a character style
or direct formatting applies bold, the result is not bold.
The Styles Pane predates the Ribbon in Word. It is also called the
Styles Task Pane.
Here is the basic Styles Task Pane as launched by the launcher in the
bottom-right corner of the Styles Gallery.
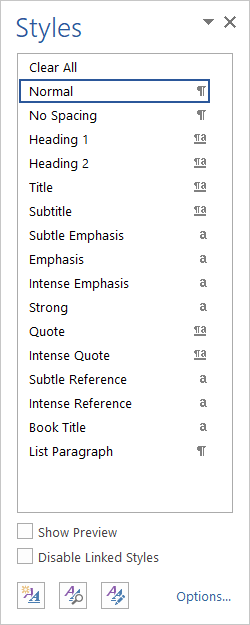
This is a floating task pane. It can be anchored by double-clicking
at the top by "Styles." It can be anchored left or right but is usually
on the right.
I recommend checking the box to Disable
Linked Styles.
It is showing recommended styles in the order recommended. You can
change this in the Options. Here is the anchored version with the
options set to show all styles in alphabetical order:
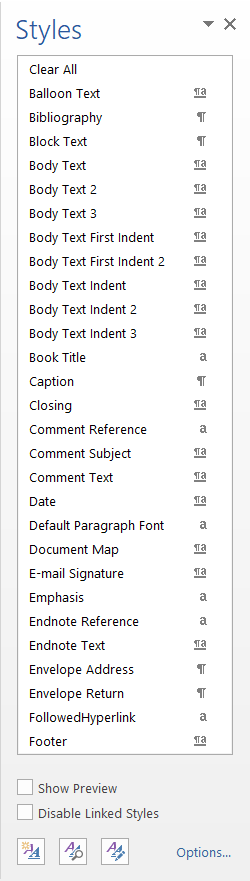
Both of the above screenshots do not show a preview of the style. You
can check the box to Show Preview. While sometimes helpful, this reduces
how many styles will be displayed without scrolling.
Note, changing options for the order and which styles are displayed
also applies to the Legacy Styles Drop-Down Menu. It does not effect the
Apply Styles Dialog.
Here is a four-column pane with preview turned on. You get extra
columns by resizing. The ability to do this was stripped from Word 2016.
Here is
my Feedback Portal suggestion for this. Feel free to comment and vote if you
think this would be useful to you.
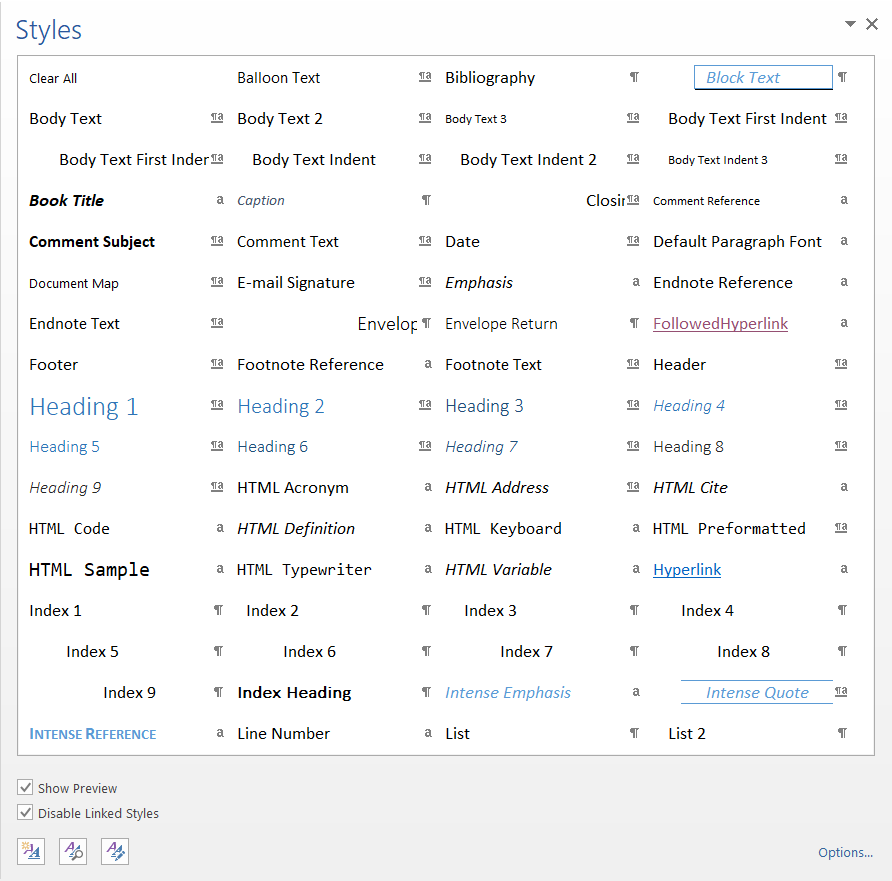
Here is a four-column pane with preview turned off.
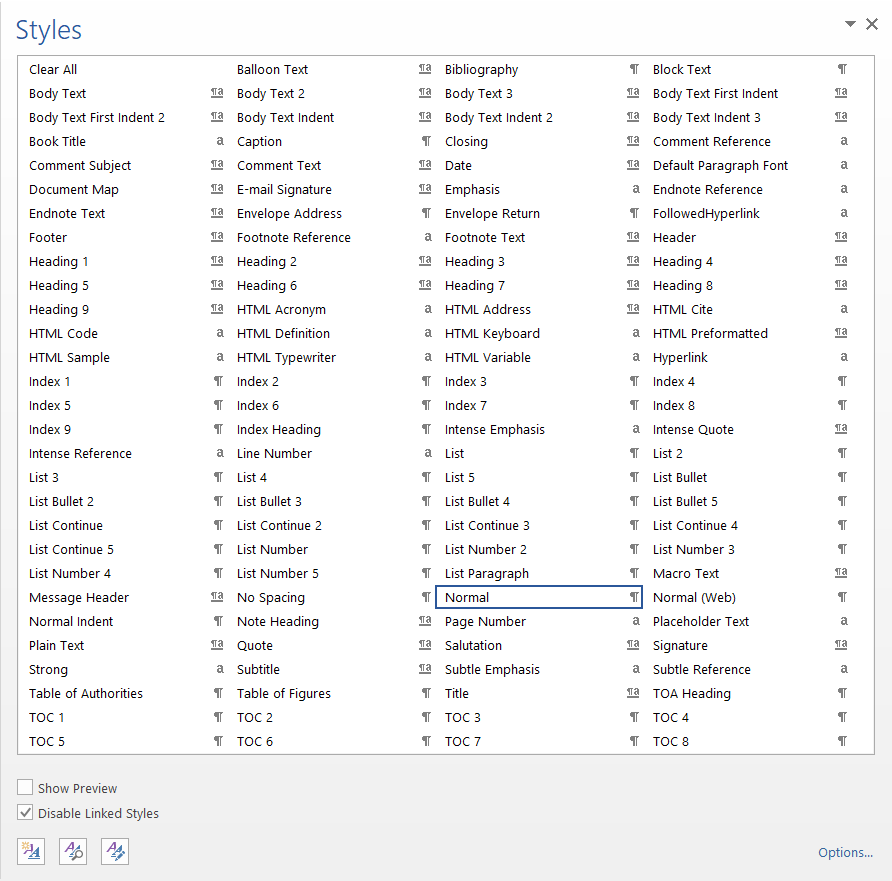
Note that with preview turned off, you can see a lot more styles!
Also note that I keep the Disable Linked Styles checked.
I seldom use four columns but often will use two.
Again multi-column display was removed with Word 2016. If you
would like this returned give feedback,
comment and vote in the Feedback Portal.
The
Clear All Command does not appear is Styles Pane
There is an XML setting that controls display of this in the
Ribbon versions of Word. It must be set to "1"; if it is 0, the
command will not appear.

Thank you Andrew Lockton for
this tip.
Otherwise, use the Clear All Formatting button in the Font group
on the Home tab.
Hyperlinks using a different font from
surrounding text even though created in that text. Character Styles vs.
Paragraph Style
Problem statement:
In text Arial 9pt or 10pt I use Create Hyperlink Here and
get a hyperlink which is underlined - which I want - but in
Arial 12pt - which I don't.
This is despite that the Hyperlink style automatically
applied has no Font size.
So how can I get Create Hyperlink Here to respect the
current font size?
Response:
This gets into the
underlying default paragraph
font setting. The character style Hyperlink takes its
initial font formatting from the default paragraph font. This is
not necessarily the font currently in use but rather the font
attributes set in the paragraph style currently used by the
text, even though the user may have applied different font
settings directly. See
The Importance of
Styles in Microsoft Word for more on why you want to avoid
using direct formatting in important documents.
(end
of CK Addition)
See also Troubleshooting
This chapter from original Legal Users Guide to Microsoft Word 2002 -
document in zip format
|
The [Quick] Styles Gallery looks Different!
Around 2023, Microsoft introduced in parts and gradually what they called
the "New Experience" or "Visual Refresh" which, among other things changed
the look of the [Quick] Styles Gallery. The original look has two lines for
each style. The first a sample and underneath in smaller type the name of
the Style.
The new look is compared to the original below, first simply in the tab,
and secondly as shown when expanded.
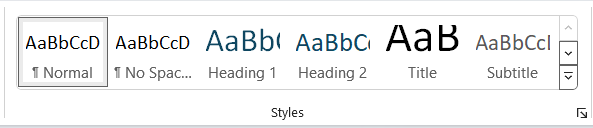
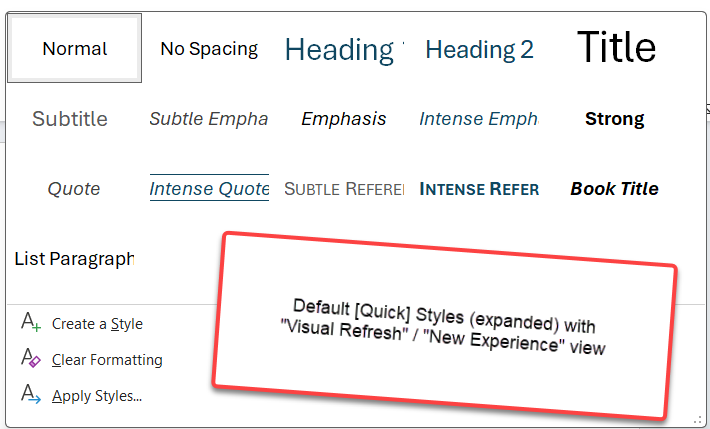
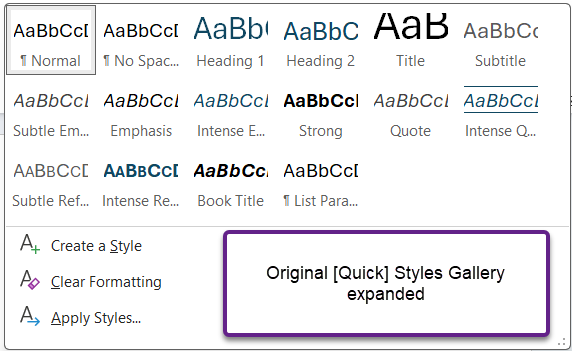
When originally introduced, this change was optional. Then it was simply
imposed. There were a number of complaints and around November 2024 it was
changed back to the original. As of this writing, the only way to alter this
is by a Registry edit. This is described in my article on the Microsoft
site:
New Experience/Visual Refresh Preview - Microsoft Office - Microsoft 365 -
Turning it On and Off. I have no idea what Microsoft will eventually do
with this but by making the registry edit, as of this writing, you can turn
it on or off.
 views since 14 April 2004
 Copyright 2000, Microsoft Corporation. Copyright 2000, Microsoft Corporation.
Copyright 2000-2002, 2004-2006, 2010-2026
Charles
Kyle Kenyon
See information about copy permission.
Search Intermediate Users Guide to Microsoft Word Using Google My office page as a
Madison,
Wisconsin Criminal Defense Lawyer.
Original Legal Users Guide to Microsoft Word 2002 - Documents in Zip Format
A note about link exchanges. This site does not participate in
link exchanges to build web presence. If you have a link that you think would be
of use to people reading this page, please send it to the webmaster with the url
of the page where you think it should appear and it will be considered. Your
placing a link to this site will not affect the decision on whether to add your
link, though.
|
