![]()
![]()
![]()
![]()
![]()
![]()
![]()
![]()
![]()
![]()
![]()
![]()
![]()
![]()
![]()
![]()
![]()
![]()
|
|
|
|
Basic Formatting Techniques in Microsoft WordWhat You Will LearnAfter completing this lesson, you will be able to:
Other Chapters Related to Topics Covered in this Lesson
Additional Written (or Web) Resources
Last edited by Charles Kenyon Thursday 27 March 2025 as to links only. Valid for Word 97-Word 2003. Principles applicable to later versions. Some notes as to Word 2010.
Search Usersguide to Microsoft Word using Google
CK Introduction to WordWelcome to Word. It is a very good computer program for putting words and images on paper. That is what it is designed to do. Everything else is added on and may not work as well as other programs. Word is a combination Mack Truck and Back Hoe disguised as a Volkswagen. Think "Transformers." It has a lot of power to do major work, but that power comes with a number of confusing controls. In Word 97-2003 those controls are in the menus and toolbars. In Word 2007-2013 you reach them through the Ribbon tabs. Always remember: Ctrl+Z (UnDo) is your friend. When working on a major project and trying something new, consider working with a copy of your document. Let's start with some basic tools to let you peek under the hood and see what Word is doing with your formatting: Reveal Formatting and display of non-printing formatting characters. Checking Formatting - Word's Reveal Codes
CK Section on Creating a New DocumentThere are a number of ways to create a new document. The simplest is to
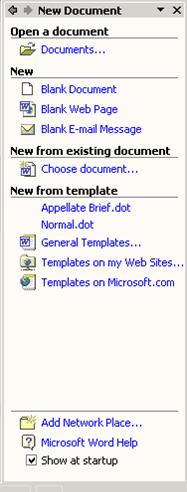
click on the new document icon If you see a template in Windows, you can create a new document based on the template by double-clicking on the template. To get to these templates from within Word you need to select New under the File menu. In Word 97-2000 this will bring up the new file dialog box: In Word 2002 and later, it will bring up the New File Task Pane. (If you don't like this and would prefer to just get the new document dialog box, see the NewFileDialog Add-In.)
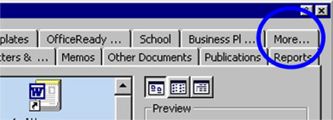
Clicking on "General Templates" (Word 2002) or "Templates ... On My Computer" (Word 2003) in the Task Pane will bring you to the New File Dialog. If the template you want is in your User Templates Folder or in the Workgroup Templates folder it will show up in the dialog box. If it is in a subfolder of these, it will show up when you click on the tab representing that subfolder. (These folders are explained in Templates in Microsoft Word.) The "More" Tab in the dialog will show you folders that might not show up in the tab space.
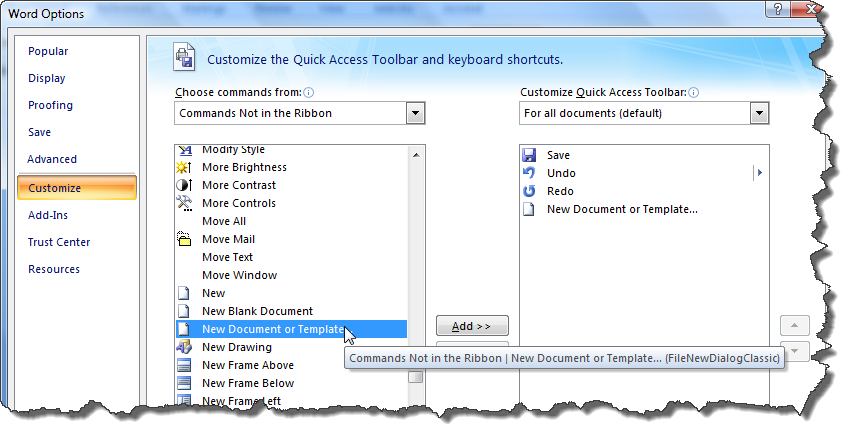
The "Blank Document" template shown in the New File Dialog is really your normal.dot template. The General Tab displays the contents (other than folders) of the User Templates Folder and the Workgroup Templates Folder. Word 2007-2013 put different steps in the way of getting to the templates on your computer but do give easier access to templates provided by Microsoft online. To get to the FileNew dialog shown above in Word 2007-2013 add the command to your QAT.
Selecting Text (CK Section)
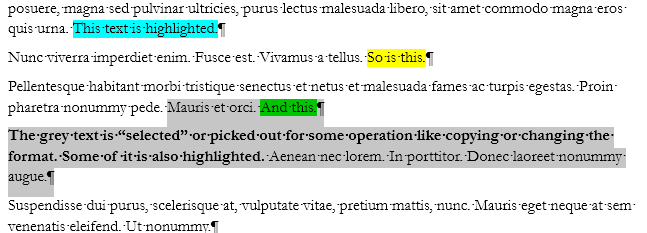
It is important to distinguish between selecting text (picking it out for some manipulation) and highlighting text. Highlighting is marking the text as in using a highlighting marker to change the background color in the document, it shows up when you print. Selecting is pointing out text so you can manipulate it. It is a method of using your computer to manipulate text. It does not show up when you print.
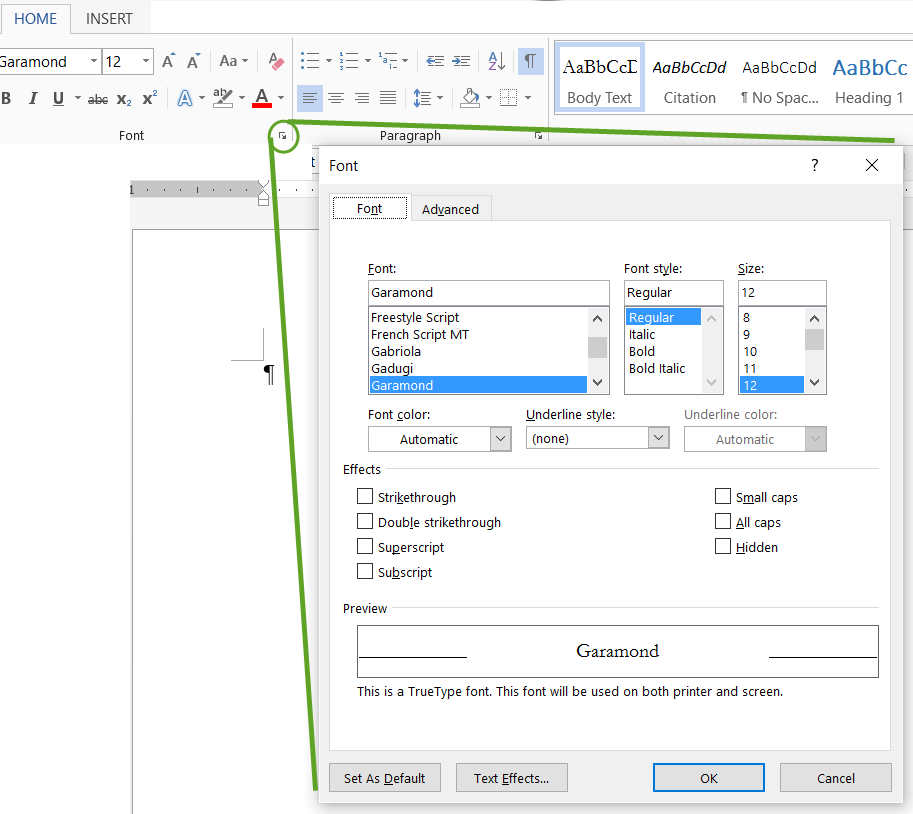
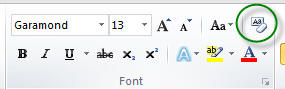
Highlighting is accomplished using the Highlighting formatting button. (Shading is also possible using a different control.) Character Formatting (CK Section)A page on formatting should have some things about how to apply formatting to your text. First, you should apply most of your formatting by using Styles in Word. This allows you to keep the formatting in your document consistent and makes it easier to make changes. But even if only to set up the styles, you need to know how to change the formatting directly. Some people only need the Bold, Italic, and Underline formatting commands that appear on the formatting toolbar. These can be applied individually or in combination. However, there are many other character formatting options available on the Font Formatting dialog box. Some that I use often are strikethrough, double-strikethrough, and hidden. (I have my computer set up to display hidden text but not print it. I put instructions in hidden text on forms. Note that this is metadata that you might not want to be sharing.) You can also change the font in the . You can get to the character formatting dialog by using the Format > Font command, or if you select a word or series of words, you can right-click and select the "format font" command to open the dialog box. Note that Word calls it Format Font and I call it character formatting because I think that designation is more precise. You are not really changing the font at all, you are changing how the characters of different fonts appear on your page. In Word 2007-2013 you can reach the font formatting dialog box through the drop down in the Font Group on the Home Tab or with Ctrl+D.
See also: the Font Group in the Ribbon (Word 2007+). An additional type of character formatting that is valuable in a legal environment is language formatting. Specifically, you can apply "no proofing" formatting to case citations and party names so that you won't have to OK them in spell check. I find this best applied, though, through a character style rather than by direct formatting. Instructions on setting up such a style can be found in the chapter on styles. Repeat Formatting Key: If you are going through a document and applying the same formatting to various words, you can use the Ctrl+Y combination or the F4 key to repeat formatting. This only applies, though, to the last formatting applied. So, if you are making something bold and then Italic, only the Italic is applied by the repeat key. If you want to apply more than one formatting change repeatedly either use a character style or use the font formatting dialog (Ctrl+D) for the first change. The repeat key will then let you repeat the full change. (This is actually the Repeat Typing key or "Do Again" key - the opposite of the UnDo key.) (this section unfinished as of 12/15/13)
Moving and Copying Text
Practice: Use Cut, Copy And Paste
Practice: More with Cut, Copy and Paste
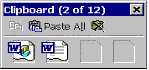
Collect and Paste (New for Word 2000)
Practice: Work with the Office Clipboard
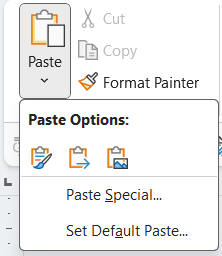
See also the Clipboard Group on the Home Tab (Word 2007+). See also Control the Formatting When You Paste Text - Microsoft Paste Special
Format Painter
|
| Tip Keyboard users can press
CTRL+SHIFT+C to copy formats and CTRL+SHIFT+V to paste
formats. Your mouse pointer won't change, but the formats can still
be copied and pasted.
CK Note: If you use this method, you can intersperse other copying and pasting. This copies and pastes to/from a memory area different from that used by the clipboard. For creating templates or documents that will be heavily edited, though, I recommend using Styles almost exclusively for formatting. |
Sometimes you just want to start over. If you select text and press Ctrl+Spacebar you will remove all character formatting from the selection, including formatting based on a character style. It returns it to the paragraph style. If you press Ctr+Q it will remove and paragraph-level formatting from the selected text or any paragraph containing such text.
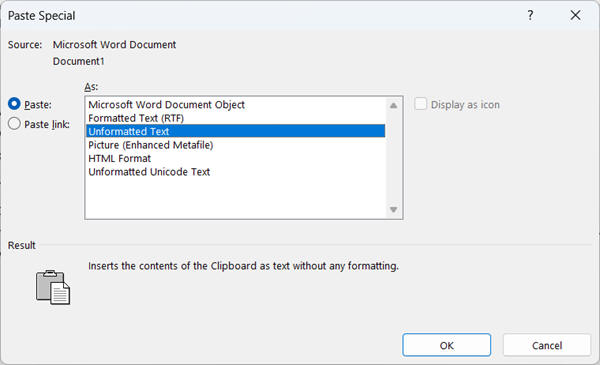
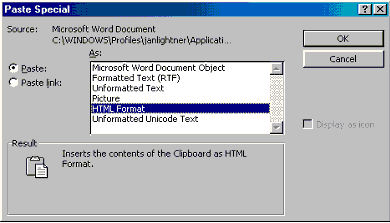
If you want to strip out paragraph style based formatting from a selection you need to Cut it and use Paste Special to paste it back as unformatted text or use the Clear Formatting command in the Styles Pane (Word 2003 and later). (In Word 2007 and later you can use the Clear Formatting button on the font group of the home tab to do the same thing.) Pasting back in as unformatted text will paste it in the current paragraph style. The Clear Formatting button or command in the Styles Pane returns the text to the normal format.
If you want, you can select all text in an area and apply the normal style to it.
For Word 2010, you can use the Clear all formatting button in the Font group on the Home tab.
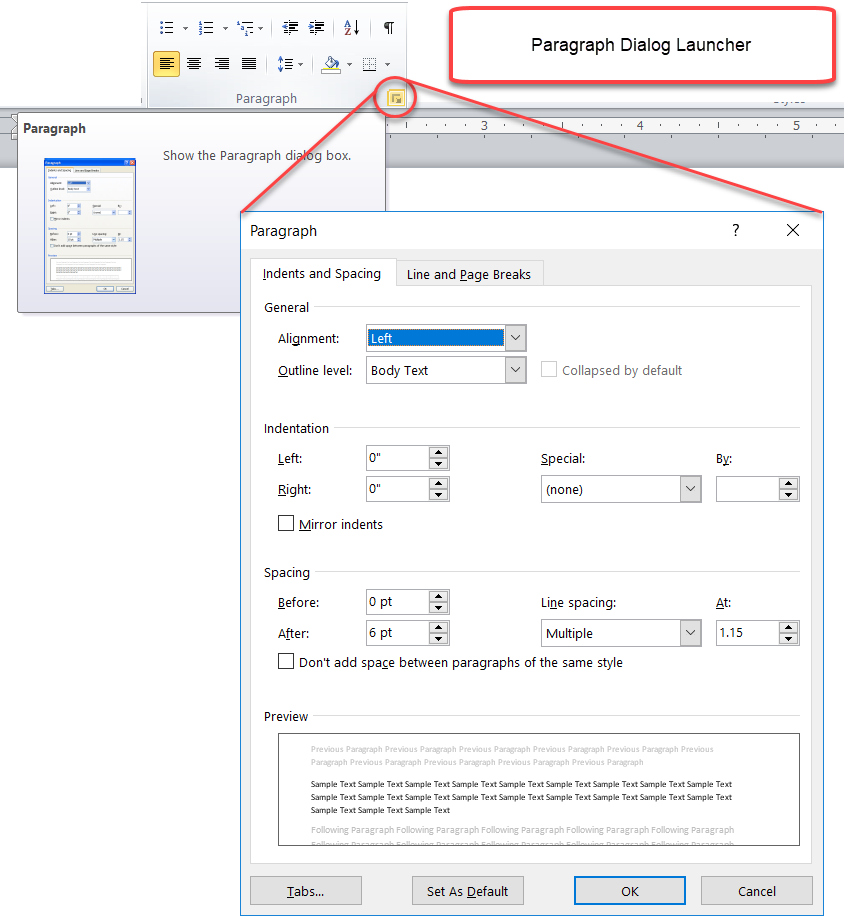
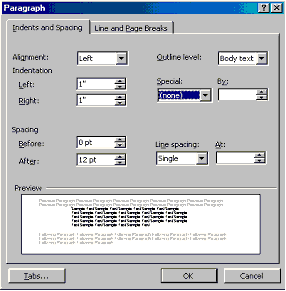
Much formatting is handled at a paragraph level. It is best handled using Styles. However, you can do direct formatting for a particular paragraph using the Ruler or the Paragraph dialog box. In Word 97-2003 this is reached using Format > Paragraph. In later versions it is reached using the dialog launcher at the bottom right of the Paragraph Group on the Home Tab.
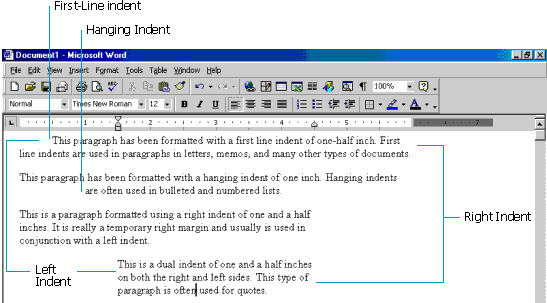
Word provides four types of indents: first line indent, hanging indent, right indent and left indent.
The following figure shows different types of indents.
One quick and easy way to set these indents is to use the mouse and drag the indent markers on the horizontal ruler. Indents are controlled by the small gray triangles and box on the horizontal ruler.
"Like a hammer, the time-proven spacebar has been used countless times to perform chores for which it was never intended. Yes, a hammer can compel a screw to join two pieces of wood together, and a spacebar can be used to move text around so it looks like a table. However, just as a hammered screw makes for a shaky wooden table, a word processing table fashioned together with spaces is equally fragile. Add something to the table and it doesn't hold together. Which table? Take your pick."
Microsoft Word 2010 Bible by Herb Tyson
 |
CK NOTE:
WORD 2000
(and later) The difference between
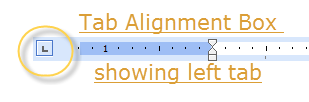
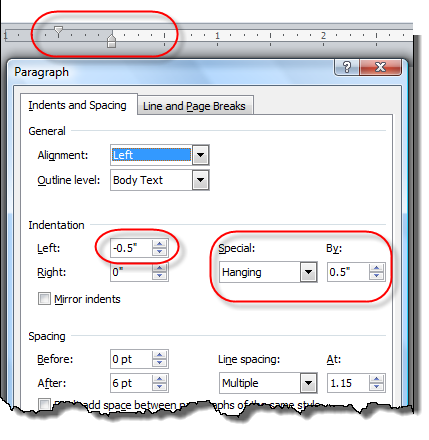
Margins and Indents In Word 2000 and later, you can set a First Line Indent and a Hanging Indent from the Tab Alignment box which is located to the left of the ruler. (View > Ruler)
The screenshot immediately above shows a "hanging" indent in the ruler. The circled marker is for the left indent for the first line. The paragraph will start at the left margin where the blue area ends but continuation lines will be indented to the next marker. These markers can be moved independently in the ruler or set in the paragraph formatting dialog box. "Indents" is the term that Word uses for paragraph margins. They are a part of paragraph formatting and are often used in paragraph styles to set different margins for a part of a document. You do not want to change "margins" within a page in Word; instead, change indents.
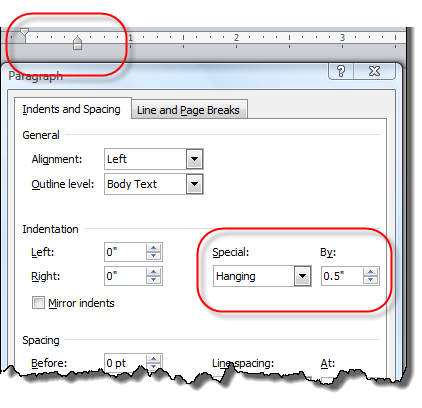
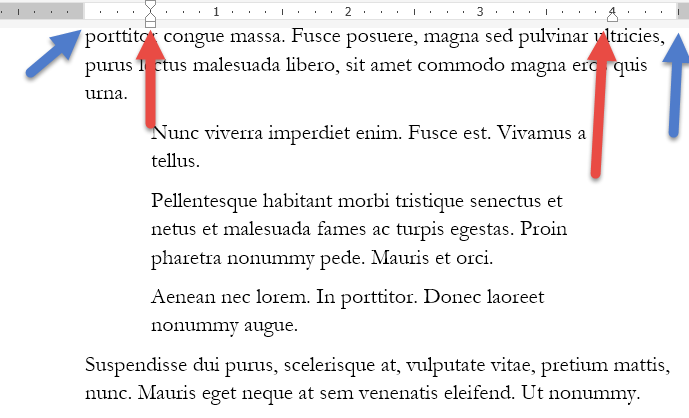
A hanging indent lets you have the first line of the paragraph start to the left of the left Indent. It can be set in either the Ruler or in the paragraph dialog box. Both are shown in the screenshot below.
The first line will start at the hanging indent (the one dropping down from the top of the ruler) and the remainder of the paragraph will wrap at the left indent (the one at the bottom of the ruler). This can be set in either the ruler or the paragraph formatting dialog box. Again - best done in a Style. The left indent (continuation indent) is traditionally set at the first left-tab stop. That way, a letter, bullet or other character is typed at the beginning of the paragraph, you press the Tab key and the remainder of the paragraph will wrap where the left indent is set. This is the formatting usually used for lists. If you are doing this for bullets or a list, you are likely better off using automatic numbering or bullets. All formatting like this is best handled using Styles instead of direct formatting, even with the format painter. The screenshot above shows the first-line (hanging) indent at the left margin. This is the usual position but is not required. The screenshot following shows the first-line indent 1/2" to the left of the left margin. Again, margins and indents are independent of each other although set in the same place by default.
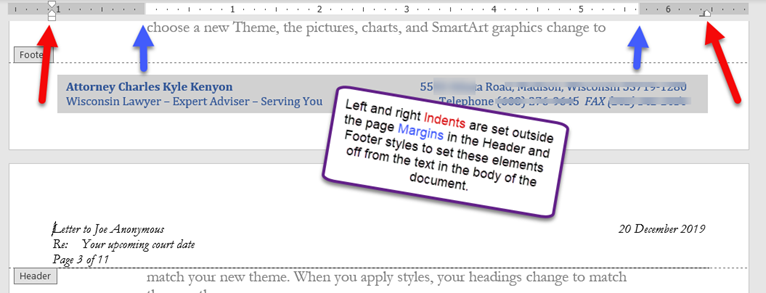
Again, Indents are paragraph formatting, Margins are Section properties. Use Indent changes rather than margin changes for most purposes. Here are two more examples showing different indents and margins. In both examples, the margins are indicated by the blue arrows and the indents by the red arrows. In the first one there is a left-and-right-indent as would be used for quoted material.
In the example below the left and right Indents are set outside the Margins. I use this in my header and footer styles to further set off the headers and footers from the body of the document.
In this example, the indents are set a half-inch from the edge of the page, outside the margins of the page. |

If you are using Word 2000, try using the Tab Alignment box to set the indents. Instead of dragging a marker, select the appropriate indent mark (First Line or Hanging Indent) and click the ruler. The indent you're setting only applies to the paragraph you have your cursor positioned. If you want to have an indent apply to many paragraphs, select all the paragraphs to which you want it applied.
See Ruler of All You Survey: How to Make the Best Use of Word's Rulers by Suzanne Barnhill, MVP and Dave Rado, MVP
The Special drop-down list allows you to set hanging and first line indents in the Paragraph dialog box.
Remember, tab settings in Word are paragraph-level, not document-level, formatting.
There is no "Flush Right" command in Word like there is in Word Perfect. It is necessary to use a right-aligned tab to achieve the same result.
There are five types of tabs in Word: left, right, center, decimal and bar. In Word 2000, they are all available on the ruler. In Word 97, the bar tab is only accessible by choosing Tabs from the Format menu. The bar tab draws a vertical line at the position you set.
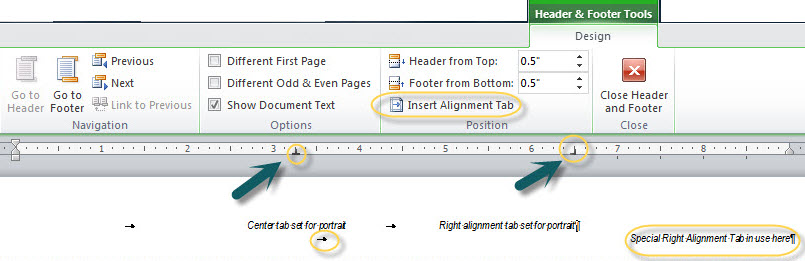
In headers and footers beginning with Word 2007 there are special alignment tabs (left, center and right). These are independent of the paragraph or style tab settings. For more on Alignment Tabs, see Headers and Footers, Sections.
While alignment tabs will work in the body of a document, the control for them is only on the header/footer tools ribbon. It can be added to the QAT. Using them in the body of a document seldom would make sense.
If you want to change where text starts or ends in a part of the body of a document, rather than change the margins (as in Word Perfect) you would change the Indents.
Indents are paragraph-level formatting, not section-level like margins. The alignment tabs are responsive to changes in the margins and the corresponding indent settings. They do not respond to the paragraph-level tab settings, though.
All versions of Word: Setting a tab using the mouse is a two-step process: While your cursor is positioned in the paragraph you want to add the tab to, first click the Tab Alignment box at the left edge of the ruler until you access the tab that you want to use. Second, click the ruler where the tab should appear. Many users report that they have better luck setting tabs in the horizontal ruler when they click in the bottom half of the ruler.
|
Note If you make a mistake, click and drag the tab to the correct location on the ruler. If it's the wrong tab (center instead of left) drag the tab marker off into the document window, release the mouse, and the marker will disappear. |
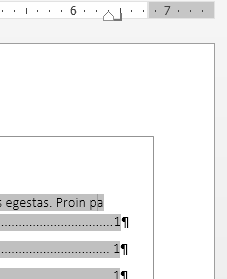
After you have made tab settings for one paragraph, they are copied down to the next paragraph when you press the ENTER key. If you need to clear all tabs, drag them off the ruler or from the Format menu, choose Tabs, and then select Clear All. The next figure is an example of various tabs applied in a document:
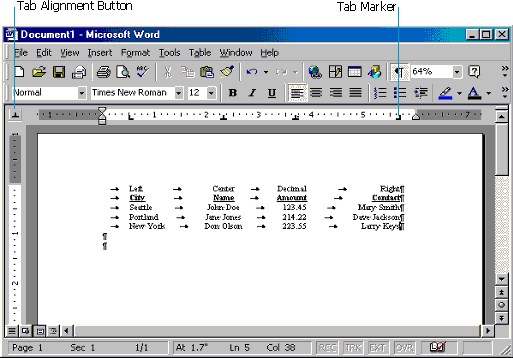
CK NOTE: In all versions of Word through Word 2010 both Tabs and Indents can be set outside left and right page margins. Tabs can be set outside the left and right Indents. I've never known a reason to set a tab outside the left Indent, though. There are some examples of this shown in Text Justification in Microsoft Word. (See below for Word 2013 and later)
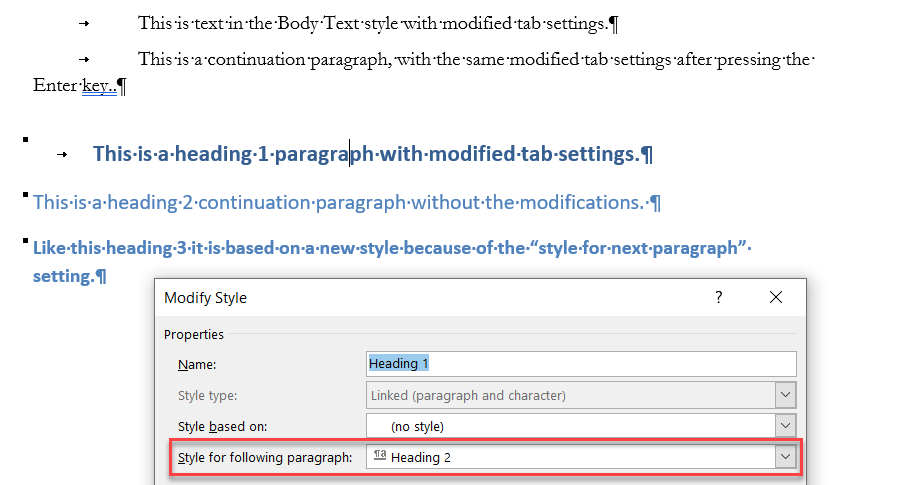
When you set paragraph level formatting like tabs in one paragraph and press Enter at the end of that paragraph, your settings will usually continue into the next (new) paragraph. That is not always true. Every paragraph has style formatting assigned (even if you didn't know anything about it). That style formatting may assign use of a different style for the following paragraph. In that case, the tab settings in the new style will apply.
Once you understand how tabs work in Word, you'll be able to set a single tab for the precise location you need rather than press TAB repeatedly to position text.
Ruler of All You Survey: How to Make the Best Use of Word's Rulers by Suzanne Barnhill, MVP and Dave Rado, MVP
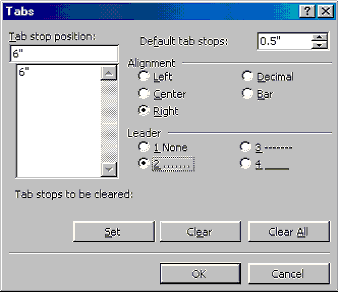
You can set dot leaders, dash leaders, or solid leaders in this way. To get to this dialog, either use the shortcut Alt+O,T, or double-click on a tab that is already on your Ruler.
|
CK NOTE: For more on tabs, see the MVP FAQ
page on
Setting
Tabs - by Suzanne Barnhill, MVP and Dave Rado, MVP.
To see how they are used to simulate the Flush-Right setting in Word
Perfect see
Flush
Right. For more on using tabs for columns and other ways to set
up columns, see
The Straight and Narrow: Using Columns (also on the MVP FAQ
site).
Also, note that dot leaders can be automatically used in Tables of Contents, Tables of Authorities, etc. You won't need to set tabs or dot leaders by hand for those if you generate your Tables automatically. See Complex Documents for more on these. Examples of tab settings and leaders can be found in the page on Justification.
Finally, setting up a table using tabs is not a good idea (although far better than using spaces). Use a Table instead. If you've already set your table up using tabs, you can convert it to a Word table easily. The key thing that keeps beginners from using tables is that they don't know how to turn off the lines when they don't want them. It is easy! See that chapter. Tabs can be used in tables, but use of a decimal tab in a table requires extra an extra tab setting. See Tabs in Tables. Tabs of the various types can be very useful for headers and footers. Word 2013 (and later) will give problems with a right-tab set outside the right margin. See this thread. This formatting is commonly used with a dot leader in a Table of Contents. To do this, you will need to set the margin narrower and move the right indent in from the margin to allow the tab to be outside the indent but within the margin.
Another workaround is to save the Word 2013 document in legacy .doc format which will allow use of a right-tab outside the margin. |
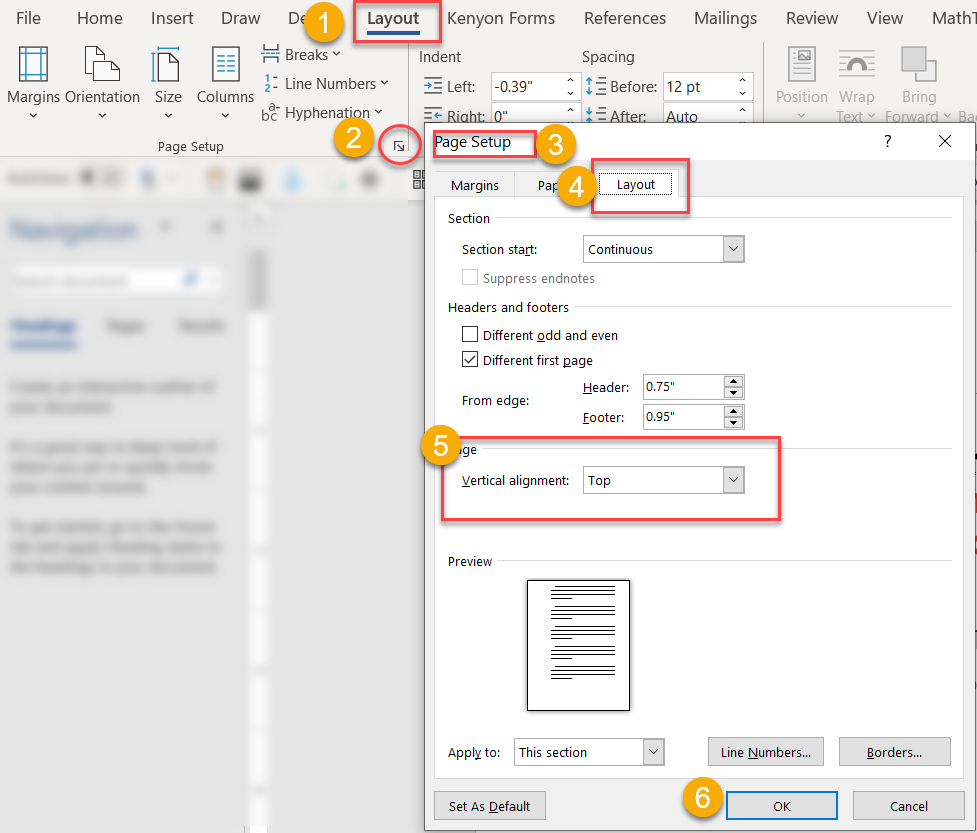
Before using section breaks in a document, it is important to understand page setup.
In Ribbon versions you start with the Page Layout or Layout Tab (depends on version of Word). Here is that tab in Word 2019.
Here is the path to reach the vertical alignment control using the Page Setup dialog.
In menu versions, to access the Page Setup dialog box, from the File menu, choose Page Setup. In the dialog box, there are four tabs: Margins, Paper Size, Paper Source and Layout. Each controls a different part of how the document is set up.
The first tab, Margins, allows you to set the margins for the document, including the placement of the headers and footers.
Paper Size offers the opportunity to move from portrait to landscape, choose the paper size, and select the portion of the document to apply this particular formatting.
Paper Source relates to printer trays. One tray may hold letterhead, another bond, and another copy paper. There may also be a manual feed for envelopes, labels, and card stock.
The Layout tab presents the options to choose any of the section breaks described in the preceding section; choose a different first page header/footer; have different headers and footers on odd and even numbered pages; select whether the page will be centered vertically on the page, aligned at the top, aligned at the bottom; and whether this formatting is to be applied to the section, the whole document or from this point forward.
CK Note: Before doing this to change Headers and Footers realize that each section has up to three headers and three footers and that by using a StyleRef Field, you can change their content to reflect the content of the text in the page. You may not need a section break.
|
Note There is a header and footer on every
page although they may be empty.
CK Note Each section has three headers and three footers which may have text even though they may not be displayed. (Each section has a first-page header/footer and an even-page header/footer which will not be displayed if the option for them is not set. See Word 97-2003 Sections or Word 2007-2013 Sections for more on this.) |
|
Note Unlike WordPerfect, there is not a Header A,
Header B, Footer A, and Footer B. In Word you must first have
section breaks and then turn off Same as Previous to vary headers
and/or footers. CK Note You do not need different headers or footers to change the text in a header or footer! If the text you want to have in the header or footer is in the body of the document, you can use a StyleRef field to display that in the associated header or footer. See StyleRef field. |
If you wish to have both portrait and landscape text on the same page, a section break is not the answer. You must use a text box to insert the landscape text on the page.
In this exercise, you will set up a document with a headline centered at the top of the page followed by text formatted in three columns, followed by a single column (page width) of text — it will look like a newsletter.
|
CK Note You must be in Page Layout View (in Word 97) or Print Layout View (in Word 2000-2003 or Print View (Word 2007-2013)) to see all three columns. In Normal/Draft View it will appear as if there is one long, narrow column of text. |
|
Note View this document in both Normal and Page/Print Layout views. To switch to Normal view, choose Normal from the View menu (or press CTRL+ALT+N). For Page/Print Layout view, choose Page/Print Layout from the View menu (or press CTRL+ALT+P). |
|
|
CK Note:
Remember that automatic page numbers are fields.
If page numbers are put in your document using Insert | Page
Numbers... they are fields inside of frames. In my opinion,
this is not a good thing.
"There are two places you can put page numbers: in the footer or in the document . If you put them in the document, you can never get proper control of them. This is the greatest trap there is for young page-numberers. The page number MUST be inserted into the footer! If your document already has page numbers, click on one. If it shows the square bounding box of a floating text box, it’s in the document: delete it!" "Remember that people flipping pages need to have that page number in the most visible spot, and it needs to be in the same place on each page. Useability research proves that the best place to put it is in the outside bottom corner." John McGhie, MVP, How to Create A Template, Part II. I have gone so far as to remove the Page Numbers... command from
my Insert Menu! |
In this exercise we will create a document that will contain multiple pages as they might occur in any long legal document such as an agreement. You will use page setup, section breaks, footers and format page numbering.
The document will contain the following elements. If you want to try to setup the document without step by step instruction, create the document as described below. If you need some assistance with setting up the complex document as described below, refer to step 4.
The first page will be the TITLE PAGE.
| Center the text vertically. | |
| No footer. |
The second and third pages will be TABLE OF CONTENTS and TABLE OF AUTHORITIES.
| Footer to include: | |
| Left aligned file name | |
| Centered page number (i, ii, and iii format) | |
| Right aligned date |
The fourth page will be TEXT.
| Footer to include: | |
| Left aligned file name | |
| Centered page number (Arabic number format) | |
| Right aligned date |
The fifth page will be the TABLE.
| Landscape orientation | |
| Footer to include: | |
| Left aligned file name | |
| Centered page number | |
| Right-aligned date |
The sixth (and final) page will be the APPENDIX.
| Back to portrait orientation | |
| Footer to include: | |
| Left aligned file name | |
| Centered page number (Appendix A format) | |
| Right-aligned date |
To accomplish the above exercise you must do the following:
In WordPerfect, you can't format by section; you format by page. If you're converting from WordPerfect, you might find this topic difficult at first. Practice with the exercises in this section and on your own to get the hang of section formatting.
A section break is a mark inserted that shows the end of a specific section, and the end of the formatting that is applied to that section. This mark stores the section formatting (page orientation, margins, headers and footers, sequencing of page numbers). The mark appears as a double dotted line and identifies the kind of section break in the center. A section break is inserted by choosing Break from the Insert menu and then selecting the appropriate section break.
There are four types of section breaks in Word:
| Continuous. Inserts a break and starts the next section on the same page. | |
| Next Page. Inserts a section as well as a page break and starts the next section on the next page. | |
| Odd. Inserts a section break and starts the new section on an odd page. | |
| Even. Inserts a section break and starts the new section on an even page. |
Some reasons for inserting sections breaks include:
| Columnar divisions as used in newsletters. (Headline, page width column, two or three columns, page width column). | |
| Separating the document so that different pages have different margin settings. (First page has list of attorney names in the left margin; and the second page needs wider margins). | |
| Format page numbers differently within a document. (Title page, Table of Contents, Body text, Appendices). | |
| Allow different headers and footers within the same document. (Different odd and even pages, header and footer text variation, etc.). | |
| Permit different paper sizes and both landscape and portrait orientation in the same document. (Attaching an envelope to a document, presenting a table or chart in landscape view in an exhibit). | |
| Control the layout of a document so that new chapters or subjects
always begin on an odd numbered page. |
|
Note The exercises for inserting section breaks are after
the section on Page Setup since we will use these two topics
together. To understand how to use section breaks to affect the
layout of a document, you must also understand how Page Setup works.
After reading the section on Section Breaks, you may want to go back
to the section on Page Set-up and try the exercises again. CK Note See Sections - Headers and Footers (Word 97-2003) and Sections - Headers and Footers (Word 2007-2013) for more information. In Word Perfect you might change margins several times on a page to indent text left and right for quotations and such. In Word this is done, not by changing the margins, but by changing the paragraph indents. These indents can be outside the page margins if needed! Margins are section-level formatting while indents are paragraph-level formatting. Unneeded section-level formatting carries with it a lot of surplus information and can make editing more difficult. |
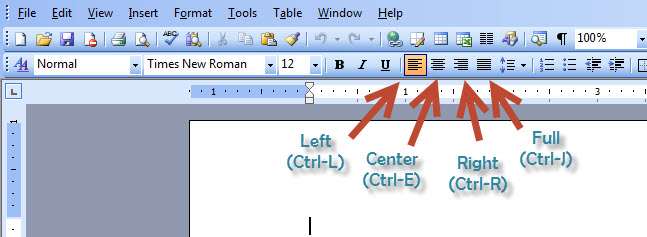
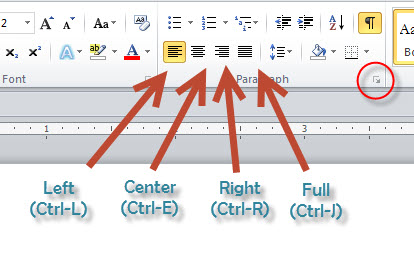
Text in a Word paragraph can be aligned along the left indent, the right indent, centered, or fully justified. Note the term "indent" rather than margin. These are often the same but can be different.
See Text Alignment in Microsoft Word for more.
(Word 97-2003)
(Word 2007-2013)
Note that these are paragraph settings and are best controlled in paragraph styles rather than direct formatting. (Direct formatting is what you get when you click on a button or use a keyboard shortcut.
Also, if you want to have part of a line be on the left, another part in the center, and yet another part on the far right, this is best done using tab settings or tables.
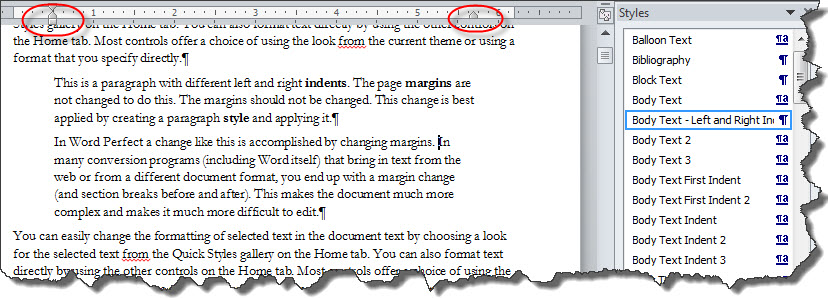
Styles can be defined as shortcuts to formatting paragraphs and text. In a document, the heading at the top of every important section might be centered, bold, and have a slightly larger font size. Instead of making those changes every time you come to a new heading, you can use or assign a style to keep that formatting intact. You can also change a style once, and all paragraphs that have that style applied will instantly be updated to reflect the changes. Understanding Styles is essential to working in Word effectively.
Styles in Word differ greatly from the styles in WordPerfect. You may use the styles that come with Word by default as they are, modify them or design your own to best suit your needs. Styles are not turned on and off like a toggle, rather they are assigned to the text or paragraph in question. Using styles will make Word easier to use by reducing editing time and producing more consistent formatting. See Why Use Styles - part of Lynda.com Video tutorials on Word.
To see the available styles in the current document (Word 97-2003), click the arrow at the right side of the Style box, which is the control at the far left side of the Formatting toolbar. You will see both paragraph styles (showing the Paragraph mark ) and Character styles (showing a). To see all the available styles, hold the SHIFT key while clicking on the down-pointing arrow. These are the styles that are built into Word. As a user, you can add your own styles or modify the ones that are already there.
CK Note: To see the available styles in the current document (Word 2007-2013), click the dialog launcher (arrow) in the bottom right corner of the Styles Gallery. You will see both paragraph styles (showing the Paragraph mark ) and Character styles (showing a). To see all the available styles, change the options. These are the styles that are built into Word. As a user, you can add your own styles or modify the ones that are already there.
See Understanding Styles in Microsoft Word to really get a grasp of Styles.
|
An important aspect of styles is the ability to create Tables of Contents without the necessity of adding codes. If you use the heading styles provided by Word, you can build a Table of Contents quickly and easily by choosing Insert, Index and Tables, Table of Contents. Word looks for the entire heading styles you have used (Heading 1, Heading 2, Heading 3, etc.) and builds the table. If you later modify these headings, there are no codes to change; just a simple keystroke to update! For more information, see the chapter on Fields. |
It is possible to display the style of each paragraph that has been assigned. To activate the Style Area, you must be in Normal View. From the Tools menu, choose Options, and then select the View tab. For Style area width, select at least .5" to 1" and click OK. The Style Area will display on the left side of the screen.
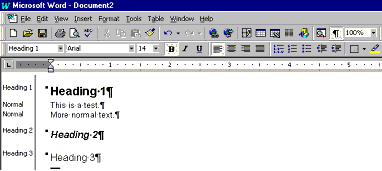
To assign a style to a paragraph, place the insertion point in the paragraph and click the down pointing arrow by the Style box. Select the style and the paragraph will take on the formatting assigned to that named style.
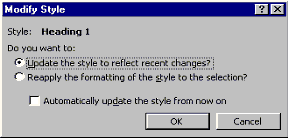
If you want to view the definition of a style, from the Format menu, choose Style and the following dialog box appears:

|
Note At this point you may choose to Modify the style or design a New one. Note that this Normal style contains both paragraph and character formatting. |
 |
Warning Any style you modify or change will only affect the current document unless you choose to add it to the template. Then it will be available to all documents built on that particular template. |
In this exercise, you will practice modifying a style. You can modify both your styles (user defined) and Word Styles (built-in).
Does it work as expected? For much more information, see the section on Styles.
Automatic paragraph or outline numbering has nine levels available in each of its' seven default numbering styles. To access these choices, from the Format menu, choose Bullets and Numbering, and select the Outline Numbered tab.
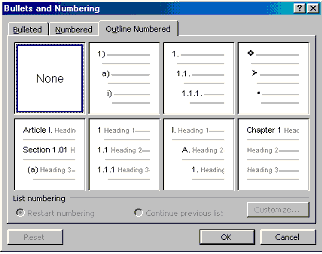
The three choices in the top of the dialog box format paragraphs with outline numbering schemes. The four remaining choices on the bottom format the paragraphs with outline numbers and apply heading styles to the paragraphs.
If you do not want the formatting of the paragraph changed, make sure you select one of the three styles in the top row. For more information, see the section on Numbering.
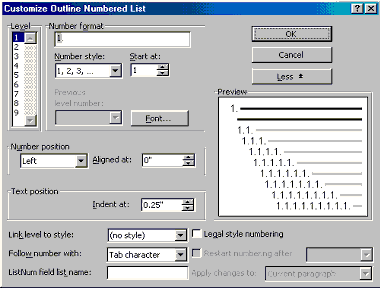
Note that you can format the font, choose different number styles, and move the alignment of each level of text. This currently shows a period after the number. This may be changed to a parenthetical mark, a colon or something else of your choosing. You can even enter text such as 'Article' or 'Paragraph'. It is, however, important to remember to never manually enter a Number style in the Number format box.
|
Note This is a very powerful tool. Every paragraph in the
document that is formatted with a heading style is now numbered.
When a table of contents is generated from headings, the ENTIRE
paragraph is placed in the table. If you want only the first few
words of the selection to appear in the table of contents, there is
a work around called a "hidden paragraph mark."
CK Note Beginning with Word 2002 there is a feature called a Style Separator available that is less trouble than the "hidden paragraph mark." See Styles for more on that. |
For more on numbering, see that section.
Warning! |
CK Note Word's numbering structure can be very unstable, especially if not linked to styles. You may want to have your numbering rooted in styles and avoid using the Bullets and Numbering gallery shown. Otherwise your numbering may renumber itself seemingly at random. This is (in part) because the numbering gallery shown is not fixed but rather changes from computer to computer and on computers over time. See Numbering for more information. Numbering using the buttons works fine for quick document generation, it becomes unstable when you get to a larger document or have something that needs extensive editing. |

|
CK Note: The remainder of this chapter is not in the Basic Formatting Chapter in Microsoft Word's Legal Users' Guide. It has not been subjected to the same kind of peer review as the rest of the chapter. |
Sometimes your fingers slip and you somehow apply formatting to a word, paragraph, or document that you don't want. Sometimes Word does this for you with Autoformat as you type.
Immediately after Word changes your text (capitalizes what you don't want capitalized, changes an underscore into a line (border) across your page, or otherwise fiddles with your text in ways you don't like, use Undo (Ctrl+Z) to set it back. (Backspace will also work at this point.)
If you have gone past the point where you can use UnDo...
Unwanted Lines
If it is an unwanted line inserted by Autoformat, go to the paragraph mark immediately before the line and
Format => Borders and Shading ...
Make sure that it is set for "paragraph" in the bottom right and click on "None." Close the dialog box. Your line should be gone.
Font Formatting
The Format > Font dialog allows changing to ALL CAPS and SMALL CAPS as a part of the font format. This can be applied directly or through a Style. As with other formatting, this can stick with the text when it is copied. If you place the insertion point inside text formatted this way and type, what you type will adopt that formatting.
Sometimes what you (or your boss) have done just isn't working and you feel like starting over. Ctrl+Q will reset the paragraph formatting to its base style. That is, it will undo any changes that have been made to things that can be changed through the Format => Paragraph or Format => Tabs dialogs.
Ctrl+Spacebar will reset the character formatting (bold, underline, etc.) to the underlying character font (of the underlying paragraph style). This is also useful to turn off a character style as you are typing.
The actions of these two reset commands differ somewhat, especially if no text is selected. With text selected, if you press Ctrl+Spacebar, all character formatting for the selected text is reset. Surrounding text is not changed. If no text is selected when you press Ctrl+Spacebar, the reset action still changes the selection - in this point - the insertion bar (cursor). If you start typing, you will be typing in the reset formatting. With Ctrl+Q, you will reset the formatting of the entire paragraph. If you have text in multiple paragraphs selected (whether or not the entire paragraph is selected) those paragraphs will be reset.
See Understanding Styles in Microsoft Word
See also: Nuke Word formatting and start over - Three shortcuts by legal office guru Deborah Savadra
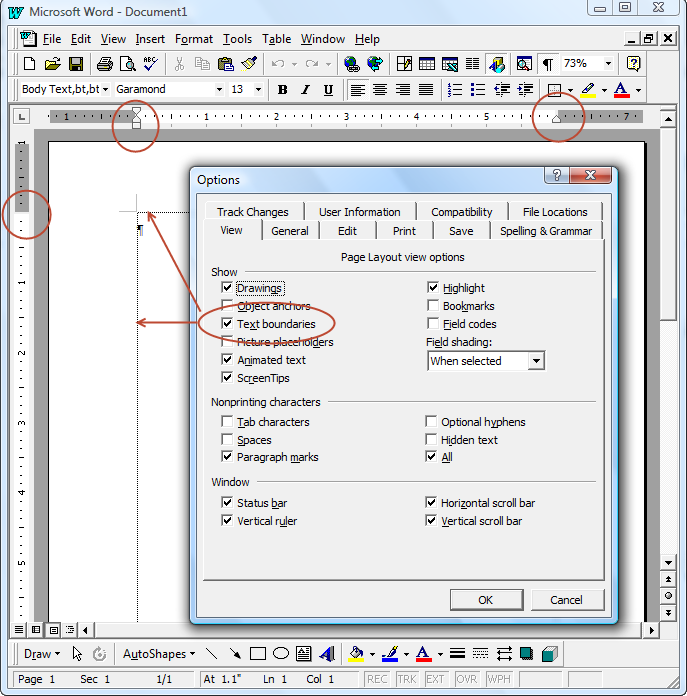
In versions of Word from Word 97-2010 it was possible to turn on the option to display text boundaries and show the page margins as a dotted line around the text. This changed with Word 2013 / Office 365. For images and a discussion see Display of Text Boundaries in Microsoft Word.
Word 97 (and later versions) has tremendous Undo capabilities. You can repeatedly click the undo button or press Ctrl+Z. You can also use the down-pointing triangle next to the Undo button to go back as many steps as necessary. While some things you do can't be undone, with Word most can, including things done by macros.
Note that this Undo information may be stored in your document. See Confidentiality.
I always work with paragraph marks showing on my screen. When I don't want to see them, I use print preview. Each paragraph mark is a container for all of the formatting for the paragraph (50-100 different commands to the computer screen and printer). Seeing them reminds me that they are there.
To you and me, a paragraph is a bundled group of sentences with a common idea or theme. To Word, a paragraph is whatever precedes a paragraph mark or whatever is between two paragraph marks.
Generally paragraph marks should not be appearing by themselves because that adds all those extra commands to a file unnecessarily. Instead, if space is needed there, the space-above format of the following paragraph should be changed (or the space-below of the preceding paragraph). Note that using styles for your paragraph formatting rather than changing the formatting directly reduces the number of commands saved in the file with each paragraph mark.
See What do all those funny marks, like the dots between the words in my document, and the square bullets in the left margin, mean? by Suzanne Barnhill, MVP and Dave Rado, MVP.
You can end a line of text without starting a new paragraph using Shift+Enter. This inserts a manual line break. I use these most often in numbered lists where I want a new line but not a new number. I also use them in the reference and cc: lines which are set (in their styles) as "hanging" paragraphs. Using a line break gives me a properly indented line without space-before or space-after for these parts of a letter. Unlike a paragraph mark, a line break doesn't carry any formatting commands.
You can end a page (force the start of a new page) using a manual page break inserted with Ctrl+Enter. Page breaks are very much like line breaks, they don't start a new paragraph and carry no formatting information. For purposes of Word, they are contained within the following paragraph. I can't think of a time when I would want to end a paragraph of text with a page break rather than a paragraph mark. When you use a page break to do this, you end up with what looks to you and me like two separate paragraphs on two separate pages. That's how it looks on screen and how it prints. What Word sees, though, is a single paragraph divided by a page break character. Word will treat both "visual paragraphs" as a single one for purposes of formatting that paragraph.
Generally when you need to start a new page with certain text, it is better to format the paragraph for that text with "page break before" instead of inserting a manual page break. It is even better if the style for that paragraph has that characteristic built into the style's definition.
See Sections - Headers and Footers for more on these, but briefly, section breaks are super paragraph marks. They contain the formatting for the preceding paragraph and the preceding section. The last paragraph mark in a document is also a section break mark. Section break marks contain the header and footer information for the preceding section.
In all versions of Word (at least through Word 2019), Word does not really see "pages" as a construct. It sees sentences, it sees paragraphs, and it sees Sections. It does not see pages. Pages are created, on-the-fly in combination with the current printer driver.
For example, if you insert a manual page break (Ctrl+Enter) at the end of a paragraph you start on a new page, but Word sees the beginning text on the new page and the text on the previous page immediately before the page break as being in the same paragraph. So, if you apply the Heading 1 style to the text at the beginning of your new page, the last paragraph on the previous page will also be in Heading 1 style because, to Word, they are part of the same paragraph.
This is not true if you insert a New-Page Section Break or if you apply "page break before" paragraph formatting.
Use the Mouse or Arrow keys to select text on the pages to be deleted. Press Delete.
Note that a "blank page" may not really be blank and that you can have problems deleting a blank page following a table. Both of these problems are addressed in Deleting "Blank" Pages by Suzanne Barnhill.
Themes were introduced in Word 2007 to allow dramatic changes in the appearance of documents that work together.
Every Office theme defines two fonts — one for headings and one for body text. They can be the same font (used everywhere) or two different fonts. . . In addition, Quick Styles galleries for text and WordArt use these same theme fonts.Your author knows little about themes. So, rather than expose ignorance, here are some references:
| Exactly what settings are changed when the Word 2003 theme is applied? | |
| What is a theme? | |
| Changing your style in the new Word (2013) |
On the Microsoft Answers Forum Jay Freedman recently noted that simply changing the font in the normal style in the Normal template used to be the way to change the default font but that in Word 2013 (and later probably) it can have unexpected side-effects. He suggested the following steps:
| Open a new blank document. | |
| Click the Design tab. | |
| Click the Fonts button (near the righ end of the Document Formatting group) and click Customize Fonts at the bottom of the gallery. | |
| Change the Body Font box to Times New Roman, and optionally change the Heading Font and the Name entries. Click OK | |
| Click the Set as Default button (to the right of the Fonts button) and OK the prompt. | |
| To change the size, first display the Styles pane (Ctrl+Alt+Shift+S) and click the Manage Styles button (third from left at the bottom). | |
| Go to the Set Defaults tab of the dialog. With the "+Body" entry selected in the Font box, select 12 in the Size box. Click the "New documents based on this template" option and click OK. | |
| Go to the Set Defaults tab of the dialog. With the "+Body" entry selected in the Font box, select 12 in the Size box. Click the "New documents based on this template" option and click OK. | |
| Close Word. If you're prompted to save the Normal template, say yes. |
See Space-Before and Space-After paragraph formatting in Styles for information on that topic.
This chapter from original Legal Users Guide to Microsoft Word 2002 - document in zip format
 Copyright 2000, Microsoft Corporation.
Copyright 2000-2002, 2004-2006, 2010-2026
Charles
Kyle Kenyon
See information about copy permission.
Search Intermediate Users Guide to Microsoft Word Using Google My office page as a Madison, Wisconsin Criminal Defense Lawyer.
Original Legal Users Guide to Microsoft Word 2002 - Documents in Zip Format
A note about link exchanges. This site does not participate in link exchanges to build web presence. If you have a link that you think would be of use to people reading this page, please send it to the webmaster with the url of the page where you think it should appear and it will be considered. Your placing a link to this site will not affect the decision on whether to add your link, though.
|
|


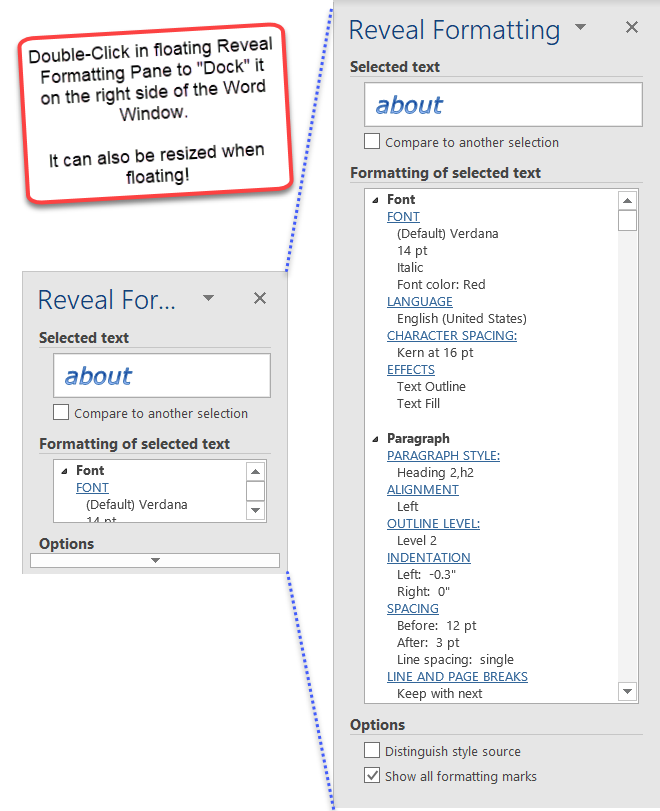
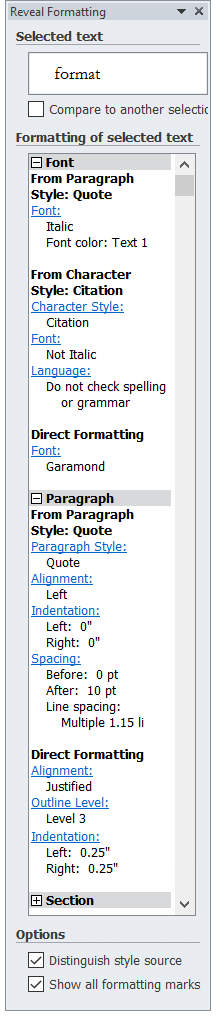 A
good way to spot formatting problems is to use Word's "Reveal Codes"
substitute: the Reveal Formatting pane. A screenshot is shown to
the left. It responds to your mouse. If you click on text, it will show
formatting information about that text. You can Toggle this pane with Shift+F1.
A
good way to spot formatting problems is to use Word's "Reveal Codes"
substitute: the Reveal Formatting pane. A screenshot is shown to
the left. It responds to your mouse. If you click on text, it will show
formatting information about that text. You can Toggle this pane with Shift+F1.