|
| |
Sections, Section Breaks, and Headers and Footers in Microsoft Word
Word 97-2003 (for Word 2007-2024 (365) click
here)
Introduction
Sections are the Word feature that controls page number
formatting, headers and footers, orientation
(portrait/landscape), margins and columns. If you are having
problems or questions with one of these, you need to know more
about Sections in Word.
What You Will Learn
After completing this lesson, you will be able to:
Additional Written Resources
Note: Although many of the links below contain certain
version numbers as a part of the link, the structure of sections
including headers, footers, page numbers, margins and columns
has remained the same since Word 97. Don't be afraid to look at
something that says it is about a different version.
 | This chapter revised for
Word 2007-2019
|
| Word for Law Firms by
Payne
Consulting Group:
|
|
Working
with Sections (or Why Word appears to behave so illogically
when you delete or move a Section break or How to preserve
Section formatting when pasting between documents) by Dave Rado,
MVP |
| Create dictionary-style headers /
footers describing page contents. Charles Kenyon. |
| How can I get a different header - footer on the second page in Microsoft Word?
Charles Kenyon. Includes tips and links on creating letterhead and
letter templates. |
|
Headers? Headings? What is the difference? Charles
Kenyon |
|
Using Headers and Footers by Suzanne Barnhill, MVP - excellent and
comprehensive web page |
|
How
to Control Page Numbering in a Word Document by Bill Coan, MVP.
Using Fields for Page Numbering - Much more Control |
|
How to Put a Portrait Page Number on a Landscape Page by
Bill Coan, MVP, Dave Rado, MVP, and Suzanne Barnhill, MVP |
|
Different Margins on the First Page by Suzanne Barnhill, MVP |
|
The
Straight and Narrow: Using Columns by Suzanne Barnhill, MVP and
Dave Rado, MVP. |
|
Letterhead in Headers - Template that can add itself to
File menu |
| Letterhead
System - download a system for letter forms that can be easily
updated |
|
Letterhead
Textboxes and Styles Tutorial - two-page template download that
demonstrates use of
 | textboxes in headers and footers to reserve space for preprinted
letterhead |
| Styles that are based on each other and use the style for
following paragraph feature |
| Use of the StyleRef field to insert information from the body of
a letter into the continuation page headers automatically |
| Insertion of a date
automatically that will not change when you open the document at a
later date (but can be changed manually) |
| See How can I get a different header - footer on the second page in Microsoft Word?
for more on how this tutorial works. |
|
| Date Fields in Microsoft Word |
|
So You
Want to Write a Book Using Microsoft Word - extensive tutorial by
MVP Daiya Mitchell with overview of Styles,
Templates and Sections and the interactions
among these tool/features. Excellent! Not just for those who want to
write books! |
|
Is there an automatic way to create a non-blank, even-numbered page at
the end of a chapter, if the chapter would otherwise end on an odd page?
by John McGhie, MVP |
|
How to prevent a header/footer from being edited by Bill Coan, MVP |
|
How to prevent a header/footer from being edited by Bill Coan, MVP |
|
How
to set up a document with front matter numbered separately by
Suzanne Barnhill, MVP |
|
How to set up a document with front matter numbered
separately - 2007/2010/2013 by
Suzanne Barnhill, MVP |
|
How to number headings and figures in Appendices by Shawna Kelly |
|
Removing Page Numbers by Charles Kenyon |
|
Create reusable headers and footers in Word by legal
office guru Deborah Savadra (video) |
|
Conditional Headers and Footers (Advanced) by Greg
Maxey, MVP |
|
FileName and Path Add-In - Adds Shortcut Key to insert
the FileName and Path field at Cursor Position |
|
FileName and Path Templates - .dotx and .dot files with
filename and path fields in all three footers |
|
Different Page Numbering in Header and Footer
demonstration - .docx and .doc files with page numbers by
document in header and by Section in footer. |
|
Document Splitter by Greg Maxey - addin to break document into
component documents |
  
(this guide table of contents) ------- (MS
Word New Users FAQ)
This chapter last edited by Charles Kenyon on
Tuesday 17 June 2025
.
Preliminary note. This chapter is based on
the
Sections chapter of the Legal Users Guide for Microsoft Word
which was developed for Word 2002. It has been modified
extensively by Charles Kenyon. The most extensive modification
was the inclusion of hyperlinks, but the text has been modified
as well as questions have arisen. These modifications have not
undergone any kind of peer review, just comments from users.
Word uses Section breaks to specify parts of a document that have
different page orientation, columns, or Headers and footers.
Section
breaks allow the user to specify where the different formatting will begin
and end.
You might use Section breaks in the following circumstances:
| Different Headers and footers. If the document you are
working on needs to have different Headers and footers on various pages,
you would use Section breaks to achieve this.
Note, using the StyleRef
Field in your Headers and footers will make the
need for changes less than you might anticipate. |
| Different page numbering schemes. If you are working in a document
where the Table of Contents needs lower case Roman numerals, the
contract needs Arabic numerals, and the Appendices need alphabetic
numerals, you can achieve all of these with Section breaks.
See
How to set up a document with front matter by Suzanne Barnhill for a
full discussion. |
| Restart Page numbering. You can restart page numbering
anywhere in a document by inserting a section break and using the
Format Page Numbers dialog. |
| Different paper sizes. If you want a document to contain one
legal-sized page and the rest letter-sized pages, you'll need a Section break
between the pages. |
| Different margins. Be sure to
distinguish Margins
from Paragraph Indents.
If the first page of a letter needs a
two-inch margin, and the following pages need a different margin, you
should not use a Section break in the document. A
Section break is not appropriate for this purpose. You can
use a different first-page Header to
mimic a different margin without
inserting a Section break. You may want different margins in different
parts of your document for other purposes, though. A Section break is
appropriate in those instances. Note also that if you want to inset text
on a page, you want to change the paragraph indents, not the margins. |
| Different Orientation. If you need to mix pages that have a
portrait orientation with those that have a landscape orientation. |
| Columns. You can use Word's newspaper-style column feature in the
middle of a page, and place Section breaks before and after the multiple
columns. If you have text prepared and put it into a column format, word
will automatically put in the Section breaks.
You may want to be using a Table, instead,
though. |
| Document protection. You can apply different protection
levels to different Sections in Word. This lets you allow editing in
some Sections and not others. |
| Restart Footnote/Endnote numbering. This numbering can be
restarted with a new Section. Endnotes can be at the end of a Section
rather than at the end of the document. |
| Line Numbering is a section property (although you can turn
it off for individual lines) - see Section 3 in the large image below |
| Start Section on Odd-Numbered Page (or Even-Numbered Page).
You can tell Word to start a section on an Odd- or Even-numbered page.
This is especially useful in documents that will be printed duplex
(on both sides of the paper). |
Word 2007 - 2013 put the controls for breaks under the Page Layout
tab under "Breaks" not on the Insert tab. When you do NOT want or at least need a Section
Break
Section breaks are very useful but they do make documents a bit more
complex. This can cause formatting problems that are hard to spot. See
Troubleshooting below for examples.
They should not be used when you do not need to do so.
Here is an excellent summary image on some of what sections control:
Here is
John McGhie's analysis of what a Section Break, in
Word, is:
| A Section Break is not just a
“page
break”,
it is a binary container that stores several
hundred properties in multiple tables. The
largest Section Break is the
“Default”
Section Break. You will never see one. The
default Section Break hides in the very last
paragraph mark of a document. Because it is
absolutely essential to the document (without
it, the file is just a stream of bytes, not a
document) Word maintains the contents itself and
hides it from you and me. |
How to view a Section Break
You can see the Section breaks in your document in many views, but
normal view is the easiest to recognize. Once you insert the Section break
a double dotted line appears from one side of your document to the other.
Practice: Inserting a Section break
- Open a blank document.
- Change your document view to Normal.
- Type the following: Title Page.
- Now choose Insert > Break.
- Choose Next Page Section Break.
- Type Table of Contents.
- Choose Insert > Break.
- Choose Next Page Section Break.
- Type Main document.
View your document in Print Preview. You now have three
Sections.
Switch between "Normal" and "Page Layout" (Word 97) and "Print Layout" (Word
2000-2003) views in this document to see how the Section break appearance
differs. In Word 2007 and later, the two views are called "Draft" and
"Print Layout."
Change Page Formatting in a Specific Section
To better understand how Sections work, think of your document as a
book with different chapters, and each chapter starts with page number
one.
In the last exercise we created a document with three separate
Sections. We are now able to apply unique formatting to each
Section of
the document. The exercise that follows will help you change the margins
and the page layout in the document using Section breaks.
Practice: Change Page Formats in Sections
- Use the document you created in the last exercise.
- Press CTRL+END to move to the end of your document. You should be in
Section 3.
- Choose File > Page Setup >click Paper Size.
- In the Orientation area, select Landscape.
- Be sure that Apply to: says This Section.
 |
Warning If you do not apply the
Section break
to "this Section only" the whole document will be formatted in
Landscape. |
- Click OK. The last page should now be landscape and the rest of the
document should still be portrait.
- Press CTRL+HOME to go to the top of the document.
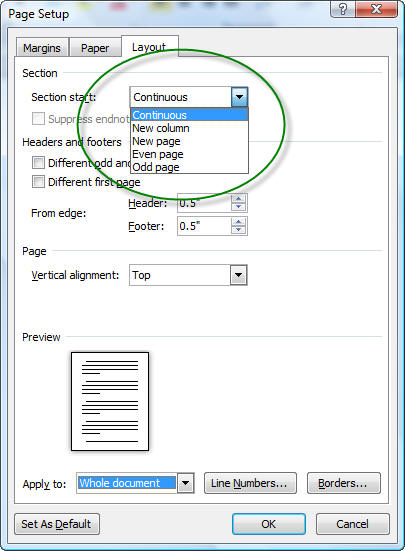
- Choose File > Page Setup >click Layout
- In the Vertical alignment: Section, select Center from the drop-down
list.
- Be sure that Apply to: says This Section.
- Click OK. Your "TITLE PAGE" text should now be centered vertically.
- Try changing margins in a specific Section.
Start a Section on an Odd-Numbered-
(or Even-Numbered-) Page
Section breaks are often used to begin a chapter in a larger
document. Generally one wants chapters to start on odd-numbered pages.
(Rarely, on an even-numbered page.)
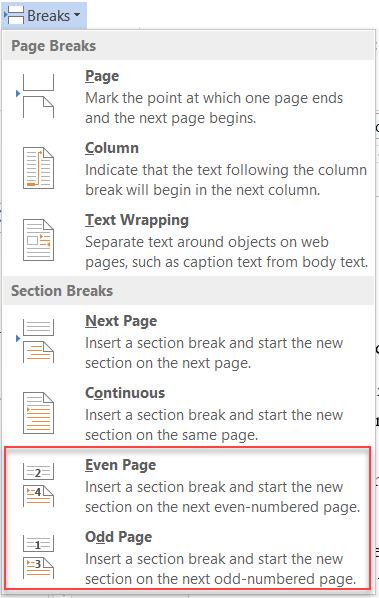
An odd-page section break inserts a section break with the
first page being an odd-numbered page according to the
formatted page number.
When an odd-page section break is inserted, Word will skip to the
next odd-numbered page if necessary to start on an odd-number. On screen
it just looks like a page number was skipped. When the document is
printed (or in a pdf) a blank page with no header or footer will be
inserted but count in the page numbering. No page number appears on the
inserted page.
An even-page section break inserts a section break with the
first page being an even-numbered page according to the
formatted page number.
When an even-page section break is inserted, Word will skip to the
next even-numbered page if necessary to start on an even-number. On
screen it just looks like a page number was skipped. When the document
is printed (or in a pdf) a blank page with no header or footer will be
inserted but count in the page numbering. No page number appears on the
inserted page.
If you need the headers/footers/page numbers to appear, see
Is there an automatic way to create a non-blank, even-numbered page at
the end of a chapter, if the chapter would otherwise end on an odd page?
by John McGhie, MVP.
These section breaks are often used with
different odd and even headers/footers and
mirrored margins.
A header or footer is text or other information such as graphics that
is stored at the top or bottom of the page throughout your document. You
can use the same header and footer throughout a document or change the
header and footer for part of the document. For example, you can use your
corporate logo in the first-page header, and then include the document's
file name in the header for subsequent pages.
Note, headers and footers can be confusing. This is
because they really are complex to allow users flexibility
in setting up their documents. I hope the
recap at the
end of this chapter will help clarify things for you. See
also
Using Headers and Footers by Suzanne Barnhill, MVP - excellent and
comprehensive web page. To view Headers and Footers in Normal View, click View > Header and
Footer. If you are in Page Layout View (Word 97) or Print Layout View
(Word 2000-2003), simply double click the visible header or footer that appears
as gray text.
Either way, the Header/Footer toolbar appears.
 |
Note The Header and Footer toolbars are
identical in Word 97 and Word 2000. It looks a little different in
Word 2003 (below). |
CK Note: If you Edit the Header or Footer
the formatting starts with a blank area using the
Header and Footer paragraph styles. The
basic Header and Footer styles have tab settings for a Center tab at 3" and a Right tab at
6.". These are based on 1.25" margins. You can easily view these
settings by showing the Ruler (View -> Ruler).
If you want to change the appearance of all of the headers
and footers in a document, modify the Header and Footer Styles.
Your author tends to have headers and footers extend outside the
page margins by half an inch and be in Italic using a different
font. I use sanserif fonts for headers and footers and serif
fonts for body text. This is intended to emphasize that the
headers and footers are outside of the body, a textual frame for
the page.
Practice: Use the Header/Footer Toolbar
- Choose View > Header and Footer.
- Click the Switch Between Header and Footer button . Your cursor
should be in the footer.
- Click the button again to toggle back to the Header.
- Press the Align Right button on the Formatting toolbar to move to
the right side of the Header.
- Type DRAFT Rough Outline.
- Click the Switch Between Header and Footer button to move to the
footer.
- Place a Center Tab at 3.25 and a Right Tab at 6.5 on the ruler.
- Press TAB once to move to the center of the Footer.
- Click the Insert Page Number button.
|
|
Note If you want to add the word "Page" or
dashes on either side of the number, you can type the information
before inserting the page number. |
- Press TAB once to move to the right side of the Footer.
- Click the Date button to insert the date.
- Click Close on the Header and Footer toolbar.
- Switch to Print Preview to view your newly added Header and Footer.
|
|
CK
Note: AutoText in the
Header/Footer Toolbar.
There are a number of useful AutoText fields available using the
Header/Footer Toolbar. It is important for you to remember that this
is really an "AutoText List Field" and as such it is
sensitive to the style of the paragraph. If somehow your style gets
changed to anything other than the "header" or
"footer" style many of your favorite AutoText entries will
seem to have vanished! When you paste something into a header or
footer, you may want to use Edit => Paste Special... =>
Unformatted Text so that you don't change the style in your header
or footer by mistake.
The header and footer styles also have special tabs set that are
especially useful in these contexts. (See the practice above.) |
Word 2007
- 2013 put the controls for the Headers and Footers under
the Insert tab.
There are times when you do not want a header/footer or page number on the first page
of your document. In WordPerfect, this was called Suppress. In Word, the
feature is called Different First Page. This means you are still able to
put information into the Header or Footer but it will not affect the rest
of the Headers and Footers in the document.
 Note, the Different First Page option applies separately
for each Section (unlike the Different Even and Odd option).
Also, for each section, the setting applies to both the
header and the footer.
Word 2007
- 2013 put the controls for
page numbering under the Insert tab. Different options are presented and you
can also get a dialog box using the Format Page Numbers button.
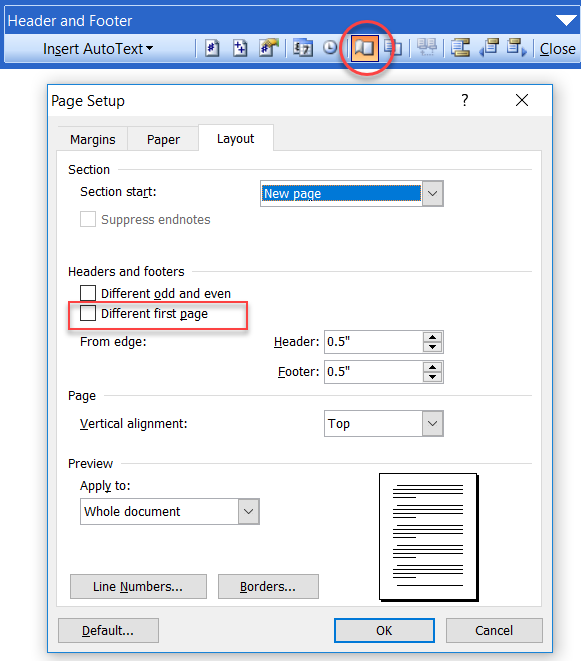
Practice: Turn on Different First Page
- Open the document from the last exercise.
- Double-click the Header in your document. This will access the
header and footer area and turn on the Header and Footer toolbar.
- Click the Page Setup button on the Header and Footer toolbar. The
Page Setup dialog box opens to the Layout tab.
- Select Different first page.
- Click OK.
- Save and close this document.
Notice the Header area now says First Page Header.
Practice: Creating first page and continuation
page Headers/Footers in a Template with only one page
When a template is created for a report or letterhead you will often
want a different first-page header/footer and also want a different
continuation page header/footer. One obvious way is to insert a
temporary page break. However, you can actually create both in a single
page.
- View > Headers and Footers.
- Your insertion point should be in the blank Header (Footer) with
default tab settings
 -
Type some text, i.e. "This is the first header I typed" or "This is
the continuation page header."
- Check the option for
"different first page" on the toolbar and what you just typed disappears!
- The
label changes from "Header" to "First Page Header"
- You can now
type your header to appear on the first page.
- If later the
document has more than one page, your continuation header
-
REMINDER: If you have multiple Sections in a document and a
Section's header/footer is set for link to previous, that will
continue not only the main header but any different first page and
even/odd page headers footers. This is true even if you do not see
them. The different-first-page setting can be set for each
Section. The different even and odd setting is for the entire
document.
NOTE: There are times when you want the same footer but
different or no header for the first page of your section. The Different
First Page setting is for both, it does not distinguish between the
header and footer.
In this case it is often easiest to simply copy the text from one footer
and paste in the other. If you do this, you can end up with an extra
paragraph (likely blank). Delete that paragraph if you want the two to
match.
The Different Even and option allows you to format your headers and
footers differently. For example, you may want the page numbers on the odd
pages to be aligned to the right and the page numbers on the even pages to
be aligned to the left when you are printing double sided documents. You
can access this option from the Page Setup button on the Header and Footer
toolbar.
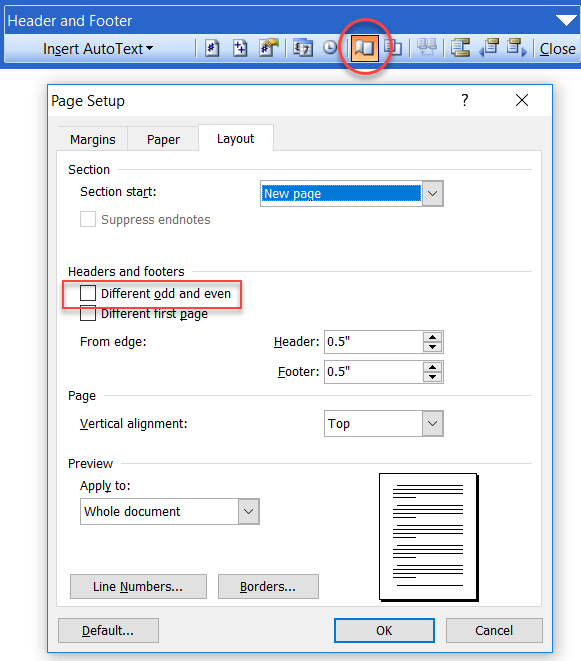 Note: the Different Odd and Even option applies to the
entire document, not just to one Section. This means that if
in some Sections you want the same header/footer you will
have to produce it twice, once for odd pages, and once for
even pages. In some cases, it is desirable to not use
different even-and-odd settings. In such a case you can use
the following
fields:
| {IF{=MOD({PAGE},2)}= 1
{PAGE}} - odd numbers |
| {IF{=MOD({PAGE},2)}= 0
{PAGE}} - even numbers |
Here the second {PAGE} field in each is what you want
to appear on that page. As written, these are for
page numbers, but could be
used for entire headers and footers as shown below. (Field codes by
Paul Edstein)
Have a Header and/or Footer Appear
Only on the Last Page or on
Certain Pages Without Using a Section Break
Using a conditional
IF Field you can have a header and/or footer appear only on the last
page of a document or on certain pages. This is done without using a
Section break.
The field would look something like this:
{ IF { PAGE } < { NUMPAGES } "Content
you want in the header or footer on all but the last page" "Content
you want in the header or footer on only the last page" }
If you want the header or footer to appear only on page 5 of a
document it would look like this:
{ IF { PAGE } = "5" "Content you want in the
header or footer on page 5 only" "Content you want in the header
or footer all pages except page 5" }
The field delimiters (braces) can only be inserted using Ctrl+F9,
not typed.
Thanks to MVPs
Suzanne Barnhill,
Bill Coan,
Greg Maxey and
Paul Edstein for help understanding this.
Header and Footer Placement and Space
There are two things the user needs to know about header and footer
placement and space. The first is that either the header or footer can
take up the entire page or be anywhere on the page. The second is that
in the page layout dialog the user can set how much space to reserve for
the header and footer from the edge of the page. Placement Items in the header or footer can be anywhere on the page. If they are
graphical elements like a logo, WordArt, a Watermark or a TextBox they
can be floating and marked to appear behind text. If they are set to be
behind text, they will not move text in the body of the document. If
they are in-line with text or set for wrapping, text in the body of the
document (as well as in the header or footer) will give them space. This
is one way of preparing letterhead templates reserving space for a
sidebar on the first page of preprinted letterhead. See
Letterhead Textboxes and Styles
Tutorial. Space for Headers and Footers So that they do
not run into text and so that text doesn't seem longer on pages without
headers and footers, space can be reserved for the header and footer in
the Page Layout dialog. First the general rule is that the running
headers and footers will use whatever space they need. That means that
if they extend into the body of the document, the text will normally
flow around them. Generally you want a bit more space to distinguish the
header and footer from the body of the document. This dialog can be
reached by File > Page Layout > Layout (tab). This setting, like most
header and footer settings, is a Section property. That is, you can have
multiple Sections in a document, but only one setting in a Section. Note that few printers can print to the edge of the page and that inkjet
printers, in particular, seem to need blank space at the bottom of the
page. See
The
bottoms of pages don't print.
Header and Footer Confusion?
The various header/footer settings can be confusing. This
recap may help you sort
things out.
Page numbers are relatively simple, but the interface can make them seem
complicated. Page numbers in Word are always fields, not manually typed
numbers. We will start by
looking at how to insert them through the interface's Insert Page Number
functions and then look at how they can be inserted and formatted directly.
The Page Number button on the Header and Footer Toolbar inserts a field
directly at the insertion point.
Warning about Page
Number Insertion Repeat: Inserting page numbers using the Insert Page
Number command may insert a page number inside a "frame" which can make
editing difficult.
|
Page Number Fields
Again, page numbers are fields. This is
true no matter how you insert them. If you select a page number and press
Shift+F9 to toggle field codes, you will see { PAGE }, a
very simple field code. If you ever need to insert this manually you can do
so through the Insert Field dialog. You can access this using Insert > Field
> Page.
A very simple way to insert a basic { PAGE } field is to
press Alt+Shift+P.
 The Insert Field dialog box is shown
above. Using the choices shown
will result in a lower case Roman numeral page number in the current
formatting. The field would look like this:
{ PAGE \* roman \* MERGEFORMAT
} (The
MERGEFORMAT switch is inserted by default. It comes from checking
the preserve formatting box. I usually uncheck that box.) Rather than
use the "\* roman" switch, I recommend using the
Format Page Numbers dialog. That page
number formatting would be reflected in a Table of Contents, while one
with the switch would not. You do not have to
choose the page type when you insert the page number but it is easiest to do
so. Other useful fields are the NumPages and SectionPages fields which
give the total number of pages in the document and Section respectively.
(There is no SectionPage field corresponding to the Page field.)
See
Page Numbering on Greg Maxey's site for information on how to have
both a count of the Section pages and of the Document pages in the same
spot. Another article on formatting page numbers and manipulating them with
calculation fields is Bill Coan's
How to Control the Page Numbering in a Word Document.
|
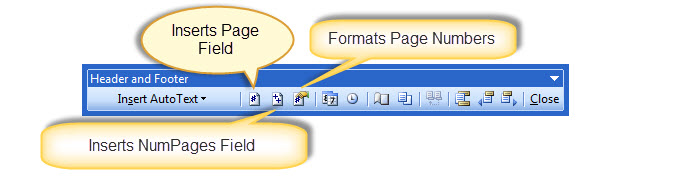
Page X of Y
There are buttons for both the page number and number
of pages (numpages) fields on the header/footer toolbar.
Page X of Y ( 1 of 3, etc.) construction consists of two
basic fields, the PAGE field and the NUMPAGES
field. These can be inserted using the Insert > Field method or you can simply type "page" or "numpages"
(without the quotation marks), select the word and press
Ctrl+F9 to make it a field and the F9 to
update it. Like Page fields, the NumPages field can be
formatted. For fancy manipulation of these and the
companion SectionPages field, refer to the
articles by Bill Coan and Greg Maxey mentioned above.
Format Page Numbers
You will need to understand how to insert and
format page numbers. For
example, you may add a Table of Contents to your document and would like
the page numbering to be in lowercase Roman numeral format. As long as
your document is divided into Sections, you can have differently formatted
page numbers in each Section of your document.
If you restart page numbering in a Section and then add a
Section break for a new Section, the new Section will also
restart page numbering at the same point. If the page
numbering is continuous in a Section, when a new Section is
started from that Section, the new Section will also have
continuous page numbering. See also
Automatic Page Numbers Across Multiple Documents
Same As Previous
/ Link to Previous

Word's default is to connect all the Headers in the document and all
the footers in the document so they are all the same.
It does this by
using the Link to Previous (formerly Same as the Previous) command. It is important to turn OFF the
Link to Previous option FIRST before you make any other changes. This will
prevent the previous Section from being changed as well.
 |
Tip It is usually better to start at the top
of your document when working with Headers and
Footers. |
|
|
Warning Word's default is to always make
the Header and Footer of a new Section the Same as
the Previous Section. Turn off Link to Previous
first, or else your changes can affect other Sections. |
|
|
CK
Note: How many Sections do you need?
If you are inserting a Section break just to change the text in your
header / footer, look into use of the
StyleRef field with Word's built-in heading styles. This lets
you change the content of your header / footer without making any
change in the header / footer. The StyleRef field can reflect the
content of the latest heading or other style and change each
time you format something new with that Style. Note each
Section in Word can have up to three headers and three
footers. The choices of different first page, different odd and even
apply to both headers and footers for each Section. The setting for
link with previous is independent for each of these, that is,
the first page header can be linked to previous while the first-page
footer is not and neither setting has any effect on the settings for
the odd or even page headers and footers. |
A document can have both Portrait and Landscape
pages with
Headers/Footers in one document.
Changing orientation is accomplished through the Page
Setup Dialog under the File Menu.

If you choose "Whole Document" to apply a change to, you
change the orientation for the entire document. If you
choose "This point forward" you will insert a
Section break
at that point with the new orientation applying to the new
Section. Other choices can include "Selected text" if you
have text selected, and "This Section" if your document
already has multiple Sections.
Headers and Footers with Multiple Orientations in One
Document
Generally headers and footers are designed to distribute information
across the top or bottom of a page, giving the reader a lot of
information in a small space. Some information is on the left side, some
in the center, and some on the right side of the page.
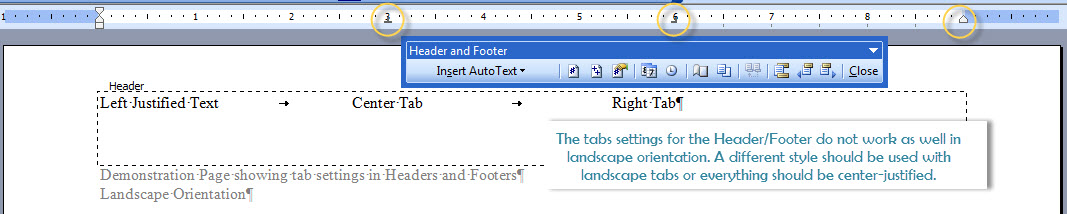
In versions of Word before 2007, this is done using tab settings in
the header and footer styles. This works well
if all pages in a document are in the same orientation. It does not work
so well when some pages are in portrait, and others in landscape
orientation. The default header and footer styles have a center and
right tab set for portrait orientation. Note that changing the
orientation of a page from that for the rest of a document requires a
different Section.
Here are screenshots showing how this works.
Portrait Orientation
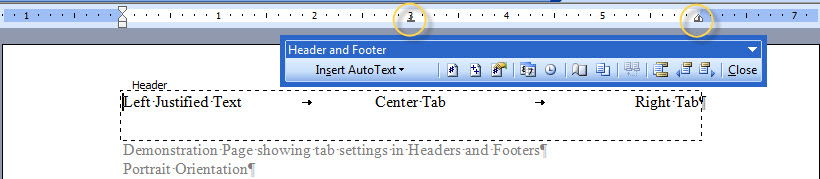
Landscape Orientation
So, if you are using headers and footers in your document and have
some pages set up as landscape orientation and others set up for
portrait orientation, you may need to use separate styles for the
headers and footers in the different orientations or use some other
method to distribute the components of your headers and footers. If you
use separate styles, you will need to not have your headers and footers
linked to previous Sections (at least in the areas where there are
orientation changes).
See also
How to put a portrait page number on a landscape page by Bill Coan,
Suzanne Barnhill, and Dave Rado,
MVPs.
Versions of Word beginning with Word 2007 have a tool that lets you
align according to margins and indents rather than tab settings called the
Alignment Tab. That makes changing orientations with headers and
footers easier.
|
|
CK
Note: Page
Numbers. There are two places you can put page numbers: in the
header/footer, or in the document. If you put them in the document
inside a frame using the Insert > Page Number
command, you can never get proper
control of them. This is the greatest trap there is for
inexperienced
page-numberers. The page number MUST be inserted into the
header or footer! If your document already has page numbers, click on
one. If it shows the square bounding box of a floating
frame, it’s in a frame: delete it! John McGhie, How to
Create A Template.
I have gone so far as to remove the Page
Numbers... command from my Insert Menu in Word 97-2003!
An alternative simple way to insert a page number is
Alt+Shift+P which will insert a page number field
without a frame. See
How
to Control Page Numbering in a Word Document by Bill Coan. This is
an excellent article on formatting page numbers and
manipulating them with calculation fields. |
For more information on using chapter numbering, see
http://wordmvp.com/FAQs/Numbering/ChapterNumber.htm.
For more information on numbering appendixes, see
http://www.ShaunaKelly.com/word/numbering/NumberingAppendixes.html.
Formatting Page Numbers
Page number formatting is best controlled using the
Format Page Numbers dialog. You get access to this dialog
from any Insert Page Numbers menu or control.
Word 97-2003
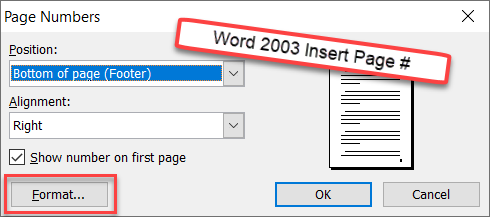 
The page number format dialog gives you a lot of control
on how your page numbers appear, not only on the page but
also in a
Table of Contents,
Caption, or
Cross-Reference.

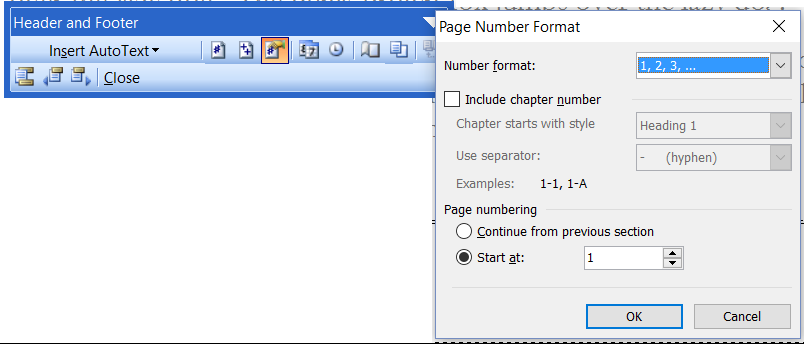
The first choice is for the type of numbering.
This lets you choose two variations, each, from the
three basic formats: Arabic numerals, Roman numerals, or
alphabet (letters).
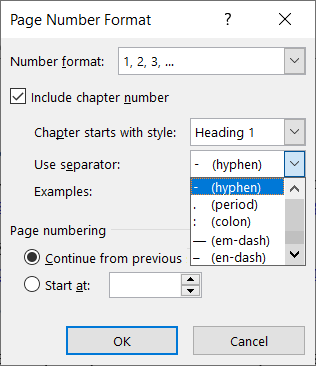
Next is a checkbox that lets you use Chapter numbering.
If you check it, it activates the selection of the
(built-in)
heading style which signals the beginning of the
chapter. That Chapter will need to be numbered using
Automatic Numbering. You are also allowed a
selection of the separator to separate the chapter
number from the page number. (Note: both of the
drop-down boxes scroll, they actually show fewer choices
at a time.)
You have the option of continuing numbering from the
previous section or restarting numbering for the section at
a different number (1).
If you start a new section, the choices made here
continue in the new section by default. This includes
the decision to restart numbering.
Practice: Format Page Numbers
Create a new blank document.
Save As (your initials) Sections.
- Type
Confidential Employment Agreement
ZZZ Company
January 1, 2000
- Choose Insert > Break. From the Section Breaks area, select Next
Page to insert a Next Page Section break.
- Type Table of Contents and press ENTER.
- Insert a Next Page Section break.
- From the Style drop-down list on the Formatting toolbar, choose Body
Text.
- Type =rand(30) and press ENTER.
- Insert a Next Page Section break.
- Type Appendix: Salary Increases and press ENTER.
- Choose File > Page Setup > Paper Size.
- Under Orientation, select Landscape.
- Be sure that Apply to: says This Section.
- Save the document.
- Press CTRL+HOME to get the top of the document.
- Choose View > Header and Footer.
- Click the Switch Between Header and Footer button. Your cursor
should be in the footer of the first page. Notice that it says: Footer
Section 1. We do not want a page number on the first page so leave it
blank.
- Click the Show Next button to jump to the next footer. It should
read: Footer Section Notice on the right that it says Link to Previous.
- Click the Link to Previous button. This disconnects
Section 2 footer
from Section 1 footer.
- Choose the Center button on the Formatting toolbar to move your
cursor to the middle of the footer.
- Click the Format Page Number button. The Page Number Format dialog
box opens.

- From the Number format drop-down list, choose lowercase Roman
Numerals.
- Under Page Numbering, select Start at to have the page numbers start
counting from this Section.
- Click OK to return to the footer.
- Click the Insert Page Number button on the Header/Footer toolbar.
- Click Show Next to move the cursor to Footer-Section 3.
- Turn off Link to Previous using the button on the Header/Footer
toolbar.
- Click Page Number Format.
- Change the number format to Arabic numerals, and choose Start At and
change the Start At to 1. Click OK.
- Click Show Next to move the cursor to Footer-Section 4.
- Turn off Link to Previous.
- Change the number format to capital letters.
- Click Close on the Header/Footer toolbar.
- Switch to Print Preview and make sure your page numbers are correct.
Having Portrait-oriented headers/footers on a Landscape Page
When a page is in landscape mode, the headers and footers are also in
landscape mode.
There are times when the writer wants to have the headers/footers stay
in the same place on the physical page rather than rotate with the page
content.
This portion arose out of a
question asked on the Microsoft Answers site and three solutions
were given.
- Place headers/footers for this section in rotated text
boxes that are actually in the left and right margins of the
landscape page.
How to put a portrait page number on a landscape page by
Bill Coan, MVP
- Where the contents are only one page put them in a Table
and rotate the text in the table. (This requires no section
break or different headers/footers because the page remains
in portrait orientation.)
- Where the landscape contents are only one page, put them
in a Text Box and rotate the textbox. (This also requires no
section break or different headers/footers.)
How to Put a Portrait Page Number on a Landscape Page by
Bill Coan, MVP, Dave Rado, MVP, and Suzanne Barnhill, MVP
Word 2010 Tutorial on Headers and Footers
Headers and Footers in Word 2003 - From Basic to Elaborate - a Tutorial
Columns are a creature of Sections in Word, like headers and footers. The command
to set them up is found under the Format menu. This opens a dialog box.
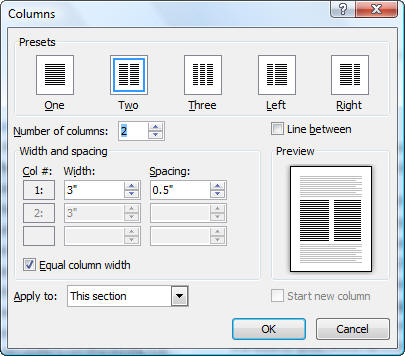
The dialog box has five presets and also lets you set your column options
manually.
The "Apply to:" choice of "This point forward" allows you to insert a
continuous Section break where you are and make the rest of the current
Section have the column settings you want. The default is "This
Section."
The Start new column checkbox is one way to insert a column break before the
bottom of the page. If you select the Left or Right column
preset it unchecks the Equal column width setting. Line between
inserts a vertical line between columns.
You can set the number of columns to a larger number if you want. Note
though that more than 3 columns is not practical on a portrait layout
letter-size page. Unchecking the Equal column width setting lets you
manually change your column width. The spacing between columns is preset at
0.5." Adjusting this is a way to get all of your text on one page or fill
out a page.
Note that a column break, like a manual page break,
will be contained within a Word paragraph, so text
immediately following the break will be in the same
paragraph as that which precedes the break. If you change
the paragraph formatting, it will change for the entire Word
paragraph.
Consider whether you
actually want Word columns, though. Perhaps you
want to use a Table.
I've been advising people about using Word for more than
twenty-five years. Often when people ask about columns, what
they really want is a
Table. The
appearance can be very similar but how they work is
profoundly different.
Columns in Word work like columns in a newspaper or
magazine, with the flow of text going from the bottom of
one column to the top of the next. This has been
described as "snaking."
Tables operate more like a matrix with rows and
columns. A table is good when you are trying to compare
or explain and want related parts to be next to each
other on the page.
Practice: Formatting Columns
- Open the document with three Sections from the Header/Footer
Exercises.
- Press Ctrl+End to go to the end of the document.
- Press the ENTER after the Heading "Main Document"
- Type =rand(30, 4) and press ENTER.
- Go back to the point just under the heading.
- Under the Format menu, select Columns click on the preset for two columns.
- Click OK
- Notice that if you were in Normal view you are now in Print Layout
view.
- Notice that your heading is inside the columns.
- Press Ctrl+Z to undo the column formatting.
- Reopen the Columns dialog box from the Format menu.
- Select the two column preset and under "Apply to" select "This Point
Forward."
- Click OK.
- Notice that your Heading is now outside the Column formatting. You
have just created a new (continuous) Section break.
- Reopen the Columns dialog box from the Format Menu.
- Try clicking the preset to have three columns instead of two.
- Click OK.
- Note that it applies to the current Section.
- Click in the middle of the page in the middle of a paragraph.
- Reopen the Columns dialog box from the Format Menu.
- Select the two column preset and under "Apply to" select "This Point
Forward."
- Click OK.
- Note that you now have a three column Section followed by a two
column Section.
- Note that the Section break was inserted in the middle of your
paragraph, even in the middle of a sentence!
The Column set up in Word is the equivalent to "Snaking columns" in
Word Perfect. To get parallel columns in Word you would use
Tables.
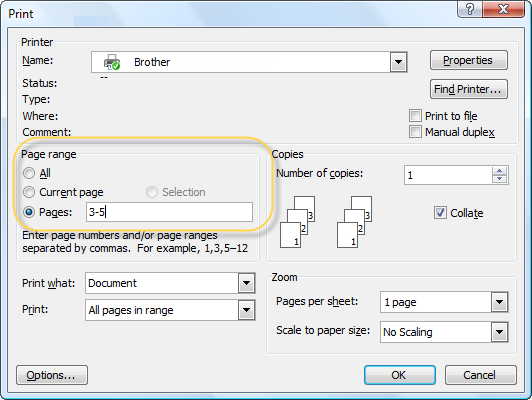
Printing a Range of Pages With Multiple Sections -
CK note
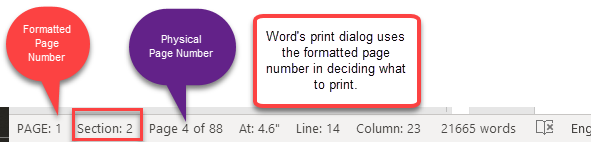
Word tracks pages for printing purposes by the page numbers assigned
by Word, itself. To print pages 3-5 you would enter 3-5. (These page
numbers may or may not be what is displayed.) Since page numbering can restart with each
Section, it
is easy to have multiple pages numbered 1 or 2, or even 10 or 30! To tell Word
which pages you want to print, you need to designate not only the page
number, but the Section number. You have to give both page and Section
for all numbers in a range.
| To print page 1 of Section 3, you would enter
p1s3 |
| To print pages 1-1 and 2-2, you would enter p1s1,p2s2 |
| To print pages 1-3 in the first Section, you would enter
p1s1-p3s1 |
| To print all of Section 4, you would enter s4 |
| To print a range of pages across Sections, you would
enter p5s2-p3s5 |
Use your Status Bar to see what Section you are in. If it isn't
showing Sections, right-click on it.
See this Microsoft
Help article for more.
Watermarks in Word 2003 (CK Note)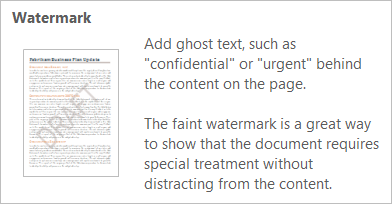
A Watermark is an element that appears behind text and is usually
faint. It is often text but may be an image. It is a confusing feature
because a Watermark in Word is part of a header. It is placed in the
Header of the first Section.
They are discussed in this chapter because they are inserted as a part of a
header and problems with Watermarks equate to problems with headers.
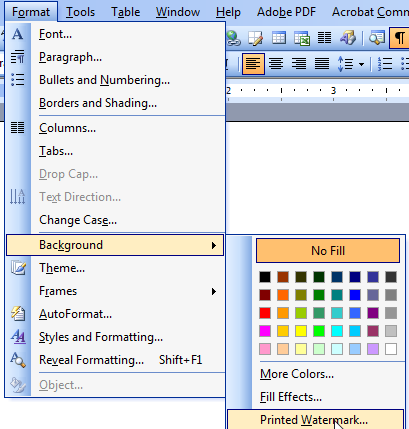
The screenshot above shows the route you need to take from the Format
menu to get to the Printed Watermark choice. Format > Background >
Printed Watermark. When you do this, you get the dialog box shown below.
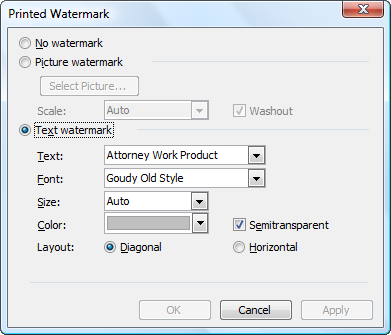
Note that you can type text or choose a picture. You can also use the
dialog box to remove a Watermark inserted by Word. If text, you can
color it, the default is Gray semi-transparent. You can have the text
shown as horizontal or semitransparent. I typed in "Attorney Work
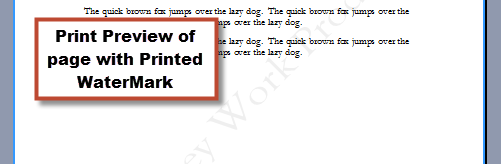
Product" and left the default settings for diagonal gray transparent
text. The result is shown below.
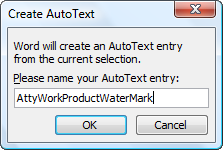
You can save a Printed Watermark as
AutoText. The templates available
should include any global
templates that are currently loaded as well as the attached document
template. AutoText cannot be saved in a document, only in a template.
Once saved, it can be used as can any other AutoText. This is not
especially convenient and was improved upon in Word 2007. To save a
selected graphic as AutoText you can press the Alt+F3 keyboard shortcut.
An image or picture can also be used as a Printed Watermark. Images
can include photos, clip art, Word Art or other drawings.
Problems that can arise and some work-arounds:
- If you are having a problem with Watermarks you need to
understand how headers work
because Watermarks are in the header. Headers are Section
properties, so Watermarks are part of Sections as well.
- If the headers in different Sections are not linked at the time
a Watermark is inserted, the Watermark will be inserted into only
the first Section and Sections with headers linked to that Section.
You will need to go into the first Section header (view it) and
select the Watermark image. This will not seem like it is in the
Header because of its placement, but it is! Copy that to the Clipboard and paste it
in unlinked Headers.
You can avoid this problem if you insert the Watermark before you
unlink the headers. Note, though, that once the headers are unlinked
you cannot change the Watermark by simply using the Watermark
button; you would still have to edit each unlinked header
separately.
- You cannot have more than one Watermark, designated as such by
Word in a document. You can, though have multiple images that look
and act like Watermarks - even in the same headers - so long as they
are not placed there by the Watermark button in Word.
- If you want a Watermark on only one page, you must place it
behind the text in the body of the document - not in a header or
footer if the header or footer covers more than one page.
- You check "remove Watermark" and nothing happens or the
Watermark continues to show on some pages. This is because some of
the Watermarks you are seeing were inserted as graphics and not
directly by using the Insert Watermark button. (See 2-4 above)
- You want vertical text - not Horizontal or Diagonal - or some
other variation. Use WordArt to create what you want and then either
insert it directly or save the WordArt as a picture and then insert
it using the Watermark function as a picture. (If you do the latter,
you will not be able to edit it in Word.)
Inserting a Watermark on only the first
page of a multi-page document (or on every page except the first page)
- Remember, Watermarks are images that are in headers/footers.
- If you insert a Watermark using the Background dialog it will
appear on all pages in a document. In Word 2003, this is true
regardless of your other header settings.
- If you have different first page checked in your Page Layout,
then go into the first-page or continuation-page header (where you
do not want the Watermark), select the Watermark by clicking on it,
and delete it.
- If after you insert the Watermark, you switch on the different
first page sett
- If you want a different Watermark on different pages, all except
one should be inserted in the relevant header by pasting the image
in the header, not through the Background dialog.
- If you have multiple Sections in the document, be aware of the
link to previous setting for each header in each Section (remember,
every Section has settings for three different headers, whether they
are displayed or not).
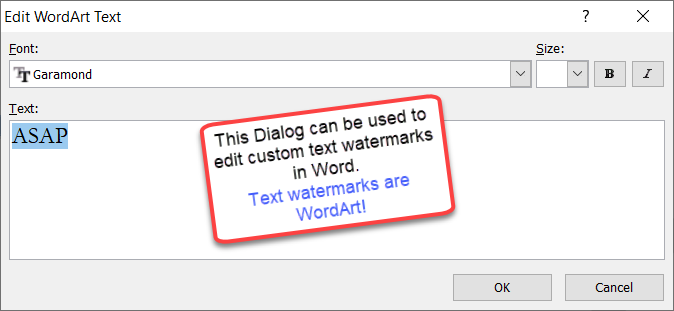
The font used by default for Custom Text Watermarks will be the font
used for the Normal
style.
This can be changed in the dialog to insert the Watermark.
Text Watermarks are WordArt. If you edit the Header and click on one,
you can use WordArt tools to edit it.
If you want to change the text, use the Edit Text button. This allows
you to change both the text and the font/size.
Watermarks are a creature of headers.
Watermarks are images, generally set to be semi-transparent.
The Format>Background>Watermark method inserts one such image that
should appear on all pages in a document.
If you want something different from this, you must start dealing
with images in headers directly. This makes things more complex.
Preventing a Watermark from being deleted
Realistically speaking you cannot. There are, however, steps you
can take.
If you want a watermark that can't be removed, send a
piece of paper with a genuine watermark.
Sorry.
| Rule #1: If they can see it, they can copy it.
|
| Rule #2: If they can copy it, they can modify it. |
Send as pdf and it will be harder to remove than than in
Word format. Convert it somehow to a jpg and it becomes
even more difficult. You can print and use a scanner to do this. You
could, then, insert that jpg into a Word file.
That said, there are some things that you can do in Word.
Watermarks in Word are dimmed images in the header or footer.
They have a "watermark" tag on them so that they can be manipulated
using the Watermark feature.
You can create your own non-Word watermark by inserting your own
image in a header or footer. Then it can't be minapulated using the
Watermark commands.
You can create a watermark in Word, then copy the image to the
clipboard and delete the watermark using the watermark command. Then
re-insert the image (in the header).
You can protect the document for filling in forms or otherwise
restrict editing, there are ways around these, though.
You can use a macro to limit
access to the header. However, that only works if the
recipient allows macros to run. Most do not.
See also
No Copies - No Editing - No Changes
Problem: Watermark does not appear on all pages.
If you use the Format > Background > Watermark method it will appear
on all pages.
If you have multiple headers previous ones may be blocking your
Watermark.
- Go into the header on the page where the Watermark appears.
- Click on it to select it.
- Copy it.
- Go to the header on a page missing the Watermark.
- Paste and position it.
- Repeat 4 and 5 as needed.
Problem: I want a Watermark on only one page
Remember, Watermarks are a creature of headers.
You may not even see a watermark while editing a document, but it
will show up in the printed copy or pdf. You can see it on print preview
even if it does not appear in print view.
If you want your Watermark to appear only on one page other than the
first page, get it out of
the header. If you want it only on the first page, you can insert it in
the first-page header using the option in headers for a different first
page.
Cut the Watermark (it is a graphic of some
sort, perhaps WordArt) from the header and then paste it behind the text
on the page where your want it instead of in the header.
Problem: I want multiple Watermarks on a page or in a document
Remember, Watermarks are a creature of headers.
You can only insert one Watermark in a document using the Background
dialog.
You can insert multiple images (including WordArt) in a header.
Create images for your Watermark, go into the relevant header(s) and
paste your images in that (those) header(s).
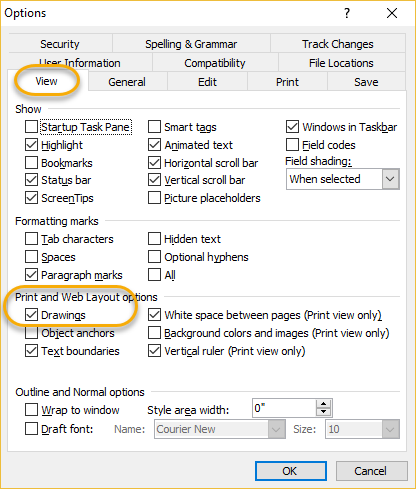
Problem: Watermark Does Not Show Up in Print View (but does print)
Watermarks inserted by Word are image files. If they are text, they
are WordArt or in a Text Box. Word treats them as images.
There is a setting in Word dating back to Word 95, at least, that
lets you not show images on the screen. This speeds up display and was
more important in the past than it perhaps is now.
Check this Option setting. Here is the dialog box from Word 2003:
(Tools > Options)
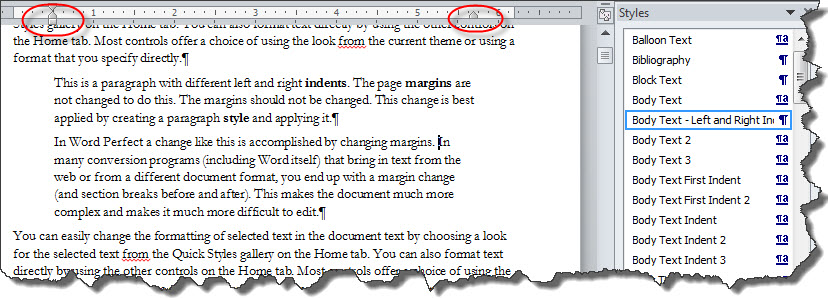
Page Margins (CK Note)
Page Margins are Section properties. They are set in the
Page Layout dialog. To change the indents of one or more
paragraphs, the paragraph formatting for left and right
indents should be set, not the page margins.
One feature allowed for margins is mirror margins. This
is intended to work with different even-and-odd
headers/footers. It allows for a binding area in documents
printed duplex. However, it does not work in Landscape
Sections if what is desired is to have the binding edge
along the long side of the paper. That would require
mirroring of top and bottom margins. A workaround is
described in
Mirrored
Margins in Landscape Pages in Microsoft Word.
Gutters in Word are set for binding on the left edge of text, even
though when using right-to-left text the gutter should be on the right,
there is no setting for this.
A workaround is described here:
Shifting Gutter Position to Right Using Shapes in the Headers -
Answers page
More on margins to follow.
Page Borders can be Section
properties
Page Borders are accessed through the Borders and Shading
Dialog Box. (Format > Borders and Shading)
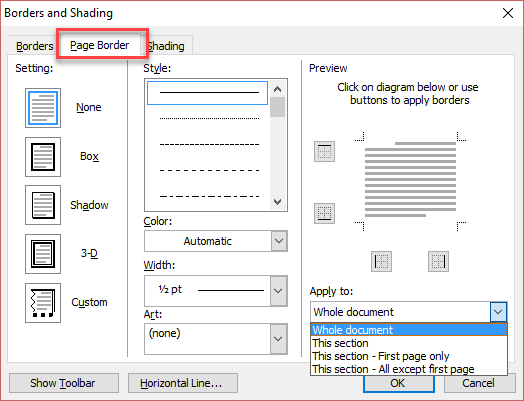
As you can see in the screenshot above, you can apply the
page border to the entire document, to the current Section,
or to either the first page of the section or every page
except the first page of the section.
| Change Columns for less than the entire
document (Continuous Section breaks)
Creating / updating an Index
does this |
| Change Margins for less than the entire
document (Continuous Section breaks) |
| Change Orientation for selected text
(Next page section break) |
You can have Word tell you which section you are in.
In which section is the insertion point?
A page can have multiple sections. The insertion point is where
the next letter you type will go.
The status bar at the bottom of the page can reflect the Section
in which the insertion point is found.
If this is not showing in your Status Bar, right click on it and
check Section.
In which section is the page?
You can use the
Section Field to give you the section number. This is similar to
the Page Field.
This can be used in a header or footer.
If there is a continuous section break on the page, it will give
you the section in which the definition of the footer is found.
Trouble Shooting Sections, Headers and Footers,
Page Numbering
Why is the spacing off in the footer of a landscape page?
- Check first to see if there are Section breaks setting off the
landscape page.
- Even though the footer will look the "Link to
Previous," that option
must be turned off.
- After turning it off, move the center tab to 5.5 inches and the
right tab to 10 inches.
- Continue to the following Section and, again, turn off "Link
to Previous."
The page number was formatted to show A, B, C. It's not appearing in
the footer.
Although the number was formatted correctly, it was not inserted. First
format the number to get what is needed; then insert the number in the
footer.
I can't see the headers and footers.
If you are in Normal View, it is necessary to click View > Header
and Footer. If you switch to Page Layout View (Word 97) or Print Layout
View (Word 2000) you will see them as unavailable. Double-click in the
header or footer and the Header/Footer toolbar will be accessible.
The Section break doesn't allow me to have both portrait and
landscape text on the same page.
Unfortunately, Word will not allow this by the use of a
Section break.
To achieve the desired effect, you must insert a text box.
CK
Note: Everything that follows
has been added by me and does not appear in the original of this chapter.
I have the codes for Page 1 of 3 (x of y) in my header/footer. It is
different on the screen from when it prints out. Or, I get Page 1 of 1,
Page 2 of 2, Page 3 of 3, etc.
Unfortunately this feature doesn't work very well. There are a number
of reasons for this, including background printing and the timing of field
updates. The best work-around that I have heard of is to use a
Cross-Reference for the "Y" of Page X of Y. Put a bookmark on
the last page of your document - at the very end - and use Insert |
Cross-Reference to insert the page number on which that bookmark may be
found. Other things to do include:
- Turn off background printing.
- Turn off display of hidden text if you have any in your document.
- View the document in Print Preview (Page Preview) mode including the
last page of the document to force an update of the fields.
For more on this see:
http://www.addbalance.com/word/pagexofy.htm.
For more on bookmarks and cross-references see
Complex Legal Documents.
I set my document for a "Different First Page" but that header/footer
is showing up on pages in the middle of my document.
Or, I have "Different First Page" set so I don't have a header/footer on
the first page but all of my pages or a lot of my pages besides the first
page have no header/footer.
Do you have Section breaks? Each Section has its own first page.
The settings for headers/footers are separate for each Section but are
often linked so that the header/footer in the first Section is continued
throughout the document.
Actually, each Section can have up
to three different headers (and three different footers), which is
the case if you have selected "Different odd and even" and
"Different first page" (also on the Header & Footer Tools Design
tab). When you have multiple headers (footers), each type must be
separately unlinked from its "neighbor" in the preceding
Section.
This gets especially complex if you have multiple Sections on a
single page. (Thanks to
Stefan Blom, MVP for putting this concept so well.)
My document has numerous Sections. How did they get
there?
Word can insert without notice Sections whenever you:
| Change Margins (not Indents, Margins) |
| Change the Page Numbering |
| Change Page Orientation |
| Change Column Arrangment |
Another way to end up with a lot of Sections is by
working with a converted
document (i.e. Word Perfect, pdf, OpenOffice,
Scanned Text) or text copied from a converted document
or from a Web page. The conversion software aims to make
a document in Word that looks like the original.
However, there is no conversion software that handles
Section formatting at all well, as far as I know as of
January 1, 2014. This includes documents that started as
Word documents, were converted to pdf, and then
converted back. The conversion software can make every
change or even apparent change in paragraph indents as a
margin change. You can end up with a three-page document
with fifty Sections!
If you want to edit such text, you are often far
ahead by simply copying as plain text and doing your
formatting using Styles to duplicate the original
formatting.
Missing Sections -
Ghost headers and footers - Page Number mysteriously
restarts
"Alright, so I have this problem and it's been driving me
absolutely INSANE for the past couple hours. I want to add page
numbers but for some reason, it re-starts from 1 in the middle of
the document."
"I get strange headers/footers popping up in the middle of my
document."
"I have a different header/footer in the middle of my document."
(Duplicates the First-Page header/footer from earlier in the
document, but this is not the first page!)
These complaints all have to do with there being a Section break
in your document, usually just before the problem. You can improve
your ability to deal with these by
displaying non-printing formatting characters in your document.
However, sometimes a Section break will be concealed at the end of a
line in Print View.
It also can be helpful to try editing in Draft View.
Every Section has its own first page. Every Section has three
headers/footers coded in even if you do not see any of them: First
Page, Odd Page, Even Page. These can be continued in a subsequent
Section. The setting for "Different First Page" is a
Section
setting. The setting for "Different Even and Odd" is a document
setting.
A single page can have three Sections (or more) with the
headers/footers set in the middle Section not displaying at all but
perhaps showing up in a linked Section that follows. Sometimes it
helps to temporarily insert a couple of page breaks in the middle of
a Section to display the headers/footers for that Section.
See Header/Footer
settings recap.
I know I can have a different header/footer on the first page of my
document / Section. Can I have a different one on the last page?
Yes, but it takes some work with fields. This is beyond the
scope of this article but involves using an IF field to test if the page
is the last page of the document or Section and give a different result
depending on the answer. See the
Fields article to see an
example.
I made a change in my Section 2 Header / Footer and
the Section 1 Header / Footer changed too.
You need to
unlink the header / footer. First, though, Copy your
new contents to the Clipboard. Then press Ctrl+Z until
it is back to what it looked like before you made the
changes. Then unlink the header / footer and Paste your
changes back. Remember, each header/footer's linked
state is
independent of all others.
I added a next-page Section break to my document. It
should have been a continuous Section break instead.
The way to handle this is through the Page Layout
Dialog. The simplest way to access this is by
double-clicking on the Ruler. It can also be accessed
through the Page Layout tab's dialog box dropdown. On
the Layout tab is a dropdown that lets you change the
type of the current Section.
This becomes a problem mostly at the end of a document where
there is a blank page that the user does not want. It is caused
by making a change in Section settings like margins, or
orientation to selected text. Changes to these settings
for selected text require insertion of a next-page Section break
because these settings can't apply to less than a page.
Word will not let you delete this section break if the
settings are different before and after the section break.
The way to fix this is to make these settings the same before
and after the break.
Click in the document so your insertion point is before the section break:
- Record a macro in which you visit each of the page
layout dialogs
- the margin dialog,
- the page size dialog,
- the Columns dialog,
- and the orientation dialog.
- OK out of each dialog box.
- End recording of your macro.
Then move your insertion point beyond the section
break and run the macro you just recorded.
Convert the next-page section break to a continuous break
(above) or insert a continuous section break before the
next-page section break to preserve headers and footers.
Then if you inserted a continuous break, select and
delete the next-page section break.
Paul Edstein, MVP (macropod) posted a
macro here to merge sections so that a section break can
be deleted without changing formatting. I believe it does
the steps outlined above. Although posted in 2011, it should
work in all versions of Word; it works in Word 2019/365.

The status bar will tell you which Section you are in.
Items that appear in the status bar
If you don't see a Status Bar, the display is controlled
in Tools > Options > View.
Word 2003 Status Bar Tutorial
| This is confusing. This is because it really is complex
to allow users the flexibility they need. If you don't need
that complexity, probably you will never see it.
|
| To understand what is happening in headers and footers
you need to know about Sections and Section breaks. Header
and footer coding is stored in the Section break that
follows the Section.
|
| You probably want to turn on display of non-printing
formatting marks or work in normal or draft view so you can
see Section breaks. Show
non-printing characters.
|
| Section breaks do not always start a new page.
Section breaks may be inserted by Word without notice when you
change columns, margins, page numbering, or page orientation within a
document.
|
| There are four kinds of Section breaks; the most
common are continuous and new page. The other two start a
new Section on either an even-numbered or an odd-numbered
page. The blank page that can be generated by such a
Section break will not have Headers or footers; it will be a
blank page. If you need Headers/footers on these pages,
Microsoft recommends insertion of a manual page break
immediately before the Section break to force a blank page
with Headers/footers. Otherwise, see John McGhie's article:
Create a non-blank, even-numbered page at the end of a
chapter.
|
| Manual page breaks do not change Header/footer settings.
New-page Section breaks can, as can continuous (no new page)
Section breaks. (All Section breaks carry Header/footer
settings.)
|
| Every Section will have three different Headers and
three different footers even if you never see them.
Because of this, and because there can be multiple Sections
on a single page, it may be easiest to temporarily expand
each Section to at least three pages (to see the First-Page,
Even-Page, and Odd-Page Headers and footers. This way you
can see what is in each Header/footer and what the settings
are. You can temporarily expand the number of pages using
manual page breaks (Ctrl+Enter)
|
| Section formatting is contained in the Section break
that follows the Section. If you delete all Section
breaks you can find in a document your formatting will be
contained in the last paragraph mark in the document, which
is the last Section break.
|
| If there is a Section break on a page, changes to the
Header/footer that follow that Section break may not have
any effect on the Header for the page that contains the
Section break. (Those settings or changes are stored in the
next Section break, the one governing that Section.)
Whether changes to the next header change the previous one
depend on the Link-to-previous setting of the next header.
|
| If you have a Section break on a page, the header and
footer for that page will be governed by the settings for
the first Section on that page, even if that Section
contains no text (i.e., the page starts with a Section
break).
|
| The Link-to-previous setting is specific to the
type of Header/footer: Primary Header, First-Page Header,
and Even-Page Header, Primary Footer, First-Page Footer,
Even-Page Footer. Link to previous is the default
setting.
|
| Link to previous is specific to Headers and footers (can
be different). It is also specific to each type of
Header/footer. That is, the first-page Header can be linked
to previous but not the first-page footer and not the
even-page Header. The Link-to-previous setting can be set
for each Header/footer in every Section after the first.
This setting can be different in each type of Header /
footer in each Section.
|
| Since each Section has three different Headers and three
different footers and the link to previous setting is
specific to the type of Header or footer, each Section
can have up to six different link-to-previous settings.
This is true even if the Header/footer to which it applies
is not visible. This is true even if the Section involved is
a continuous Section in the middle of a page and has no
Headers or footers displayed.
|
| The different-first-page setting covers both
Headers and footers and is a Section (not document) setting.
This setting is carried over into a new Section started from
a Section set for different-first-page.
|
| Different odd and even covers both Headers and
footers and is a document (not Section) setting. Enabling
this for the first time renames each "header" into the
"odd-page header" and each "footer" into the "odd-page
footer." The even-page headers and footers will now be
displayed. They will normally be blank and you will have to
add content.
|
| Each Section can have different settings for the
distance from the edge of the page for the Sections
Headers and footers. The default is .5 inches.
|
| Size: The page layout settings reserve room for
headers and footers. Even if there is no header or footer,
that reserved space will not be filled by the body text.
However, if you put more in a header or footer than the
space reserved, the body text will not overwrite it. The
header or footer will be allowed that space. This includes
space-after or space-before formatting of the line closest
to the body text.
|
| Copying and pasting content: Since the three
headers and three footers in a Section are independent of
one another it is often easiest to copy from one and paste
in another if you want to have the same content. I.e. you
want your first-page footer to be the same as the odd-page
footer. If you do this, turn on
display of non-printing formatting marks and delete the
extra paragraph mark after you paste.
|
| See also:
Quick Reference Card for Headers, Footers and Page Numbers
|
| See also:
Using
Headers and Footers by Suzanne Barnhill, MVP - excellent and
comprehensive web page |
|
What Happens When You Start a New
Section? What Gets Carried Over?
When you start a new Section, that Section will carry
certain attributes from the preceding Section. This is true
even if you started the new Section by changing columns,
orientation, or margins.
| Headers and footers will be linked to the
previous Section's headers and footers. You can
unlink them if you want. |
| If page numbering restarted in the existing
Section, it will restart in the new Section unless
the section break is a continuous section break. The
formatting of the page numbering will also be copied
into the new Section. |
| The line numbering setting will continue. If you
change it, it may apply to only the new section. |
| If you had a header or footer set to be
different first page, that will be the setting in
the new Section. |
|
Troubleshooting
Watermarks
See also
Troubleshooting
Sections and
Working
with Sections This chapter from original Legal Users Guide to
Microsoft Word 2002 -
document in zip format |
 since 28 August 2001
 Copyright 2000, Microsoft Corporation. Copyright 2000, Microsoft Corporation.
Copyright 2000-2002, 2004-2006, 2010-2026
Charles
Kyle Kenyon
See information about copy permission.
Search Intermediate Users Guide to Microsoft Word Using Google My office page as a
Madison,
Wisconsin Criminal Defense Lawyer.
Original Legal Users Guide to Microsoft Word 2002 - Documents in Zip Format
A note about link exchanges. This site does not participate in
link exchanges to build web presence. If you have a link that you think would be
of use to people reading this page, please send it to the webmaster with the url
of the page where you think it should appear and it will be considered. Your
placing a link to this site will not affect the decision on whether to add your
link, though.
|