|
| |
Complex Documents in Microsoft Word
Last edited by Charles Kenyon on
Friday 09 January 2026
What You Will Learn
After completing this lesson, you will be able to:
Additional Written (and Web) Resources
 | Word for Law Firms by Payne
Consulting Group:
|
|
Track Changes, Merge
and compare documents, insert comments (another chapter in this
usersguide) |
|
Mail Merge Using a basic document filled
with information from a datafile (another chapter in this usersguide) |
|
Complex
Documents - Word 2002 (Word Format - not supplemented) |
| MetaData in Word Documents and Confidentiality
by Bob BlacksBerg
|
Introduction to Tables of Contents - Microsoft video course -
says applies to Word 2013 but concepts apply to all versions of Word |
|
Take Tables of Contents to the Next Level - Microsoft video
course - says applies to Word 2013 but concepts apply to all
versions of Word |
|
How to Make a Table of Contents in Word - video by Kevin
Stravert |
|
How Can I Include Just Part of a Paragraph in My Table of Contents
by Suzanne S. Barnhill, MVP |
| Bookmarks and Fields Sampler
by Jay
Freedman and Charles Kenyon |
| Ask Fields and Bookmarks
by Charles Kenyon |
|
Table of Contents basics in Word - Office Watch |
| | Preparing
your document
Making
a simple TOC
Updating
a Table of Contents
TOC
Title
Add
Text
Changing
the ToC
Options
Modify
Multi-level
Table of Contents |
|
How
to Create an Index by John McGhie |
|
TOC Tips and Tricks
by Suzanne Barnhill, MVP |
|
Customizing
Your Table of Contents with Switches by Suzanne S. Barnhill, MVP. |
|
Format or Customize a Table of Contents - Microsoft Support |
|
Create a Table of Contents on Word for the Mac (Versions 2016/2019
and 2011) - Microsoft |
|
Microsoft Documentation on the Table of Contents (TOC) Field |
|
Microsoft Documentation on the Index Field |
|
Microsoft Documentation on the Table of Authorities (TOA) Field |
| Word
Bookmarks by Cindy Meister |
|
How to Create a List of Abbreviations in Microsoft Word by
TechWalla |
|
How to number headings and figures in Appendices by Shauna Kelly |
|
Section 7 Captions and cross-references | Microsoft Word for the
Social Sciences |
|
Captions - Add, Format or Delete Captions in Word (Microsoft) |
|
Add chapter numbers to captions in Word - Microsoft Support |
| Quickly
Reorganize Long Documents Using Outline View (Microsoft) |
|
The
Pitfalls of Word's Table of Contents Features by Tim Byrne of
Microsystems Engineering |
| How
to Use Word to Create a Thesis - People writing a thesis are
facing problems similar to those faced by people trying to create
complex legal documents. However, they may have little experience with
Word. This is a tutorial for them. You may find it useful as well.
University of Waterloo, Waterloo, Ontario, Canada |
| How
to Control Page Numbering in Microsoft Word by Bill Coan,
MVP.
Using Fields for Page Numbering - Much more Control |
| Folio by Chapter or "I
want to include the chapter number with the page number in the Header
– how can I do this?" by John McGhie, Word MVP |
| Gender Toolbar Add-In by
Charles Kenyon (uses document properties, autotext, and fields) |
| How
to create a menu to navigate through the non-hidden bookmarks in a
document by Astrid Zeelenberg. (Note this is for documents that
will be used on-line rather than ones that will be printed or
converted to .pdf files.) |
| Why
do my footnotes sometimes end up on a different page from their
references in the text? by Suzanne S. Barnhill, MVP, and Dave Rado,
MVP. |
| StyleRef Field
Tutorial - short Word document download |
| IncludeText
Field Tutorial - 2 documents with IncludeText links demonstrating
switches, interaction of styles, and use of hidden Page field for continuous
page numbering of separate documents. |
|
So You
Want to Write a Book Using Microsoft Word - extensive tutorial
by MVP Daiya Mitchell with overview of Styles,
Templates and
Sections and the interactions among these tool/features.
Excellent! Not just for those who want to write books! |
|
Word
Fields Part III : (Advanced) Using Events to Push the Envelope (Includes
Index Hyperlinks!) by Cindy Meister, MVP
- note this is an archived page - you may need to go to an earlier
date |
|
Putting one page inside of another by Office for Mere Mortals |
|
Accept all tracked changes to page numbers and cross references only
by Paul Edstein |
|
Creating a Table of Contents Spanning Multiple Documents by
Jonathan West, MVP (archival) |
|
How to create a table of contents in Microsoft Word by Shawna
Kelly, MVP |
|
Why use Microsoft Word’s built-in heading styles? by
Shawna Kelly, MVP |
|
Table of Contents Add-In by Graham Mayor, MVP |
| Using
Styles in Letterhead and in Headers and Footers by Charles Kenyon
- the StyleRef field |
| An older version of
this
chapter in Word format - Note that the chapter (as modified)
contains text, actual cross-references, at least one footnote, and
three Tables of Contents which cannot be accurately reflected on this
web page. If you are having problems understanding the concepts
described in this chapter, I suggest that you look at it in the Word
version. |
|
How to set up a document with front matter numbered separately -
2007/2010/2013 by
Suzanne Barnhill, MVP |
|
Two ways to create a Table of Contents in Word by legal office
guru Deborah Savadra (video) |
|
Creating a highly-customized Table of Content using Table Ently (TC
Fields) by legal office
guru Deborah Savadra (video) |
|
How to number headings and figures in Appendices by Shawna Kelly |
|
Hyperlinked Indexes - Index Linker - an Add-In |
|
Formatting Cross-References by Suzanne Barnhill, MVP |
|
Microsoft Word 2010 Bible by Herb Tyson, MVP |
|
How Cross-Reference Fields in Word Work by Lene Fredborg, MVP. |
|
Formatting Cross-References by Suzanne Barnhill, MVP |
|
Add Screen Tips to Text in Word by Lene Fredborg, MVP - macro
set to use Hyperlink field to give mouse-over text |
|
Insert your first
Table of Contents - a Microsoft Training Template |
|
Insert a Table of Figures - Microsoft Support |
|
Multiple Tables of Contents in One Document With Entries Not in Same
Area - Solution by Jay Freedman, MVP. |
|
Getting Rid of the Jason Tab in a Table of Contents |
|
Indexing - How to create a muti-level index in WORD - see MVP
Stefan Blom's responses |
|
Build an Index in Word Using a Concordance File (video) by Chris
Menard |
|
Create and Manage Indexes - LinkedIn Learning video |
|
Create and Manage a Table of Figures - LinkedIn Learning Video |
|
Add formatting to a Table of Contents - Microsoft Support Video |
|
How to auto-number thesis chapters and sections in Microsoft Word by
James Hayton, PhD |
|
Manual Troubleshooting of Cross References by Lene Fredborg, MVP |
|
Boilerplate Macro Package
See Also:
[ Home ] [ Introduction ] [ Web Resources ] [ Word Books ] [ Confidentiality ] [ Word FAQ ] [ Downloads ] [ Word 2002 ]
 
(this
guide table of contents) ----- (MS
Word New Users FAQ)
Search Usersguide to Microsoft Word using Google
Complex Document Overview
Complex documents in a legal environment are plentiful, and generally
these documents are to be filed or sent to clients on a time sensitive
basis. That's why knowing the ins and outs of the tools that Word has to
offer in the quick creation of Tables of Contents, Tables of Authorities,
Indexes, cross-references (and more) is essential in the timely completion
of these documents.
CK Note: A key to drafting and editing complex documents in Word is
using
Styles in your formatting, especially the
built-in heading styles. In Word 2007 and later the features
discussed in this chapter start with the References Tab on the Ribbon.

Quick Navigation Using Document Map or
Navigation Pane
When you use styles in your complex document Microsoft Word's Document
Map feature lets you quickly move to different headings within a document.
This is a real time-saver when working with long documents.
The Document Map is just like a road map. If you have used heading
styles within your complex document you can maneuver your way through the
document by clicking on the corresponding heading that you need to access
for editing. By clicking the heading, you are transported to that
destination in your document. So, if you had a document that was
42 pages long, and you needed to get to heading 6.2 on
page 31, just click on the heading in the Document Map area and you
quickly move to this location.
CK Warning - The Document Map has known bugs that can corrupt your
document if you use it to reorganize. This was fixed with the
Navigation Pane in Word 2010. The Outline
View does not have the drawbacks of the Document Map and can be used
in all versions of Word, at least since Word 97.
Practice: Navigate Using Document Navigation Pane (Word 2010 and
later)
- Create or open a long document formatted with heading styles.
- View Tab and check the box for Navigation Pane.
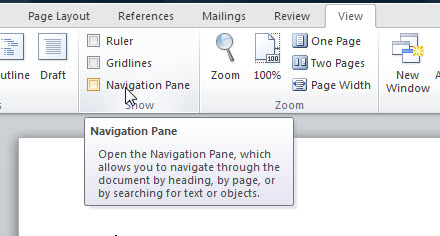 - Click on a heading within the
Navigation Pane to move to that section
in the document.
- Click on a different heading in the document map to move to another
section within the document.
To turn off the Document Pane, click X at the top right corner of the
pane.
See also Outline View in Microsoft Word
Practice: Navigate Using Navigation Pane (Word 97 - Word 2007)
- Create or open a long document formatted with heading styles.
- Click the Document Map button on the Standard toolbar, or from the
View menu, choose Document Map.
- Click on a heading within the document map to move to that section
in the document.
- Click on a different heading in the document map to move to another
section within the document.
To turn off the document map feature, click the Document Map button on
the Standard toolbar. The button works as a toggle.
CK Warning: Using the Document Map
to move text in a document can lead to document corruption!
 |
CK Note: This chapter gives step-by-step instructions on
generating a Table of Contents. Here are what I consider some of the best
reference articles on generating a Table of Contents in Word.
Tables of Contents generated by Word are
fields. Specifically, a TOC field. The simplest way to create
such a field is to type the letters "TOC" and select them, then press
Ctrl+F9 to make it a field. (It will look like { TOC }.)
Then press F9 to update the field. That gives you a table of
contents for outline levels 1-9. You can do much more. The following
shows you how to mark text to go in the Table of Contents, how to
generate that field so that it only handles certain levels and more.
|
When you use Word's built-in styles or your own custom styles within
your long document, generating a table of contents can be as easy as
1-2-3. Word will do all the work for you by inserting your applied
headings (at their different levels) into a quickly generated table of
contents. You can also customize your indents, tab leaders, page numbers,
and even other formatting for your table of contents easily in the
creation process of your TOC.
You are not restricted to using just the heading styles method of
creating a table of contents, you can mark your headings manually, or you
can define what styles the table of contents includes by selecting any
styles from within the document.
See also:
Two ways to create a Table of Contents in Word by legal office guru
Deborah Savadra (video)
Practice: Generate a Table of Contents Using Applied Styles
- Create a new document and type the following text:
Introduction
Overview
Unsolicited
Proposals
Solicited Proposals
General
The Proposal
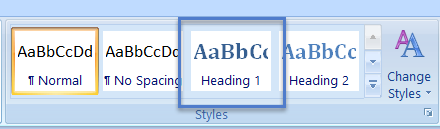
- Click anywhere within the first line, Introduction.
- (Word 97-2003) Click the Style drop-down arrow and apply Heading 1.
(Or, press Ctrl+Alt+1)
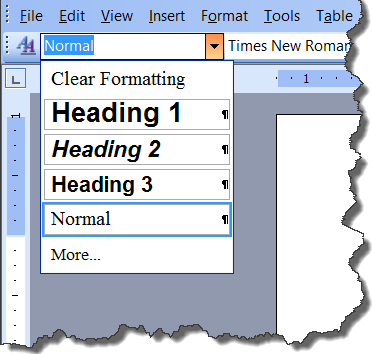
(Word 2007-2019) Click the Heading 1 style in the QuickStyles
Gallery. (Or, press Ctrl+Alt+1)
|
Note In Word 97, finding your style in
the Style drop-down list can be a bit confusing. The styles are not
listed in alphabetical order. In Word 2000 the styles are
listed alphabetically. |
- Select Overview, and apply Heading 2.
(Ctrl+Alt+2)
- Select Unsolicited Proposals, Solicited Proposals and General. Apply
Heading 3.
(Ctrl+Alt+3)
- Select The Proposal and apply Heading 2 style and after deselecting
the text, press Enter twice.
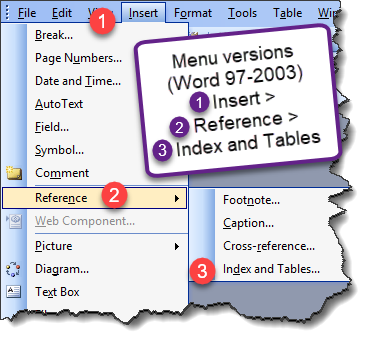
- (Word 97-2003) From the Insert menu, choose References > Index and Tables. Select the Table of
Contents tab.
(Word 2007+) On the References Tab, Click on the Table of Contents
Button and Select Custom Table of ContentsWord 97 Table of Contents Tab:
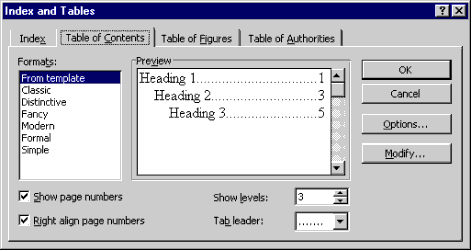
Word 2000-Word 2019 Table of Contents Tab:
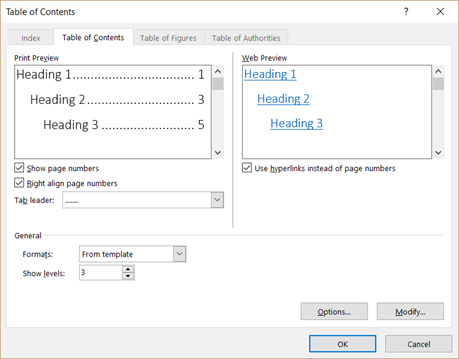
As you see from the two previous figures, the only difference between
Word 97 and Word 2000-2019's Table of Contents tabs is that
Word 2000-2019 allows you to preview your table of contents, as it will
look on the web, not with page numbers, but with your headings as
hyperlinks.
|
Note On the Table of Contents tab in the Index
and Tables dialog box, Word provides you with the default format
"From Template," and lists other options under the Formats box. By
clicking on the other available formats within the format area
notice how the preview of the table of contents change, as well as
the available options below the Formats and Preview sections in the
dialog box based on the format selected. CK Note: Word
2007/2010/2013/2016/2019/2021/2024/365 Insert Table of Contents is through the References Tab.
Picking a gallery option there is not the recommended method, though, for documents that will
have a multiple-page TOC. Inserting a TOC using a gallery choice on the
References tab inserts a special document part in addition to the
TOC field and such a TOC can take longer to create or update than
one using only the field.
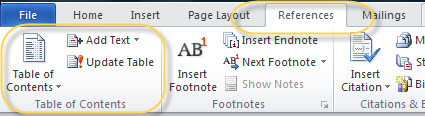 In
the Ribbon versions you can get to the dialog with TOC settings
under the Table of Contents Button. You use the Insert Table of
Contents... (Word 2007-2010) or Custom Table of Contents... (Word
2013-2024/365) selection near the bottom of the menu.
| If you go to
macros, word commands, InsertTableOfContentsMenu brings it up. If
needed often, it can be attached to the QAT. |
| You can also get it by right-clicking on the Table of
Contents and choosing Edit Field. In the Field dialog box click
on the Table of Contents button. Make the changes you want. When
you click on OK Word asks you if you want to replace the
existing TOC. Choose "Yes" to save your changes. You can get to
this without an existing TOC by using Insert > Field. |
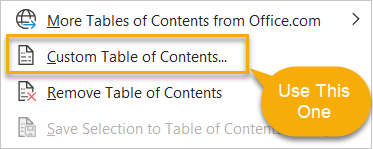
Recommended method for Word 2007-2024 is to directly
insert the TOC field. There are two ways to do this. Both bring up
the Table of Contents dialog without inserting the field within a
separate document part.
- The first is under the Insert Table of Content button on the
References tab. In Word 2013 and later, choose "Custom Table of
Contents." In Word 2007 & 2010, choose "Insert Table of Contents"
from the Gallery.
- The second is Insert Tab > Quick Parts > Fields > TOC. Click on
the Table of Contents button.
- For either method, if you accept the default settings, you will
get the same entries in your Table of Contents as if you had picked
one of the Gallery choices.
You can use the Tables of Contents from the Gallery, they will work,
however, it will be slower in use even if quicker to insert. The
Gallery choices also all include a Title like "Table of Contents"
or Contents as
a part of the Content Control.
|
- Accept the "From Template" default. Click OK and your table of
contents is generated.
Practice: Generate a Table of Contents By Manually Marking
Entries
-
Create a new document and again type the following text:
Introduction
Overview
Unsolicited
Proposals
Solicited Proposals
General
The Proposal
- Select the first line Introduction.
- Press Alt+Shift+O on the keyboard. This combination opens the Mark
Table of Contents Entry dialog box. (Notice that your selected text is
in the Entry field.)
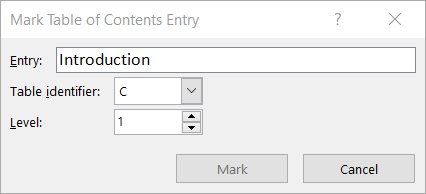
- The Table Identifier default is C if you do not have any other
tables (Table of Figures, Table of Authorities, etc.) within your
document. This is for multiple tables and allows for hierarchy among the
tables.
The next field is the Level identifier for your selected text. You
change this field to correspond to whatever heading levels you have
selected.
- Click Mark, and your TOC entry has been marked for insertion to your
table of contents. The Mark Table of Contents Entry dialog box will stay
open so that you can click twice back into your document and select the
next heading without closing the dialog box.
- Select the next heading, and then click twice back into the dialog
box, and the newly selected heading will automatically be placed in the
Entry field.
- Mark all of the headings in your document with the appropriate
levels.
- Place the insertion point where you want the table of contents to be
generated. From the Insert menu, choose Index and Tables. Select the
Table of Contents tab.
- Click Options.
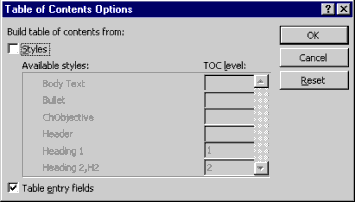
- Under the option for Build table of contents from, uncheck the
Styles checkbox and check the option for Table entry fields. Click OK,
and then OK again to close the dialog box and to generate your manually
marked table of contents.
|
|
CK
Note: Manually inserting a
Table of Contents Entry inserts a TC field in
your document. For more on this field, see the Microsoft Support page
on it. The display of TC fields, unlike most other Word
fields, is controlled by the option to
display hidden text. This can be quickly toggled using Ctrl+Shift+8
(Ctrl+*). Using the Alt+Shift+O shortcut to enter the TC field
automatically turns this display of hidden text on. |
Using the Add Text Option in the Table of
Contents group of the References Tab - Word 2007 and later
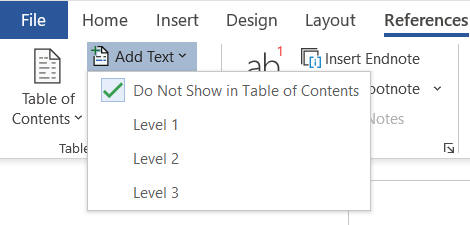
The Add Text command gives you a short menu.
The default is to not show text in the TOC and you will notice it is
checked.
If your paragraph already has an Outline Level of 1-3
the level will be shown and you can escape this menu.
What this menu does is the equivalent of pulling up the
Format Paragraph dialog and assigning an Outline level to the
paragraph. Unlike the TC command, it does not use the selected text but
marks the entire paragraph.
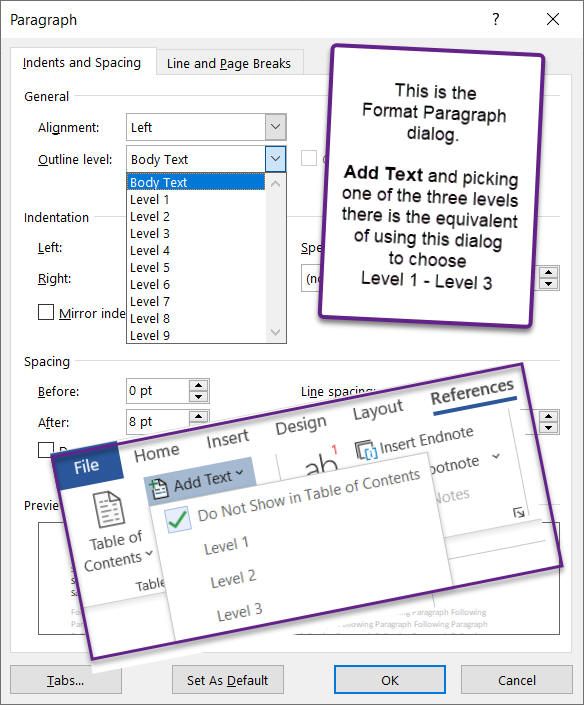
Paragraphs so marked will appear not only in the TOC
but also in the Navigation Pane.
Generating a Table of Contents Using Word 2007 and Later
- The Gallery
The instructions above work. The
method of manually marking text to go
into the Table of Contents is the same in all versions. This section is
about the Gallery entries that come with the Ribbon Versions of Word.
There are three of them. If you do not have a Ribbon Version of Word,
skip to Updating a Table of Contents.
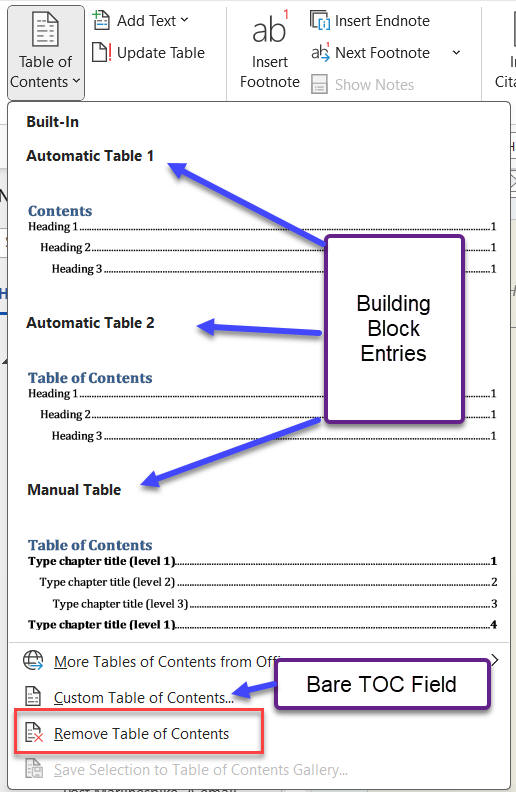
Word 2007 and later move the Table of Contents controls to the
References tab on the far left end of the tab. If you click on the
Table of Contents button you get a drop down menu. By default that menu
looks like this:
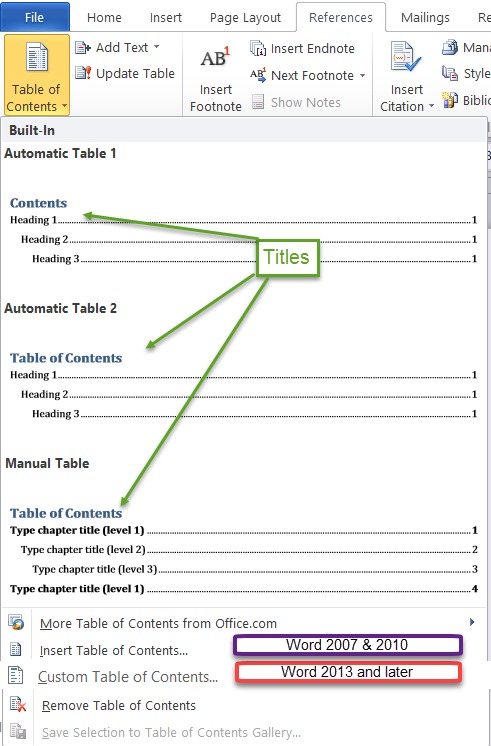
The first two entries "Automatic Table 1" and "Automatic Table 2"
insert a TOC field inside of a Content Control under a Title. The only
difference between the two is the Title: "Contents" or "Table of
Contents." In the document, when selected, the Content Control looks
like this:
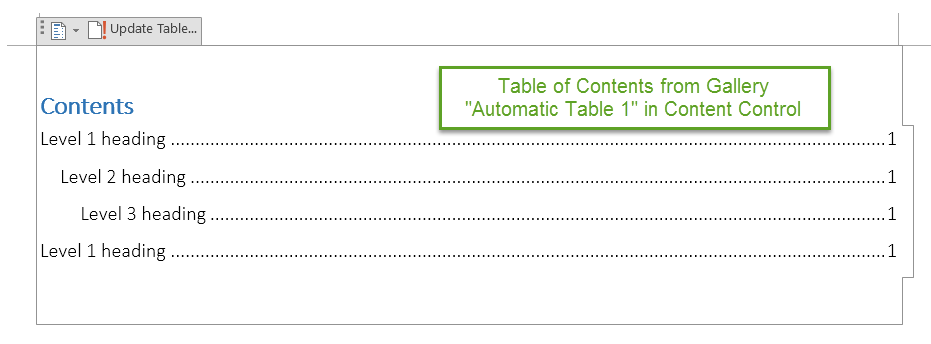
The "Update Table" tab and the outline disappear when your selection
is outside of the TOC. This is a Content Control. It is noticeably
slower at updating or editing than is the simple field. Again, the only
difference with "Automatic Table 2" is that it will read "Table of
Contents" instead of "Contents." If you use the "Insert Table of
Contents" (Word 2007/2010) or "Custom Table of Contents" (Word 2013 and
later) commands instead of picking an entry, you will get just the field
rather than the Content Control with title. I have provided a
template on my
downloads page that lets you add this to the gallery if you would prefer
that to using the command.
The third entry "Manual Table" inserts Content Controls formatted
using the TOC1-TOC3 styles instead of a field. You then type your own
content and page numbers. It is not at all automatic other than the
styles for formatting. Although the TOC Content Control says "Update
Table" because it contains no fields, clicking on that will generate an
error message. (It won't hurt anything, though.)

Each entry in this is a Content Control that will disappear once you
type in it. The page numbers are entered manually, not generated from
the pages that something is actually on.
The "Insert a Table of Contents..." choice takes you to the classic
Insert Table of Contents Dialog that lets you pick options. In Word 2013 and
later, this choice is "Custom Table of Contents..."
In my Word installation, I've gone so far as to delete the automatic
Table of Contents and Manual Table of Contents entries using the
Building Blocks Organizer under Quick Parts.
Again, there are two components to any Table of Contents, the field and
the TOC styles. The field controls what goes into your TOC, the styles
control how the TOC looks. This is covered in MVP Suzanne Barnhill's
article TOC Tips and
Tricks.
If you create a Custom Table of Contents, you can select it and add that
field to the Gallery using the "Save Selection to Table of Contents
Gallery..." command on the menu. If you changed the TOC styles, you will
need to get those styles in a document to perfect the look.
Updating a Table of Contents
As with all complex documents, edits are constantly occurring. These
edits will ultimately affect your initially generated table of contents.
There are various ways to update the table of contents:
| METHOD |
ACTION |
| Shortcut menu (Alternate-click) |
Click anywhere in the table of contents and select Update
Field |
| F9 |
Click anywhere in the table of contents and press F9 |
| Select Text+F9 |
Only updates selection. This works well when you have other
fields in the document |
| Tools, Options, Print tab, Update Fields |
This allows the document to update all fields whenever you print
the document |
| Word 2007+ References Tab Update TOC |
This updates the table of contents from anywhere in the document.
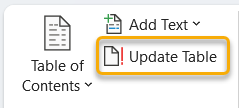 |
| Word 2007 and later Update from Content Control |
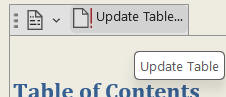 When a TOC
is inserted from the References tab using one of the Building Blocks
in the Table of Contents Dropdown, the TOC will be inside a Content
Control. Selecting the TOC gives access to the commands shown
including Update. When a TOC
is inserted from the References tab using one of the Building Blocks
in the Table of Contents Dropdown, the TOC will be inside a Content
Control. Selecting the TOC gives access to the commands shown
including Update.If you are not in a TOC and there are multiple
TOCs, this only updates the first Building Block TOC in the
document. |
| Word 2007 and later Update from Context Menu |
The Context (Right-Click) menu for a TOC contains an
update command. |
When you decide to update your table of contents and use one of the
options listed previously, the Update Table of Contents dialog box
appears.
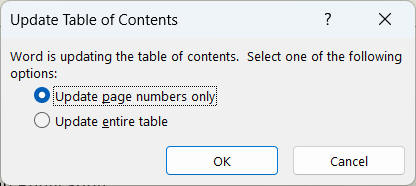
You are asked whether you want to Update page numbers only, or if you
would like to Update entire table. If you have manually changed any text
in the table of contents and only want the page numbers to be updated,
select that default option.
Otherwise (almost always), you want to update the entire table.
 |
Warning If you have made manual changes and
choose to update the entire table all of your changes will be lost.
If you have not made any manual changes to the entries, but have
added or moved headings within the document, select the entire table
option. |
|
|
CK
Note: If
your page numbers show up in Arabic (1, 2, 3, etc.) or Roman (I, II,
III, etc.) in your Table of Contents when the page numbers on the
pages are otherwise, it is probably because you formatted the
numbers in your headers or footers using field formatting switches rather than using the
Format
Page Number dialog. |
[ Home ] [ Introduction ] [ Web Resources ] [ Word Books ] [ Confidentiality ] [ Word FAQ ] [ Downloads ] [ Word 2002 ]
(this
guide table of contents) ----- (MS
Word New Users FAQ)
Search Usersguide to Microsoft Word using Google
By default, a Table of Contents generated in Word
will contain hyperlinks to the sections listed in the Table of Contents.
These hyperlinks are normally invisible (not formatted using the Hyperlink
character style). Word 2000 makes the entire entry a hyperlink. In
Word 97 only the page numbers are hyperlinks. If a document has a Table
of Contents generated using Word 2000 and is read or edited in Word 97,
the hyperlinks on the text in the Table of Contents will remain unless
that Table of Contents is updated using Word 97. However, they will be
formatted using the Hyperlink character style (blue and underlined by
default) in Word 97.
If you right-click on the Table of Contents and
“toggle” the field code, you will see how the field is constructed.
One of the “switches” in the field is “\h.” If you delete this
switch and update the field, the hyperlink property of the text will
disappear in Word 2000. (The page numbers will continue to act as
unformatted hyperlinks, though.).
Normally the Web and Word versions of this Users'
Guide are very similar and interchangeable. However, in this chapter, I've
added examples in the Word
version that can't be accurately reflected here. Those examples are
accompanied by text which also isn't shown here. The field code generated
by default in Word 2000 is The field code for this is: { TOC \o
"1-3" \h \z }. The Word version of this chapter
demonstrates the Table of Contents and contains three different Tables of
Contents with different field codes to show how these can be modified to
change the heading levels and remove the hyperlink switch. See also
Customizing Your Table of Contents with Switches by Suzanne
Barnhill.
In Word 97-2000, the hyperlinks are shown in the
Table of Contents with blue underlined text. In later versions of Word,
the hyperlinks to content for the entire entry continue with the \h
switch, but the hyperlink formatting of blue underlined text is
suppressed. This leads to a further anomaly...
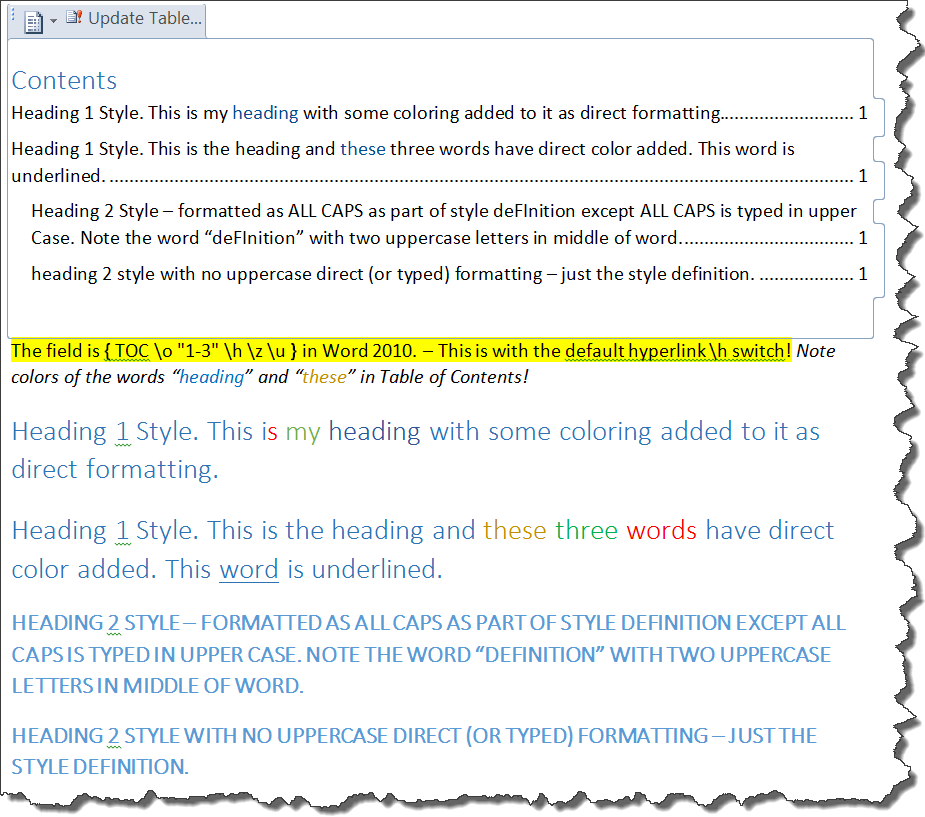
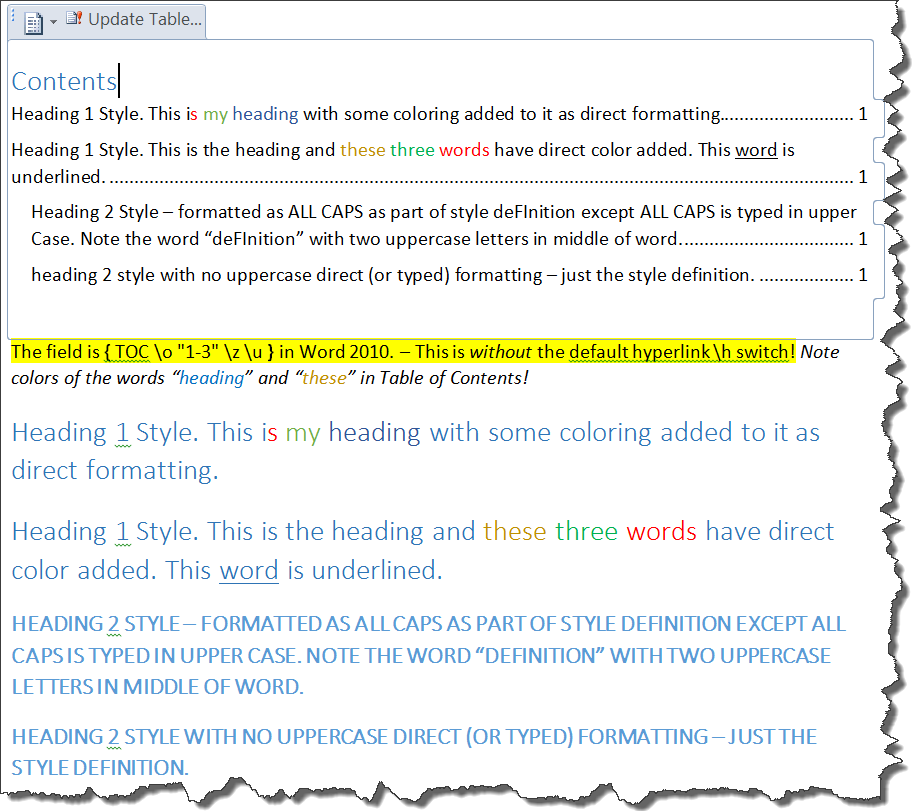
With the default field code, the entries in a Table
of Contents are
hyperlinked to the content shown in the TOC. This is done with the \h switch
in the TOC field.
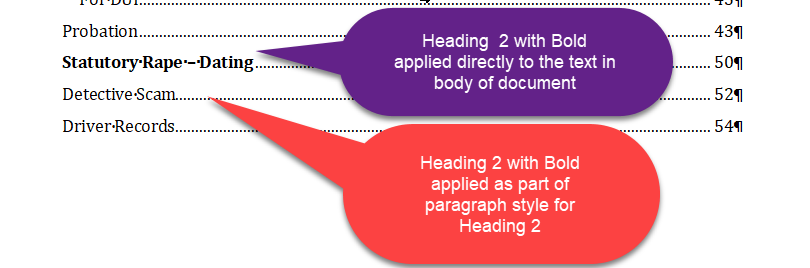
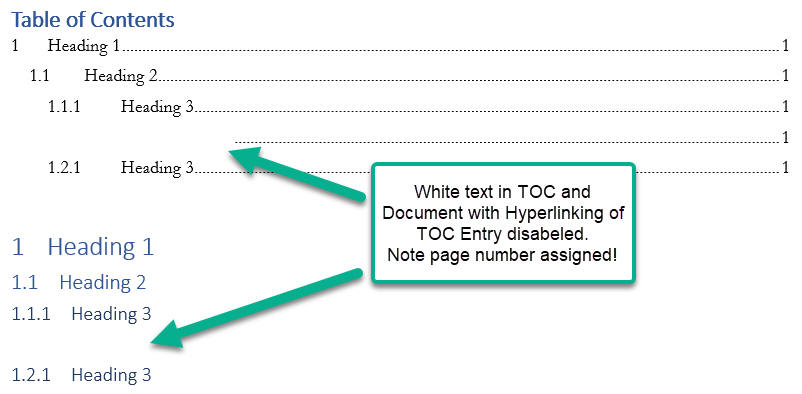
Without that switch, direct formatting applied to the entry (that is,
not done through the paragraph style) will show up in the Table of
Contents. However, with the \h switch you get no underlining from the
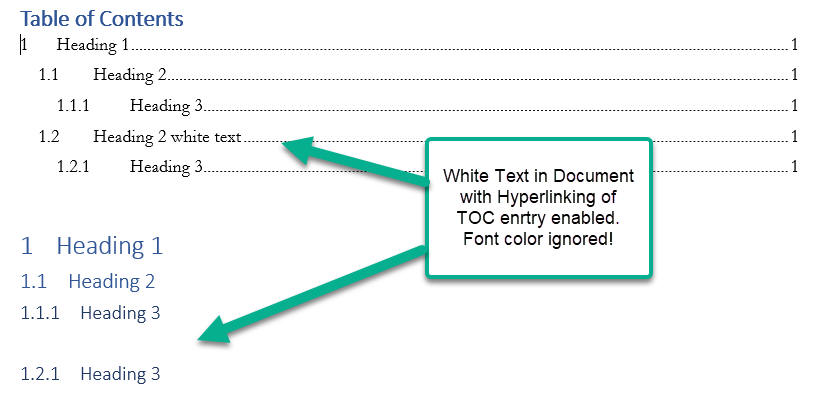
original text and in Word versions up to 2007 no color. In Word 2010 and
later, you may get some color reflected some times, but not necessarily the color
from the original and not always. As far as I can tell you might get blue color in the
TOC. Here is an example of a TOC and related text in Word 2010 with and
without the \h switch.
Strangely enough, a
macrobutton field in text which is
also in a style set to be in a Table of Contents will be formatted in
the Hyperlink style when shown in the Table of Contents and the field
will be active in the TOC.
I assume that this would also apply to
Tables of Authorities and Tables of Figures (but have not verified
that). See also Suzanne Barnhill's article on
direct formatting and a Table of Contents.
The formatting of the Table of Contents itself is
determined by the Styles TOC 1, TOC
2, TOC 3, etc. You need to modify those styles to make changes in the
appearance of your Table of Contents that you can't get from the choices
offered by Word. If you just modify the format directly, your changes
will be lost when the table is updated. See Troubleshooting an example on this.
Sometimes it is useful to have a Table of Contents for only part of a
document (i.e., a chapter). This can be done by selecting that part and
inserting a Bookmark for that part. Then, you
modify the TOC field to include a "switch" that makes it active only for
the bookmarked text.
If, after inserting the Table of Contents, you press Alt+F9 to
toggle display of field codes you should see something like this:
{ TOC \o "1-3" \h \z \u }
The codes above are for a default Table of Contents. If you want to
have it only for that portion of your document that is in the bookmark
"Chapter_4," you would modify the field to read:
{ TOC \b Chapter_4 \o "1-3" \h \z \u }
Then press Alt+F9 and F9 to update your Table of
Contents. It should now reflect only those entries within that bookmark.
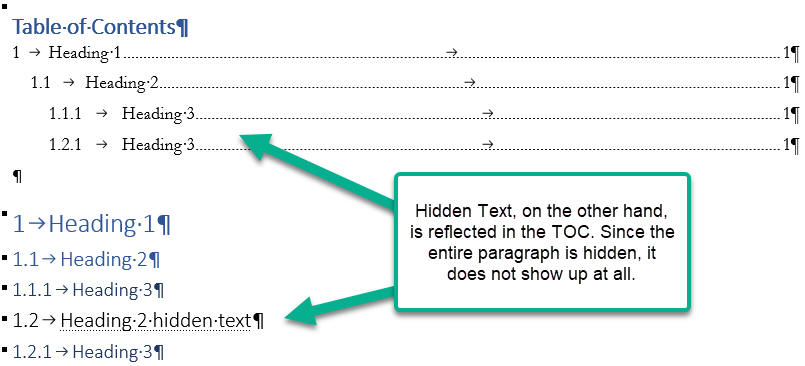
Putting Only Part of a Heading in a Table of Contents Automatically Using the
Style Separator -
CK Note
The Table of Contents field uses items marked with
the TC field or with certain Outline levels like the Heading Styles. If
you have a lengthy heading and only want part of it in the Table of
Contents, this can be done (beginning I believe with Word 2002) using a
Style Separator.
The following screenshot shows a paragraph with two paragraph styles
applied, separated by a Style Separator.
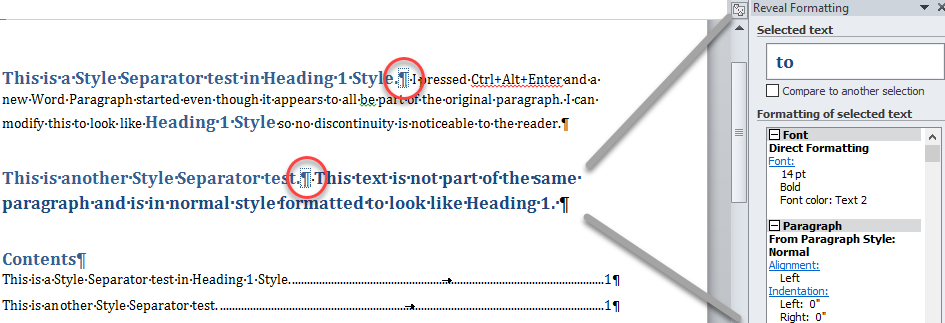
When a Style Separator is used,
normally the Styles on either side appear to be the same. The color of
one was changed here for demonstration purposes.
See
here for more
on using the Style Separator and creating the continuation style,
including a
cautionary note about joining automatically numbered paragraphs
using the Style Separator.
It is possible to create a single Table of Contents for multiple
documents. That Table of Contents should be a separate document
containing
RD fields. (Referenced
Document)
The fields needed for that could be in the format:
{ RD "Chapter 1.docx" \f }
{ RD "Chapter 2.docx" \f
}
{ TOC }
The above is for all of the documents in the same folder.
Note that the braces {} cannot simply be typed. You need
to have Word insert a field.
Using Fields in Microsoft Word - a Tutorial in
the Intermediate Users' Guide to Microsoft Word
The simplest way to remove a Table of Contents is to select it and
Delete. If you do this, press Shift+F9 to reveal the TOC
Field code first. You will want to delete the field.
If the TOC was inserted from a TOC Building Block
(one from the Gallery), it will have a
Content Control container. You can select that by clicking on the three
dots. Then delete the entire Control.

Or, for one created from a TOC Building Block, you can
pick the drop-down and pick Remove Table of Contents. Note that if
there are multiple Tables of Contents in the document, that command will
remove the first one in the document even if you are working with a
different one!
If the TOC is a bare field like {
TOC
\o "1-3" \h \z \u }, simply select and delete the field.
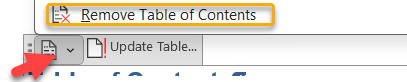
Keep in mind that there are two types of Tables of Contents in Ribbon
versions of Word. While the Table of Contents menu under the References
tab has a "Remove Table of Contents" Command, that command will not
remove a simple bare TOC field. It will remove the first Table of Contents
in the document that was
inserted from one of the TOC Building Blocks in the Tables of Contents
Gallery. (See screenshot below.)
If the document contains multiple Tables of Contents, this Remove
Table of Contents command will remove the first Building Block
TOC in the document. This is true even if you have selected a different
Table of Contents.
Again, it will not remove a TOC inserted as a bare TOC Field.
Removing All Tables of Contents in a document other than one at a
time will require a macro. (or tedious manual work)
This was discussed in the Microsoft Word VBA forum in
this question.
There are several macros that work well. Here is one from Greg Maxey:
Sub TOCRemoveAllMaxey()
' Greg Maxey 9 Jan 2026
'
https://www.msofficeforums.com/word-vba/53950-delete-table-contents-2.html
' Removes all Tables of Contents in a document, including TOC
Headings
' Includes those inserted from Building Blocks as well as bare
fields
' Removes Manual TOC inserted from menu as well as Automatic TOCs
'
Dim oRng As range, oRngTOCHdg As range
Dim TOC As TableOfContents
For Each TOC In ActiveDocument.TablesOfContents
Set oRng = TOC.range.Paragraphs(1).range
oRng.Collapse wdCollapseStart
Do Until oRng.Style = "TOC Heading" Or oRng.Start =
ActiveDocument.range.Start
oRng.Move wdParagraph, -1
Loop
If oRng.Style = "TOC Heading" Then
oRng.End = oRng.Paragraphs(1).range.End
If Not oRng.Start = ActiveDocument.range.Start
Then
Set oRngTOCHdg = oRng.Duplicate
Do While
oRngTOCHdg.Paragraphs.First.Previous.Style = "TOC Heading" Or _
Len(oRngTOCHdg.Paragraphs.First.Previous.range.Text) = 1
oRngTOCHdg.MoveStart
wdParagraph, -1
Loop
End If
If oRngTOCHdg.Paragraphs(1).Style = "TOC Heading"
Then
oRngTOCHdg.Delete
Else
oRng.Delete
End If
End If
Set oRng = TOC.range.Characters.Last
'This should delete the TOC and where applicable, whatever is
left in the container
Application.CommandBars.ExecuteMso ("TableOfContentsRemove")
'However, in some configurations, the above command fails.
So, use a sledge hammer.
If Application.IsObjectValid(TOC) Then TOC.Delete
'Delete empty trailing paragrahp if present.
If Len(oRng.Paragraphs(1).range.Text) = 1 Then oRng.Delete
Next 'lngIndex
lbl_Exit:
Exit Sub
End Sub
One I wrote is:
Sub TOCRemoveAll()
' Charles Kenyon 7 January 2026
' Deals with up to one hundred Tables of Contents from Building Blocks
' (i.e. in containers)
' Removes Bare TOC Fields
' Does NOT remove manually added headings for TOC fields
'
https://www.msofficeforums.com/word-vba/53950-delete-table-contents-2.html
' above thread discusses multiple options
' This is shorter and may be all that is needed, TOCRemoveAllMaxey is
more thorough.
'
Dim i As Long
Dim TOC As TableOfContents
' Remove up to 100 Tables of Contents from Building Blocks with Headings
For i = 1 To 100
Application.CommandBars.ExecuteMso ("TableOfContentsRemove")
Next i
' Remove all remaining TOC fields
For Each TOC In ActiveDocument.TablesOfContents
TOC.Delete
Next TOC
End Sub
This macro does not delete all traces, though. Headings and extra
paragraph marks may remain.
See
Install/Employ VBA Procedures (Macros) by Greg Maxey or
Instructions for
Installing Macros from Forums or Websites by Graham Mayor, MVP
for instructions on how to use the above macro.
Training Template from Microsoft
Early in 2019 Microsoft published a training template. "Insert
your first Table of Contents"
The template may not show up in File > New searches in
earlier versions but should be useful in all Ribbon versions of Word.
File > New from within Word. Search for Table of Contents. If you can
not get it directly
from Microsoft, you can download it from my
downloads page.
Marking citations for a table of authorities is comparable to manually
marking headings for a table of contents. Word looks for cases, statutes,
rules, treatises, and constitutional provisions to generate a table of
authorities. You can also mark any additional authority you need included.
Here is the Microsoft
support article on creating a TOA. CK Note: In Word 2007 and later the Table
of Authorities controls start on the
References Tab


Practice: Mark a Table of Authorities Entry
- Open a document that contains citations that you want to mark for a
table of authorities and place your cursor at the beginning of the
document.
- From the Insert menu, choose Index and Tables, and select the Table
of Authorities tab.
- Click Mark Citation.
- The following dialog box will appear. Click Next Citation. Word
searches the document for terms such as: in re, v., Id., Supra, Infra,
Cong., Sess., and §.
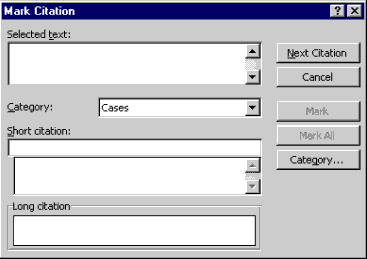
- After Word has found a citation in the document, click twice back in
your document and select the full citation (e.g. Escobedo v. Illinois,
378 U.S. 478 (1964)). Click twice again, this time in the Mark Citation
dialog box and the selection appears in the Selected Text field.
- Choose a category for your citation (i.e. Cases, Statutes, etc.),
and then edit the text in the Short Citation field to match the short
citations in the rest of the document. This may be Escobedo v. Illinois,
or just Escobedo. If you use just the first party, Word will find the
party whenever it is referenced, for example, as "in Escobedo, the
parties…". The long citation would have all variants on the
citation required by your court.
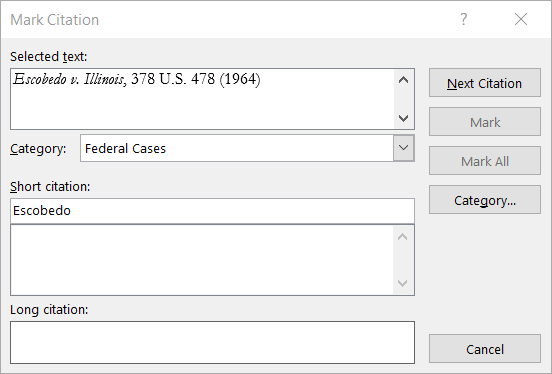
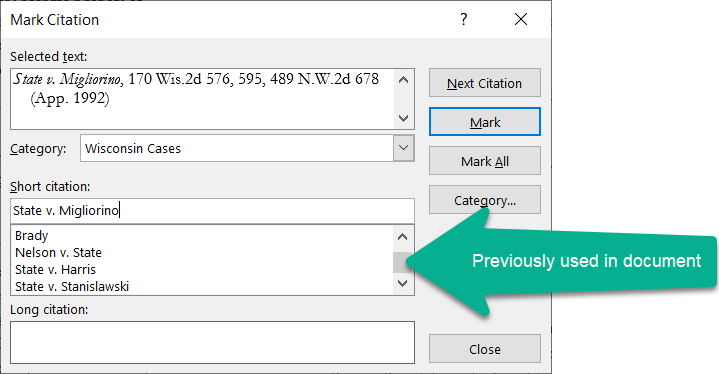
- Now you can mark the citation by clicking Mark for just the long
cite, or Mark All to find all of the references throughout the document.
- Repeat steps 3 through 6 to mark the rest of the citations in your
document. When you are finished, click Close to close the dialog box.
- Leave this document open for the next exercise.
|
|
CK
Note: Inserting a
Table of Authorities Entry inserts a TA field in
your document. For more on this field, see the Microsoft Support
page
on it. The display of TA fields, unlike most other Word
fields, is controlled by the option to
display hidden text. This can be quickly toggled using Ctrl+Shift+8
(Ctrl+*). |
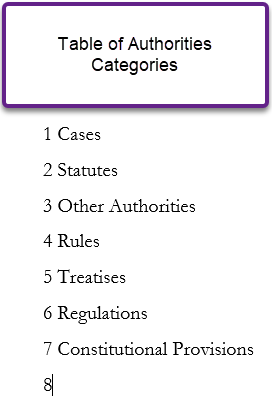
The Categories shown in the list can be edited and you can have up to
16 catogories. You can edit the list by clicking on the Category button
in the Mark Citation Dialog.


Shauna Kelly demonstrates using the Table of Authorities feature to
create a list of technical terms in Word in her page on
Creating a Glossary.
Practice: Generate A Table of Authorities
- (Word 97-2003) Place the insertion point where you want the table of authorities to
be generated. From the Insert menu, choose Index and Tables. Select the
Table of Authorities tab.
(Word 2007+) Click on the Table of Authorities button on the References
Tab.Word 97 Table of Authorities Tab:

Word 2000-2019 Table of Authorities Tab:
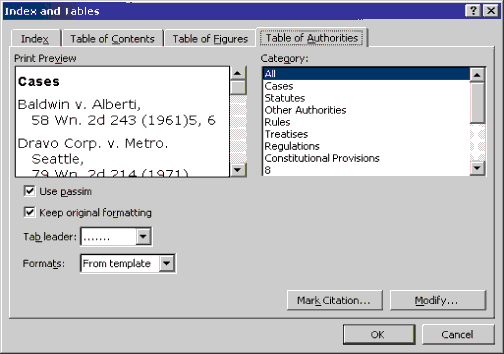
The only difference between Word 97 and later versions in the Table of
Authorities tabs is that the categories are no longer in a drop-down
box.
- Select a format for your table of authorities. Just as with the
Table of Contents dialog box, as you change your selected format, the
preview changes to reflect that format.
- Uncheck the Use passim option. If checked and a citation is
referenced on more than 5 pages, Word will put the word "passim" in
place of the page numbers. If unchecked, Word allows all referenced
pages to be listed, no matter how many there are.
- Clear the Keep original formatting check box as well. This will
insert the citations in the formatting of the table of authorities
style. If the box is checked, all formatting of the citation will come
from how it is listed in the document (e.g. underlined, italicized,
etc.).
- In the Category field, use the drop-down arrow (Word 97) to select
what category of citations you want in your table of authorities. For
this exercise, select All. (Word 2000+ users can select All from the list
of categories.)
- If you want your entries to have dot leaders in the table, you have
a choice of three different leader styles from the drop-down list.
Alternatively, if you do not want them, you can select (none).
- After you have made your choices with the options available, click
OK and your table of authorities is generated.

Updating a Table of Authorities
If there have been edits to the document that has been marked for a
table of authorities, and new cites have been added, you can repeat the
steps for marking entries into the table of authorities that was in the
exercise on marking entries. If new short citations have been made for a
citation that had previously been marked, highlight the long citation,
press ALT+SHIFT+I, and select Mark All.
CK Note: Word 2007-2019 Insert Table of Authorities is through the References
Tab.
A Table of Authorities is a
Field in Word. It looks like: { TOA \h \c "1" }. (You
cannot simply type a field like this; the braces must be inserted by
Word itself!) The "switches" are inserted automatically by the choices
you select when you Insert the Table of Authorities. You can manually
edit or insert these switches if you wish.
The paragraph formatting of the Table of
Authorities, itself, is determined by the
Style Table of Authorities. You need to modify this style to make
changes in the appearance of your Table of Authorities that you can't get
from the choices offered by Word. If you just modify the format
directly, your changes will be lost when the table is updated.
It is possible to create a single Table of Authorities for multiple
documents. That TOA should be a separate document containing
RD fields. (Referenced
Document)
The fields needed for that could be in the format:
{ RD "Chapter 1.docx" \f }
{ RD "Chapter 2.docx" \f }
{ TOA }
The above is for all of the documents in the same folder.
Note that the braces {} cannot simply be typed. You need
to have Word insert a field.
Using Fields in Microsoft Word - a Tutorial in
the Intermediate Users' Guide to Microsoft Word
Shauna Kelly demonstrates using the Table of Authorities feature to
create a list of technical terms in Word in her page on
Creating a Glossary.
Inserting / Creating a Caption for a Table (Figure
/ Picture / Equation)
You can label certain parts of documents using captions, which can be
automatically numbered. You can tell Word to insert such captions
automatically as you add a table / picture / figure / equation. The
process is essentially the same to add captions for any of these
document elements. Here we will look at captions for
Tables.
See also:
Adding Captions in Word - Office Watch
"Here’s a list of Word features we could
find that accepted captions:
Tables, Pictures, Online Pictures, Shapes,
Icons, 3D Models, SmartArt, Chart, Screenshots. Online Video, Text
Box, WordArt, Signature Line, Object (new or inserted, full display
or icon).
That list is just going across the Insert
tab. Almost any object or inserted item in Word can be captioned.
The caption ‘figure’ is really a catch-all
name for anything not a table or equation. As we’ll see, you can
add other caption labels beyond the three Word defaults."
Captions can appear above or below the marked object and can be
sequentially numbered. To manually add a caption to an object like a
table, you select the object and the use the References feature to add a
Caption. In earlier versions of Word, this is done using the Insert >
References command on the menu:
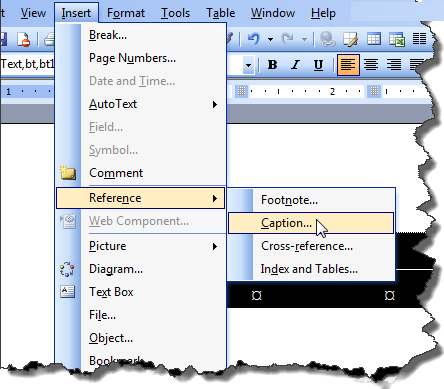
Insert Caption command (Word 2003)
In the Ribbon versions of Word a Caption is inserted
using the Insert Caption command on the References Tab ribbon.
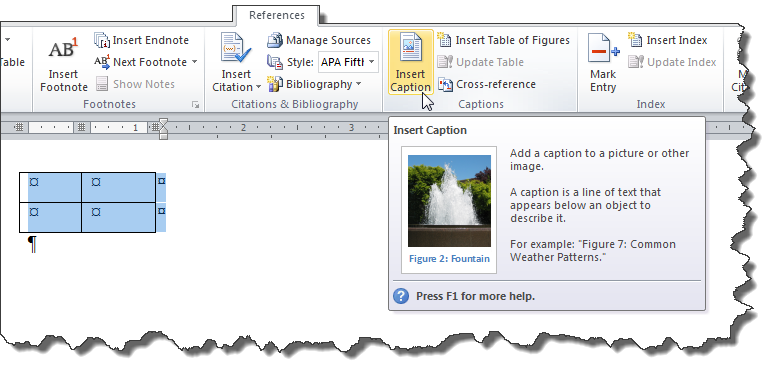
Insert Caption Command (Ribbon version - Word 2010)
Note that the "tooltip" explaining the command talks about images and
tells you that the caption appears below an object, the same command is
used for all captions and the caption can appear above or below the
object. Either method brings up the Caption dialog box.
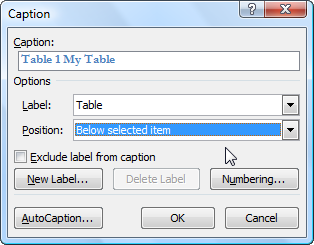
Caption Dialog box - you can type in additional text to label
your caption
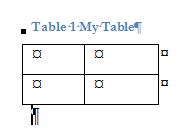
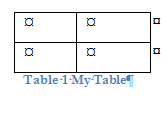
Word will suggest a label for your caption, in this case
Table 1. You can modify this by typing additional text or change the
label altogether using the "New Label" button. The numbering button can
be used to change or format the numbering. The AutoCaption button can be
used to tell Word to add a caption whenever you insert this type of
object. Note: Custom labels you create are saved on your computer and
can be used again in different documents. Custom labels are not saved
with the document, though. If you edit your document on another computer
and want to add a caption with one of your custom labels, you will need
to re-create it.
When you insert any kind of Caption, manually or
automatically, what Word does is insert a
SEQ Field with the Label
chosen. This Caption uses the built-in Paragraph
Style "Caption." It is that
Style that controls the appearance of the Caption (font/size/color).
That Style is also used to find captions for use in creating a
Table of Figures.

Table Caption with Field Code displayed in Caption
Style - Word 2021
If you use the Insert Caption function in Word, these
fields in the Caption Style can be used to create a Table of Figures or
a Table of Tables or a Table of Equations, etc. Captions for a Table
cannot be inside the table.
Note that Custom Labels
for Captions are not stored in the document, but on the computer. The
ones you insert will continue to work. However, if you create a custom
label and use it, if you use your document on a different computer, you
will need to recreate the label if you want to use it. For the numbering
to work, you need for it to be exactly the same.
If the document is used on a computer with different
language settings for Word, the built-in labels will also be different
(in the other language). Again, you need the labels you use to be the
same for numbering to work.
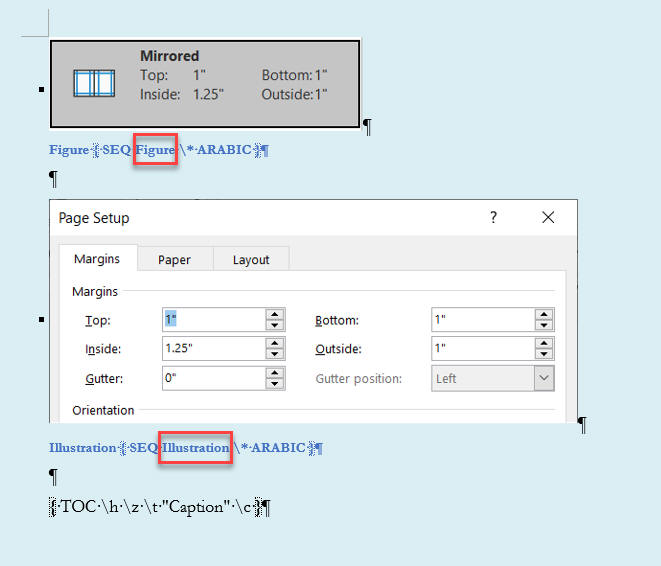
You can use chapter numbering in captions. To do this,
your chapters must start with a style set for numbering. See
How to create numbered headings or outline numbering in Ribbon Versions
of Word by Shauna Kelly for instructions on doing that. You click on
the Numbering button in the Insert Caption dialog and tell Word which
style has your numbering. You can choose the style which designates the
beginning of your chapter in the Caption Numbering dialog. Numbering of
captions will restart with each chapter.

Note that captions are text and fields; once inserted, they can be
changed directly, but not by the Caption dialog. This means that you can
simply delete a caption (including the paragraph mark) and use Insert
Caption to insert another one. It also means that if you insert a
caption for something that already has one, you will insert an
additional caption and use a second number with the seq field. See
screenshots below.
If you choose to include the Chapter number in your caption, numbering
will restart with each chapter. While you can have the chapter number
without restarting, you can't do that through the dialog box. You would
need to modify the SEQ field to remove the \s switch at the end.
See also:
Add chapter numbers to captions in Word - Microsoft Support
Here is a Table caption with field display toggled. It is as set by the
dialog box with a chapter number included:

Here is the same caption after being modified to remove the restart
switch at the end of the SEQ field:

Each caption will have to be changed if you do not want the restart. You
can copy and paste to do this.
For Equation Captions on the same line, see
How to Create Captions for Equations.
Especially for Equations, see:
Section 7 Captions and cross-references | Microsoft Word for the Social
Sciences
Deleting a Caption
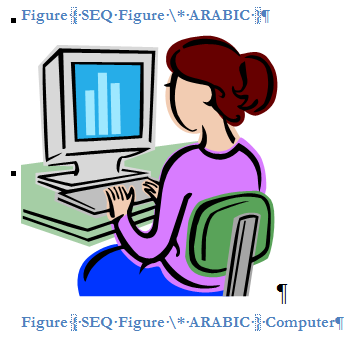
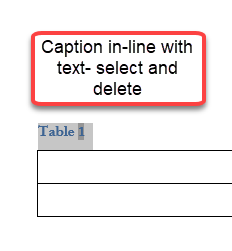
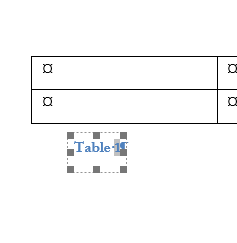
Captions may be inline or inserted in text boxes. The easiest way to
delete one is to select it (entire paragraph) or the text box container
and press Delete.
See also
Add, Format or Delete Captions in Word (Microsoft).
See the
Chapter on Numbering for more about
SEQuence Fields.
Editing a Caption
Captions in my Word document all change to figure if I change only
one caption to figure. See Stefan Blom's response in
this Answers Question.
Moving a Figure and its Caption
|
Big Idea #1 - Positioning/Wrapping of
Image/Figure/Table |
Images are inserted in Word either "in-line-with text" or floating. If
they are floating, text can wrap around them.
In recent versions of Word (.docx) floating images are associated with a
fairly rare error that starts "Error- the name in the end tag of the
element"... If possible, place your items in-line with text,
perhaps inside a one-cell borderless table to avoid this.
If an image/figure is floating, the Caption for it will be inserted in a
text box above or beneath, also floating. Beginning with Word 2016
Windows version, Captions for floating objects are inserted in Frames.
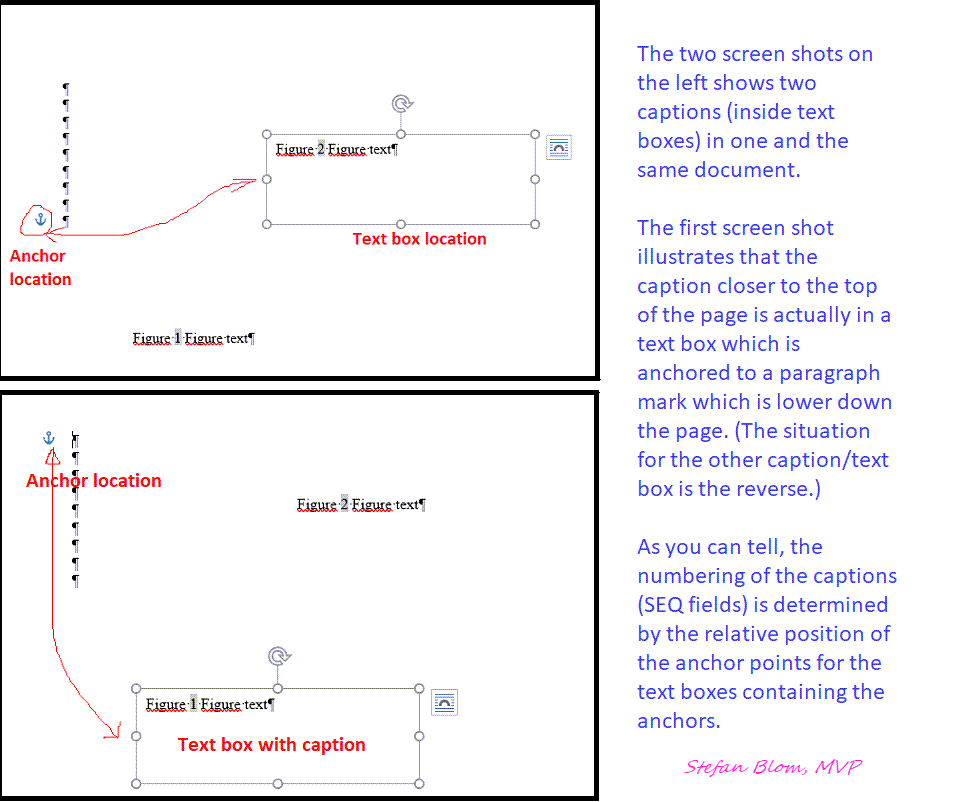
|
Big Idea #2 - Grouping Image/Figure/Table and
Caption before moving |
If you move an image/figure, you want to move the relevant caption with
it. The easiest way to do this is to create a single-cell borderless
table to hold your image/figure. When you create a caption from such an
image/figure, the caption will also be in the table cell. To move the
image, move the table.
Otherwise, if both the image/figure and the caption are floating, you
can select them both and use a Grouping control to keep them together.
If an image/figure is in-line with text, the Caption for it will be a
separate paragraph in the Caption style. If in-liine-with-text, you have
a two-paragraph set of the figure and its caption. You want the first of
these paragraphs set to keep with next in the paragraph formatting. If
your captions are always set above the figure, you can modify the
Caption style to include this paragraph formatting.
See also:
Easy Table of Figures in Word and
Make a List or Table of tables in a Word document - Office Watch
You can insert a Table of Figures, or Illustrations,
or Tables easily in Microsoft Word. There are two primary methods. The
first uses the Captions that you inserted using
Insert > Caption. The second uses a particular style, perhaps even
the Caption style! A third method inserts
everything in the Caption style into a regular (combined) Table of
Contents.
The formatting of the Table of Figures is
controlled by the separate Table Of Figures style since it is assumed
that a Table of Figures/Illustrations/Tables/Equations will only have a
single level.
The Table of Figures also
picks up some Direct Formatting from the source for the entries the
same way a Table of Contents will. As with the TOC this does not apply
to formatting through the paragraph style.
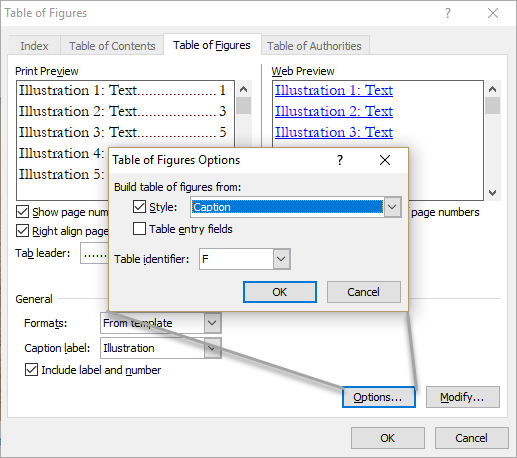
Method 1: Insert > Table of Figures (Illustrations, Tables,
Equations)
These tables are all variations on the
Table of Contents
field and can be adjusted using the other tabs on the dialog box for
that field. In menu versions you start the same way, Insert >
References... > Index and Tables...
In Ribbon versions of Word (Word 2007 and
later), use the Table of Figures button on the References Tab.
This gives you a dialog box similar to the ones
below.
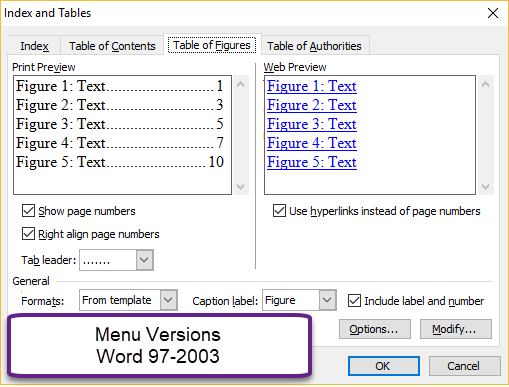
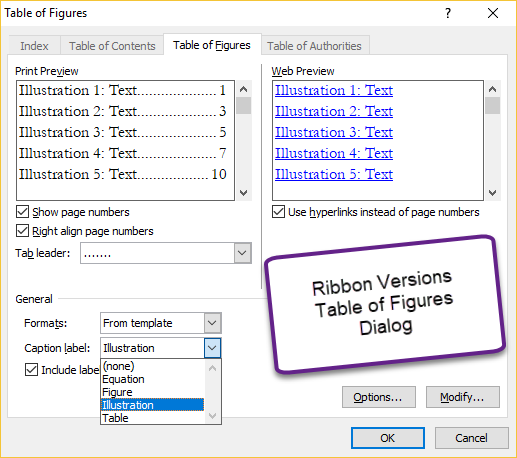
These dialogs are essentially the same. The title
of the dialog box is different. Note that each of them includes tabs at
the top
allowing creation of an Index, Table of Contents, or Table of
Authorities in addition to the Table of Figures. The Caption labels
shown above includes Illustration, which was a custom caption label
added using the Caption dialog when an Illustration Caption was created.
The default labels include: Equation, Figure, and Table. If you used a
custom label when creating your caption, that label will also be
available.

The field above is for a Table of
Tables. The label that was chosen is in quotation marks. The numbering
of the Tables is done using the SEQuence field identifier (as described
above) when the Caption was inserted.
Here is a comparison of the fields for a TOC, a TOF,
and a TOT. (This is a screenshot, with non-printing formatting marks
displayed.)

Using a Style as the key to create
a combined table
The default setup creates the table from the
Caption and is specific to the label used for the Captions. It is also
possible to use, instead, the Style used for the Caption paragraph. If
your caption was created using the Caption feature in Word, that style
will be the Caption paragraph style. To use a style as the key for your
table, you click on the Options button of the dialog box.
Here is a screenshot showing codes for a combined
Table of Figures that ignores the labels and uses the captions formatted
using the Caption paragraph style. The labels are inside the Seq field.
The Table of Figures/Equations/Tables is really a
Table of Contents field that uses the \c switch to pick up text in the
Caption style that has a particular caption label such as "Table."
Note that the
TC field can be used for this purpose as well. You would need to add
an \f switch.
Method 3 - a Table of Contents that also includes Captions
A Table of Contents that includes both headings and figures!
You can also include all captions in an ordinary Table of Contents
along with headings and TC fields. You add the Caption style as
something to be picked up when creating the TOC. Here is the TOC Options
dialog assigning that style level 1. You get the TOC to pick up a style
by assigning a level.
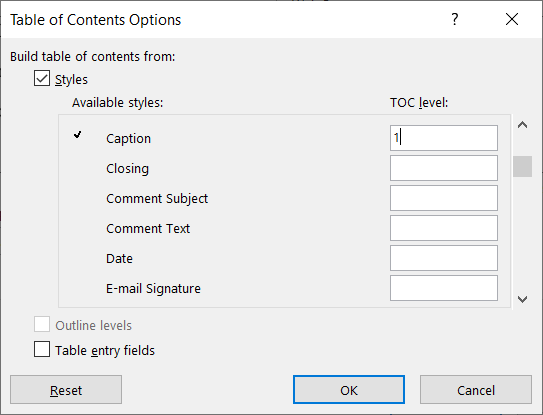
This gives a field including the Caption style at level 1.

See also:
What goes into a Table of Figures depends both on the Caption and
the settings for the Table of Figures
| The Numbering is by "Label" set when the Caption is created. So
is whether the Caption ends up in your Table of Figures. |
I.e. for a Table, not only might the caption, itself, say "Table"
but the SEQ field uses that as a label. The caption text need not
have the word "Table" in it. If you tell Word you want a Table of
Tables using the Table label when creating it, it looks for "Table"
as the SEQ field identifier. Again, the label need not appear in the
text of the Caption but needs to be there.
| Word has three default labels. You can add to those but your
additions stay on your computer. |
The three built-in are Figure, Table, and Equation. If you add
"Illustration" or "picture" those labels will show up on your
computer in both Captions and the Table of Figures. If the document
is edited on another compter, they will have to be added again to be
used in a new Caption or Table of Figures.
I only want part of a heading (or
caption) to appear in my Table of Contents (Figures)
This can be done, since Word 2002, at least, using a
Style Separator.
The part of the logical heading paragraph (or caption) that you do not
want in your Table of Contents must be formatted in a different
paragraph Style.
I went into this is some depth in answer to
this question in Super User. In that, I show how to have the word
"Figure" appear in the caption but not in the Table of Figures.
See also
Insert a Table of Figures - Microsoft Support
After marking documents for table of contents and table of authorities,
you are sure to be comfortable marking an entry for an index. It is done
in the same manner as tables of contents and authorities.
Access to the controls to create indexes is different in the
Ribbon versions of Word (Word
2007 and later) and the earlier versions of Word. See also:
How to Make a Really Good Book Index in Word
Index Ribbon Versions of Word
(Word 2007 and later) (for menu versions, click
here)
In Word 2007 and later the marking of entries and generation
of the index starts with the References Tab in the Ribbon. Practice: Mark an Index Entry
- Find and open a document that you want to index.
- Find the first instance of text for the index and select.
- From the References Tab, click Mark Entry.
(Keyboard shortcut: Alt+Shift+X)
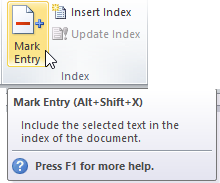
- Your selected text is automatically placed in the Main entry field.
Here you can edit the text to change the way that it will look in the
index, if needed.
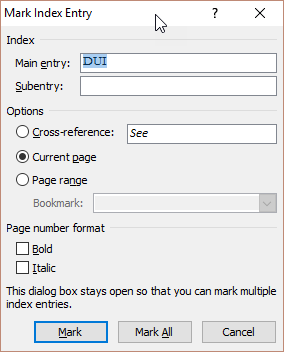
At this point, you can add a Subentry for your main entry. You can also
select options for your entry: Cross-reference refers the reader back to
another entry in the index, Current page refers to the page number of the
marked entry, and Page range refers to a range of pages referenced by a
bookmark.
- Click Mark to mark the first entry, or Mark All to have Word find
all instances of this entry.

|
Warning Word is case sensitive with index
entries. If you use Mark All, your main entry text must match exactly what the document
contains. If you select "Heading" as a main entry, Word will not
pick up "heading," nor will it mark
"Headings." |
- Repeat steps 2 through 5 to mark all of the index entries.
- Keep this document open for the next exercise.
|
|
Note:
Inserting an
Index Entry inserts a XE field in
your document. For more on this field, see the Microsoft Support
page
on it. The display of XE fields, unlike other Word
fields, is controlled by the option to
display hidden text. This can be quickly toggled using the keyboard
shortcut Ctrl+Shift+8
(Ctrl+*). |
Practice: Insert an Index
- Place the insertion point where you want the index to be generated.
On the References Tab, click on Insert Index.
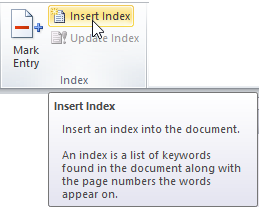
This brings up the Index dialog box:
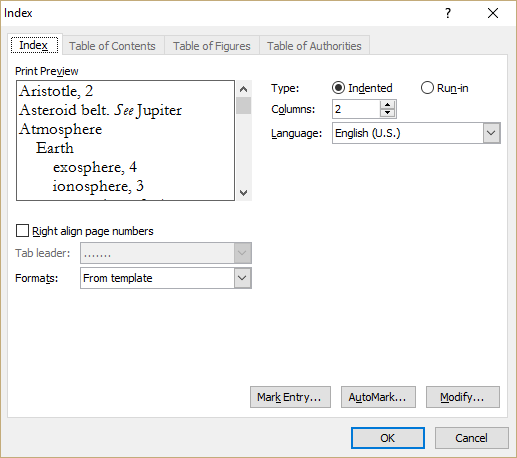
- Select a Type for your index, whether you want it Indented or
Run-in. The indented option places your subentries on separate lines;
and the run-in option places subentries (separated by semicolons) on the
same line.
- Click the arrows in the Columns spin box to change the number of
columns for the index.
- Select Right align page numbers to change the alignment of the page
numbers.
- Select a tab leader style in the Tab leader drop-down box, or use
(none) if none is desired.
- Choose a format in the Formats box and take a look at it in the
Preview pane. If it doesn't suit your needs, select a different format
in this box.
- Click OK to insert the index. Word will add a continuous section
break at the beginning and the end of the index. This allows you to have
the index formatted with multiple columns.
- Find and open a document that you want to index.
- Find the first instance of text for the index and select.
- From the Insert
menu, choose Index and Tables, and select the Index tab.
Click Mark Entry. (Keyboard shortcut Alt+Shift+X)
- Your selected text is automatically placed in the Main entry field.
Here you can edit the text to change the way that it will look in the
index, if needed.
At this point, you can add a Subentry for your main entry. You can also
select options for your entry: Cross-reference refers the reader back to
another entry in the index, Current page refers to the page number of the
marked entry, and Page range refers to a range of pages referenced by a
bookmark.
- Click Mark to mark the first entry, or Mark All to have Word find
all instances of this entry.
|
Warning Word is case sensitive with index
entries. If you use Mark All, your main entry text must match exactly what the document
contains. If you select "Heading" as a main entry, Word will not
pick up "heading," nor will it mark
"Headings." |
- Repeat steps 2 through 5 to mark all of the index entries.
- Keep this document open for the next exercise.
|
|
Note:
Manually inserting an
Index Entry inserts a XE field in
your document. For more on this field, see the Microsoft Support
page
on it. The display of XE fields, unlike other Word
fields, is controlled by the option to
display hidden text. This can be quickly toggled using the keyboard
shortcut Ctrl+Shift+8
(Ctrl+*). |
- Place the
insertion point where you want the index to be generated.
From the Insert menu, choose Index and Tables. Select the
Index tab.
This brings up the Index dialog box
(Word 97 looks looks slightly different):
- Select a Type for your index, whether you want it Indented or
Run-in. The indented option places your subentries on separate lines;
and the run-in option places subentries (separated by semicolons) on the
same line.
- Click the arrows in the Columns spin box to change the number of
columns for the index.
- Select Right align page numbers to change the alignment of the page
numbers.
- Select a tab leader style in the Tab leader drop-down box, or use
(none) if none is desired.
- Choose a format in the Formats box and take a look at it in the
Preview pane. If it doesn't suit your needs, select a different format
in this box.
- Click OK to insert the index. Word will add a continuous section
break at the beginning and the end of the index. This allows you to have
the index formatted with multiple columns.
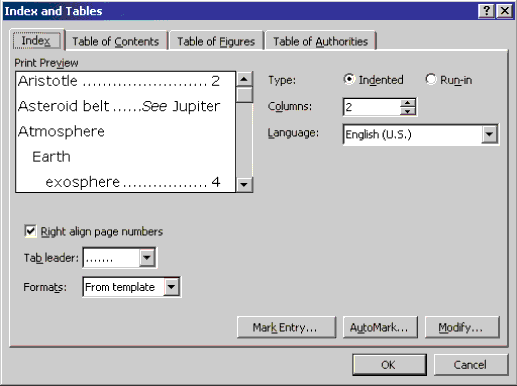
|
|
CK
Note: When
a Table of Contents is generated by Word, the Page numbers are
hyperlinks to the text referred to in the Table of Contents. (The
entire Table of Contents can be a hyperlink in Word 2000 and
later.) People sometimes want to do this with an index, as well. It
can be done, but doing so isn't necessarily easy.
If you have a real need for such a hyperlink-enabled index, I
recommend your reading the three articles on fields written by Cindy
Meister. You can find links to them
here.
The third article will show you how to create these links
(automatically) and you can download the macros to do it.
When you insert an Index, Word will automatically insert
a
continuous section break so that it can change to a
two-column layout for the index. If you insert an Index
other than at the end of the document, it will insert
section breaks before and after your index. |
Indexes are not hyperlinks and Word provides no automatic method
for doing this. You can use a third-party program to do this if you
need hyperlinks, though:
IndexLinker
AutoMark and a Concordance File
It is possible to create a separate Word document listing the
terms you want indexed and have Word use this file in your document
to mark your index entries. You may have noted the AutoMark button
on the Insert Entry dialog. Experienced indexers recommend that this
method not be used.
"But the end result is that you have every term indexed at
EVERY place it occurs. Most of the mentions of a term in a book
are simply passing references: what the reader wants to see in
the index is only one page number; the one that contains
the main topic for the term. If you send them on a wild goose
chase to 20 other places first, they will think most unkindly of
you." John McGhie
How Do I Create an Index in Word?
If you want to create a concordance or AutoMark file, you start
with a new document. Add a two-column table. In the first column you
put the terms that you want Word to index (remembering that the
Index feature is case sensitive). In the second column you put the
Index heading that you want to appear in the Index. See
this page for more. I strongly recommend reading John McGhie's
article, first, though.
See also this video from Cambridge University Press:
Indexing in Microsoft Word.
Here is a very succinct and accurate video on using
AutoMark and a Concordance by Chris
Menard:
Build an Index in Word Using a Concordance File
It is possible to have more than one index with different entries
in a single document. An Index is created by the
Index Field. That is based on
XE fields.
Both of those have a "switch" \f which allows the index with
that switch to only show XE fields that also have the same
identifier. I know of no way, other than editing the fields,
to insert this identifier.
For more on Fields see Using Fields in Microsoft Word.
It is possible to create a single index for multiple
documents. That index should be a separate document
containing
RD fields. (Referenced
Document)
The fields needed for that could be in the format:
{ RD "Chapter 1.docx" \f }
{ RD "Chapter 2.docx" \f }
{ INDEX }
The above is for all of the documents in the same folder.
Recent versions appear to not need the \f switch in the
field when they are in the same folder.
See also:
Using RD and Other Fields to Construct Multi-File Documents
in Word.
Note that the field braces {} cannot simply be
typed. You need to have Word insert a field.
Using Fields in Microsoft Word - a
Tutorial in the Intermediate Users' Guide to Microsoft Word
Footnotes and endnotes are inevitable parts of working with complex
legal documents. With Word, footnotes (listed on the bottom of the page)
and endnotes (listed at the end of a document or a section) can be
created, edited, and deleted with a great amount of ease. You can have
them automatically number throughout your document, or use custom marks
(symbols) - whichever you prefer. Moreover, to view them for reference or
for editing is extremely easy.
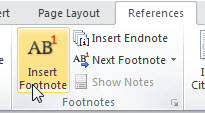
CK Note: In Word 2007 and later Footnotes and Endnotes start from the
References Tab on the Ribbon.
Practice: Insert a Footnote
- Open a document in which you want to add footnotes.
- From the View menu, choose Normal (or press ALT+CTRL+N).
- Move your insertion point to the end of the sentence where you want
to place the footnote reference mark.
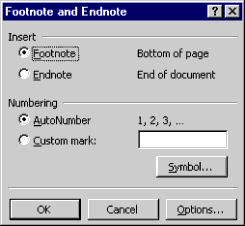
- From the Insert menu, choose Footnote, and the Footnote and Endnote
dialog box appears:
CK Note: In Word 2007 and later you start this process
through the References Tab on the Ribbon.
- This is where you can choose to insert a Footnote or Endnote. You
can also choose whether you want an AutoNumber (1,2,3) or a Custom mark
(such as symbols). For the purposes of this exercise, insert a Footnote
that is AutoNumbered.
- This will open a footnote pane at the bottom of your document window
showing you the footnote. Type at the insertion point to enter the
footnote. As you can see, your document window is also showing where you
placed the footnote reference mark within the text.
- To close the footnote pane, click Close on the footnote pane bar.
- Keep this document open for the next exercise.
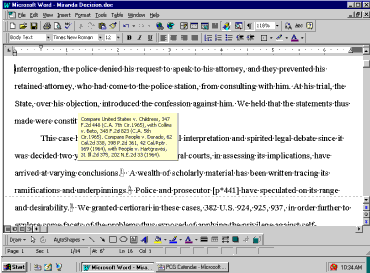
Viewing and Editing Footnotes and Endnotes
There are various methods to viewing footnotes and endnotes. The first
way you have already seen in the preceding exercise by viewing within the
footnote pane in Normal view. When you insert a footnote in Page
Layout/Print Layout view, you get a different look footnotes. You can also
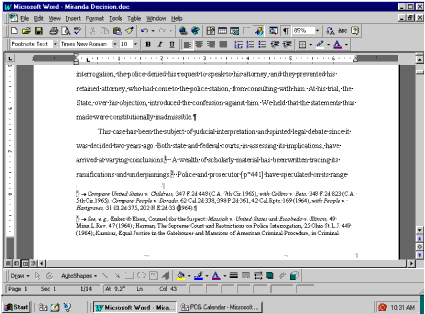
choose View, Footnotes. This is the how you will see footnotes when you
are in Page Layout (in Word 97)/Print Layout (in Word 2000+) view:
If you need to edit the footnote, you can just click within the
footnote and start typing. Another way to view footnotes is by hovering
your mouse arrow over the reference mark in the document. A Screen Tip
will pop up and allow you to see the text in the footnote:
You can also browse by footnotes or endnotes by using the Select Browse
Object. This button allows you to browse by a number of different options:
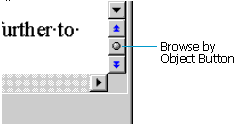
When you click on the Browse by Object button, you get the following
option box:
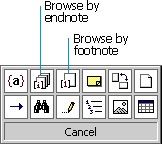
After you have selected either browse by footnote or endnote, use the
blue double arrows on the top and bottom of the Browse by Object button to
move to the previous or the next footnote or endnote.
Editing a footnote or endnote is just as easy as entering text within
the document itself. You just view the footnote or endnote, click and
type.
|
Warning When deleting a footnote, you must
delete the footnote reference mark within the document. If you
delete the text and the number from the footnote pane or from the
page in Page Layout/Print Layout view, it does not delete the number
within the text itself. If you do this, and then add a new footnote
to the document, your numbering will be off by one. Word still
thinks the deleted footnote is still active. You can correct this by
going to the original reference mark in the document and deleting
it.
CK Warning Footnotes and
Endnotes may not be included in the Word Count automatically
generated by Word. See below.
|
Practice: Edit a Footnote
- From the View menu, choose Normal (or press ALT+CTRL+N).
- From the View menu, choose Footnotes to open the footnote pane.
- Click within the footnote pane, and edit. When you are finished with
your changes, click Close.
You can also cut and paste a footnote or endnote from one place in your
document to another just by highlighting the footnote reference mark
within the document and choosing Edit, Cut (or by alternate-clicking and
selecting Cut), move your insertion point to new site for the footnote and
choose Edit, Paste. When you cut or copy a footnote or endnote reference
mark, Word automatically takes the text of the footnote with the reference
mark.
Converting Footnotes and Endnotes
If there is a change in plans and the footnotes need to become
endnotes, or vice versa, Word will quickly convert your footnotes to
endnotes with a click of the mouse.
Practice: Convert Footnotes to Endnotes
- Create a new document with one or two footnotes.
- From the Insert menu, choose Footnotes, and click Options.
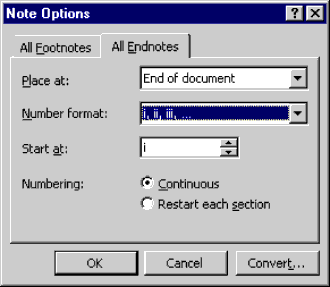
- Select the All Endnotes tab and choose a Number format for your
converted footnotes.
- Click Convert.
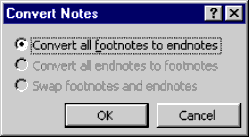
- Click OK, then at the Options dialog box click OK. The last step is
to close the Footnote and Endnote dialog by clicking Close. Your
footnotes have now become endnotes.
If you want to reverse the procedure, just go through steps 2-4, and
the following dialog box appears:
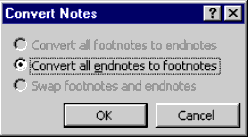
Then repeat steps 5 and 6, and your endnotes have been converted back
to footnotes.
We have all used bookmarks at one time or another. We've dog-eared
pages and even used sticky notes to mark where we have left off in a book.
Word does the same thing in long documents. If you have bookmarked a
paragraph or heading in your document, the next time you open the document
you can use Goto to move to your bookmarked location.
This is especially handy when you find that there are parts of your
document that are constantly being updated. You can use bookmarks to jump
in and out of those problem spots quickly.
|
CK Note: Bookmarks are also
one of
the best ways to have text inserted in one place reflected elsewhere
in the document -- or even in another document! You do this by
insertion of a cross-reference to the
text of the bookmark. Cindy
Meister refers to this as the second mode of bookmarks -- not
just holding a place in a document but holding content
in a document. Another good way in versions of Word 2007 and later
is by use of
Document Property Content Controls and Other Mapped Content Controls |
Practice: Insert a Bookmark
- Select any text on the page.
- From the Insert menu, choose Bookmark (or press CTRL+SHIFT+F5).
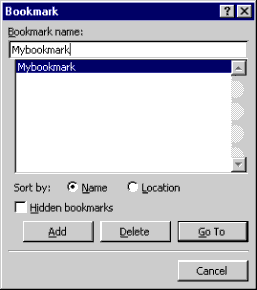
(In Word 2007 and later the control to insert a Bookmark
is on the Insert Tab of the Ribbon. The Ctrl+Shift+F5 shortcut continues
to work.)

- Create a name for your bookmark in the Bookmark name field (you
cannot start a Bookmark name with a number, and Word won't allow spaces
within the name).
- Click Add. (Notice that Word has added this new bookmark to the
bookmark list.)
- Click Close.
Navigating With Bookmarks
Now that you have marked your document with bookmarks, let's go over
the easy ways to move throughout your document using them.
Practice: Find your Bookmarks
- Press F5 on your keyboard. The Find and Replace dialog box appears,
with the Go To tab activated. In the Go to what list, find Bookmark.
- One of your bookmarks will fill the Enter bookmark name field. If
this is not the bookmark you are looking for, click the drop-down arrow
and select the bookmark that you want to find. Click Go To, and Word
will take you to the bookmarked location.
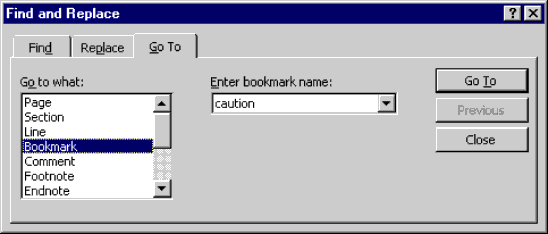
- You can go to the next bookmark by pressing F5 again and selecting
the new bookmark name and clicking Go To.
|
CK Warning: Bookmarks are
fragile creatures and easily deleted when you are editing bookmarked
text! For instance, if you follow the directions above to go to a
bookmark, you will have the bookmark (as well as the bookmarked
text) selected. If you make changes without adjusting this, you will
delete the bookmark and any references to that bookmark (see below)
will be invalid.
When you are working with bookmarked text, keep
your view options set to view bookmarks and your Undo key handy!
When I am working with bookmarked text and want to preserve the
bookmark, I will put my insertion point (cursor) inside of the
bookmarked text - just after the first letter of that text. I will
then insert the changes that I want to make and delete the surplus
text by hand using the delete or backspace keys.
This fragility exists in all versions of Word to date (2013).
For more on bookmarks see:
Word
Bookmarks by Cindy Meister
|
To refer the reader to another part of the document, you can insert a
cross-reference. See
How Cross-Reference Fields in Word Work by Lene Fredborg, MVP.
Here is a video in the legal context:
How to cross-reference and Interrogatory
|
CK Note:
Cross-reference fields can refer to bookmarked text. Further, instead of
simply providing a link or a page number for referenced text,
cross-reference fields can reproduce that text. This one of Word's ways of
repeating variable text in a document. In Word 2007 and later another great
way is with
Document Property
Content Controls and Other Mapped Content Controls.
With both the links
in cross-references and in those from hyperlinks, in Windows the keyboard
shortcut Alt+Left Arrow should return you to your previous location after
you have used the link.
 |
- Create a new document and type the following:
Introduction
Overview
Unsolicited Proposals
Solicited Proposals
General
The
Proposal
- Click anywhere within the first line, Introduction.
- Click the Style drop-down arrow and apply Heading 1 (or use
Ctrl+Alt+1 shortcut).
- Select Overview, and apply Heading 2 (or use Ctrl+Alt+2 shortcut).
- Select Unsolicited Proposals, Solicited Proposals and General. Apply
Heading 3 (or use Ctrl+Alt+3 shortcut).
- Select The Proposal and apply Heading 2 style, and after deselecting
the text press Enter twice.
- Your cursor is where the cross-reference is to be inserted.
- Type something to the effect of, "For more information, see".
- From the Insert menu (tab), choose Cross-reference.
-
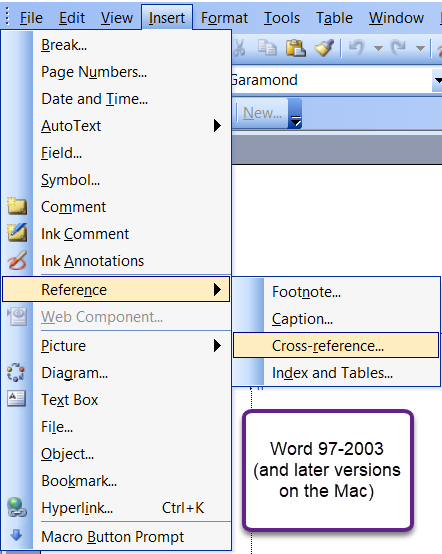
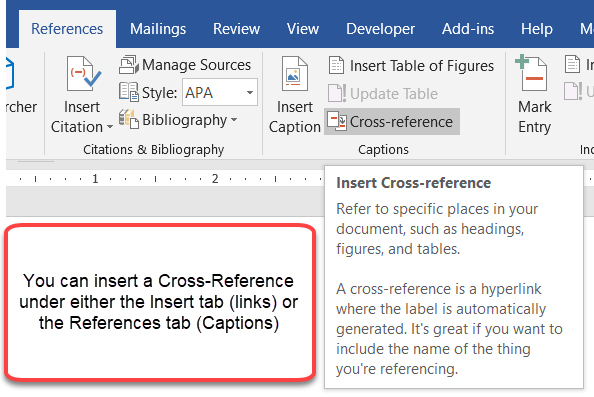 -
-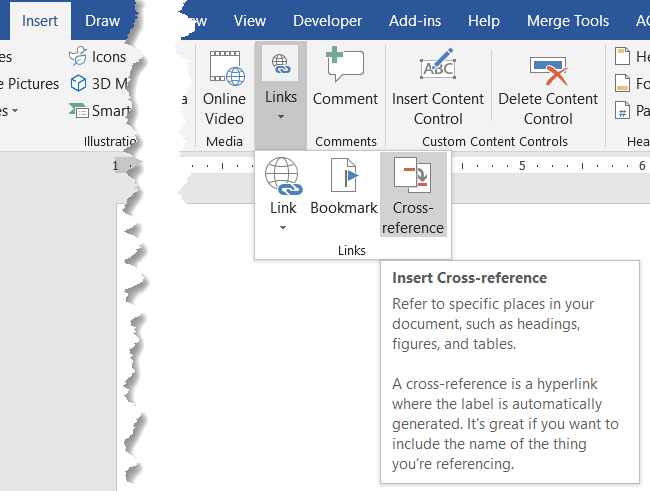
- In the Reference type drop-down list, select what reference type is
appropriate for your cross-reference, for this example use Heading as
the reference type. You can also use a numbered item, bookmark,
footnotes, endnotes, equations, figures or tables.
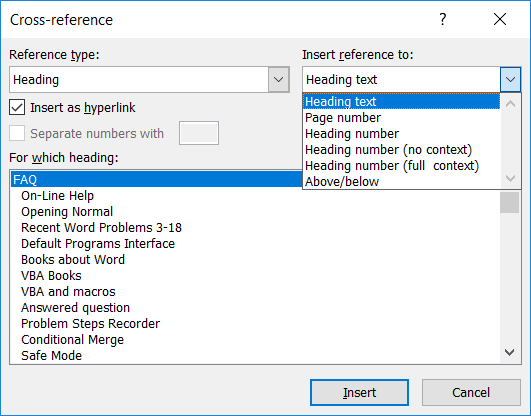
In the Cross-reference dialog box, you also have a choice of how you
want the reference to look. You could reference the heading text as
shown above, or Page #, Heading #, Heading # (no context), Heading #
(full context), and above/below.
- Select Unsolicited Proposals and click Insert. The dialog box
remains open for any other cross-references that you may want to add. If
you do not want to add more cross-references, just click Cancel.
- As you can see, your cross-reference has been marked. If you click
"Unsolicited Proposals," Word takes you to the heading.
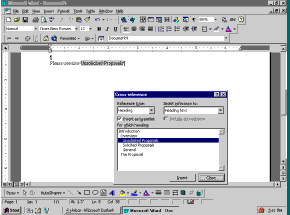
-
If you inserted as a link, you can use that link to go
from the cross-reference you inserted to the source. As with a
hyperlink, after you have used such a link you can use the keyboard
shortcut of Alt+Left Arrow to return to your original position.
Updating Cross-references
If you have changed your text that is a cross-referenced passage in
your document and the cross-reference has not updated, you need to
update the field. You can alternate-click on the field code and select
Update Field, or select the field code and press F9. This updates the
field to reflect recent changes.
|
CK Note:
If the material in a cross-reference displays a field in the original text,
you may want to include the following "switch" in your cross-reference field
code: \! This is the "lock result" switch and prevents a field like {
DATE } in your original bookmarked text from updating in your
cross-reference when you update the cross-reference field, unless it has
been updated at the source. (Complex, I know, but you usually will want to
use this switch.) Further, you can use a macro to update all
Cross-Reference fields at once. The following macro will update all
cross-reference documents in the main body of a document.
Sub UpdateAllRef()
' Based on code at http://www.gmayor.com/installing_macro.htm
' Update all Ref fields in a document, even if in headers/footers
Dim oStory As Range
Dim oField As Field
	'
For Each oStory In ActiveDocument.StoryRanges
For Each oField In oStory.Fields
If oField.Type = wdFieldRef Then oField.Update
Next oField
	'
If oStory.StoryType <> wdMainTextStory Then
While Not (oStory.NextStoryRange Is Nothing)
Set oStory = oStory.NextStoryRange
For Each oField In oStory.Fields
If oField.Type = wdFieldRef Then oField.Update
Next oField
Wend
End If
	'
Next oStory
	'
Set oStory = Nothing
Set oField = Nothing
End Sub
For instructions on how to use this macro, see Graham Mayor's
Installing Macros page. Although Cross-Reference fields are
hyperlinks, they do not look like hyperlinks. You can change this. See
Formatting Cross-References by Suzanne Barnhill, MVP. Word's built-in
heading styles are designed to use with cross-references in ways other
styles are not. See
Why use
Word's built-in heading styles? by Shauna Kelly. See also Word MVP
Lene Fredborg's page on
Troubleshooting Cross-References |
|
I see "Error, Bookmark not defined" instead of my page numbers in my
table of contents.
You need to update your table of contents by clicking within the table
and pressing F9 on your keyboard, and then selecting Update entire table.
CK Note: In Word 2000 you'll
probably have to move into the TOC using the arrow keys rather than by
clicking in the TOC because of the default hyperlinks built into a Word
2000 TOC.
Why do I see { TOC \o "1-3" } instead of my table of contents? (Or
alternately, { TOA \h \c 1 \p \f } instead of a table of authorities.)
What you are seeing is the field code that Word uses to complete the
resulting table of contents or table of authorities. If you press ALT+F9,
you will toggle the field code back to the result of the code seeing the
expected table.
On a Mac, the shortcut is Opt+F9.
CK Note: If this doesn't work, the
field codes were probably "toggled" rather than displayed. Press
Alt+F9 again and then if needed Shift+F9.
You may need to add the Fn key to function key shortcuts. I deleted a footnote, but now my footnotes seem to be off by
one.
When you delete a footnote, you must delete the reference mark from
within the document text. If you do not, even though the text and the
reference mark are gone from the footnote pane, Word will not delete the
footnote reference mark from the document. Highlight the reference mark
for the unwanted footnote, and delete it. Your references should now be
numbered correctly.
I tried to edit my footnote by deleting a paragraph mark and "Not a
valid action for footnotes” appeared.
You can format this paragraph mark, but it cannot be deleted.
I pasted a selection that contained a bookmark into a new document,
I tried using GoTo to find it, but it wasn't listed in my bookmarks.
Make sure the selection contains a space before the bookmark. Then when
you paste the selection into the new document, the bookmark will be there.
I have material in one or more textboxes and it does not show up in
my Table of Contents, Index, Document Map, Navigation Pane...
Before Word 2007, no headings in Textboxes would be picked up in a
Table of Contents, this is still true of XE entries (Index). These do
not appear in the Document Map or Navigation Pane. You may want to use a
Frame instead.
Here is a link to my article on this:
Headings that do not show up in the Navigation Pane or in a Table of
Contents.
Here is a link to a short demonstration document.
Linked Styles Demo
I have Headings that do not show up in my Table of Contents even
though they are the correct level.
It is common to have Headings applied to something other than a whole
paragraph not show up in the Table of Contents.
This is because they have been applied as "Linked
Styles."
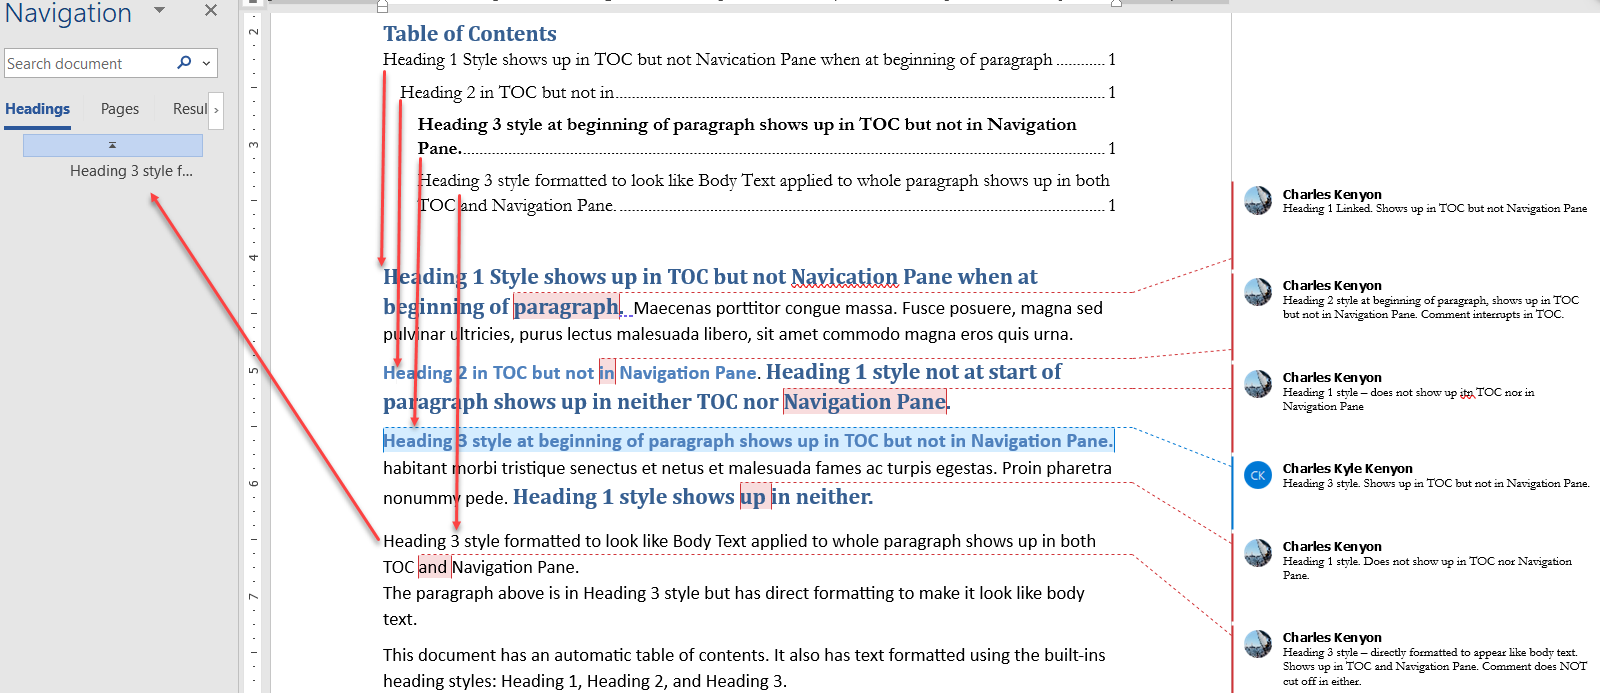
Here is a link to my article on this:
Headings that do not show up in the Navigation Pane or in a Table of
Contents.
Here is a link to a short demonstration document.
Linked Styles Demo
My "Table of Contents" or "Contents"
heading is appearing inside the
Table of Contents rather than just being the heading.
This heading is formatted in the built-in TOC Building Blocks using
the TOC Heading paragraph style which is based on the Heading 1
style. That may carry with it the Outline level of 1.
Modify the TOC Heading Style to be Body Text.

Some of my Table of Contents entries do not have a dot leader even
though I selected dot leader when I set it up.
This can happen when there is a tab character in the line being
indexed. This often occurs with automatic numbering.
Dot leaders are set in the TOC styles. The solution is to delete or
move the tab stop setting in the TOC style that is interfering with the
dot leader.
I need two columns in my Table of
Contents.
This note came as a result of a
question asked on the Microsoft Answers forum. The user wanted to
include a column of reference numbers as well as the page number. The
reference numbers were in the original heading. The solution is to
separate the reference number from the rest of the source text by a tab
character and then modify the relevant TOC style to include a tab
setting before the area for page numbers and to move the right indent in
that style to the left of the area for the column.

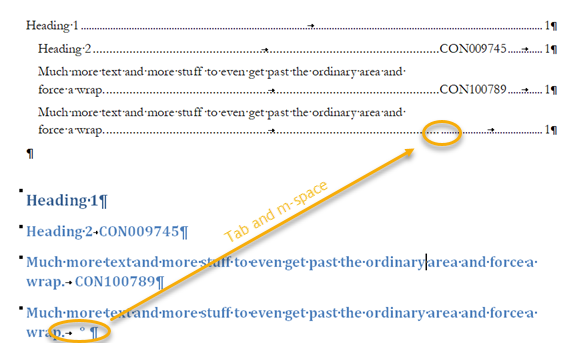
The m-space followed by a tab is for the situation where there is no
reference number. For a tab in the source text to be reflected in the
TOC, it must be followed by some text (other than an ordinary space).
See the
original question and discussions for more on this.
I edited a heading I had already cross-referenced, and I went to
update the cross-reference but it didn't update.
You probably deleted the bookmark brace ([ or ]) that contained the
reference. When editing a heading that has been marked for cross-reference
remember that the heading has been marked as a bookmark. This is how Word
knows where to find the reference in the document.
When editing a cross-referenced heading try this method: Click before
the last word in the heading, type in the new/additional text along with
the last word, and delete the next instance of that word. That way you
will not delete the bookmark brace. You can now update the
cross-reference.
|
Word Count
|
CK WARNING: In all versions
of Word (at least through Word 2000) the Word Count shown in the document statistics in the
document's properties will exclude text in footnotes or
endnotes. This smaller number is also the figure generated
by the {NumWords} field.
This can cause problems with meeting court rules.
|
|
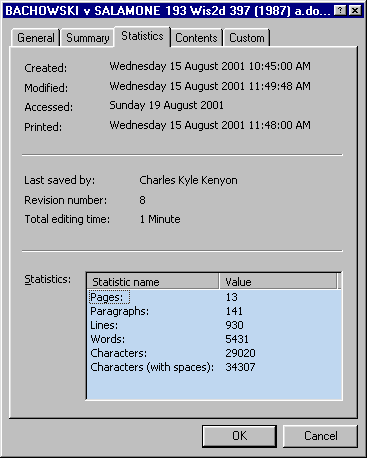
Document Statistics erroneously shows the total word
count for this document as 5,431 because endnotes and footnotes are
excluded from the count. If you have a certificate page showing
the word count, it probably uses a {NumWords} field
that gives the same (erroneous) number.
Therefore, if text in footnotes and endnotes is
supposed to be included in your word count it is vital to use Tools => Word Count to get an
accurate word count for the entire document by checking the option for
counting text in footnotes and endnotes.
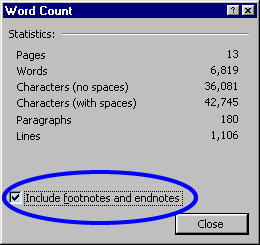
This method shows a count of 6,819 words for
the same document.
Selected Text Counts. Also, in Word 97 (2000)
the word count can not include text in footnotes or
endnotes referenced by selected text. The checkbox to include
footnote and endnote text is not enabled.
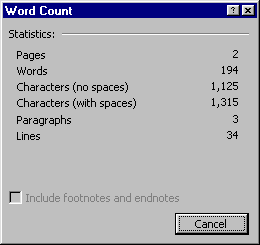
The word count excluding footnotes and endnotes is
194 words. For selected text counts, see KB Article Q239423.
There is a macro work-around to get a count on selected text that
includes footnotes and endnotes available in KB Article Q241316.
That macro will give you the following display:

Using the macro solution, the count for the same
selection of text is 834 words, 194 in the body and 640 in
footnotes.
|
|
CK Warning Master
Documents Feature All
versions of Word since at least Word 95 have contained a heavily
marketed "feature" called Master Documents. At least
through Word 2024 casually using this feature will corrupt your documents
(including documents you aren't even using at the time) and
eventually leave you with confetti where your great American novel
or thesis used to be. See Master Documents Feature in Microsoft Word
for more on this and workarounds (as well as a link to the rigorous
procedure necessary to attempt using this "feature").
Word will handle very large documents if they are properly
prepared. Proper preparation includes extensive use of styles
and proper use of bullets and
numbering linked to styles. If you need to split your document
into multiple files, see the workarounds on the Master Documents
page but don't even think about using Master Documents unless you
are willing and able to follow the rigorous procedure outlined by
Steve Hudson.
|
I want to insert a Table of Contents
(Authorities) inside the first
column of a Word Table. I want my TOC in the
first column and have other text in the right column. The page numbers
disappear!
This is because the Styles for the entries
are set for a full page. You need to
modify the Styles.
The screenshot below shows the problem and its source in the
paragraph formatting of the Table of Contents style used.
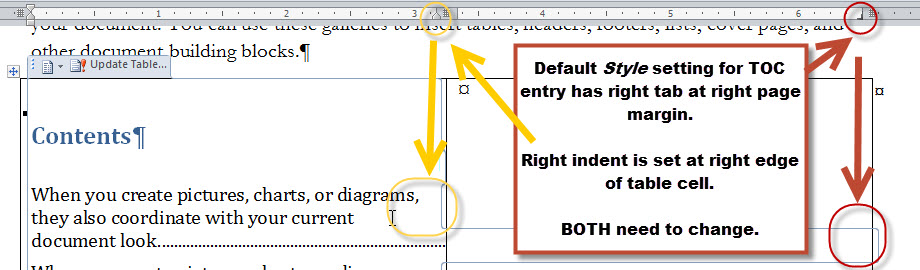
What is needed is changes to both the right-tab position and the
right indent for the style. Click on
modify the style for directions on modifying your styles.
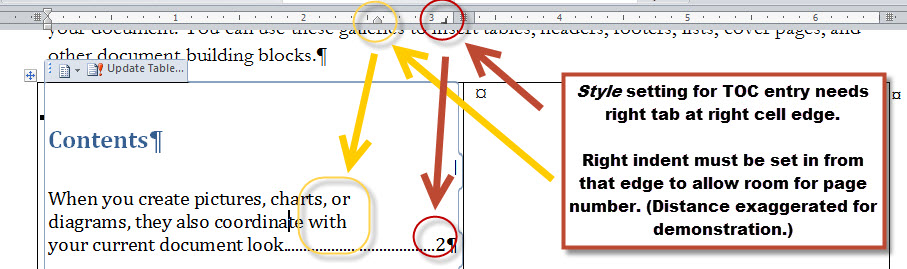
Again, click on
modify the style for directions on modifying your styles.
Some of my Table of Contents Lines Contain Different Formatting
The formatting of the Table of Contents is set by TOC styles. The Table
of Contents disregards the formatting set using the Style of the source
text. It does pay attention, though, to direct formatting (not applied
by using the paragraph style). So, if your TOC picks up various headings (the norm) and one of the headings
has direct formatting (not applied through the Heading paragraph Style)
the Table of Contents line with that heading will pick up and use that
direct formatting. For instance, if you make a Heading or part of a
Heading Red, the line in the table of
contents may have the same red coloring.
If, instead, you have a separate Style variation for that Heading (i.e.
"Heading 3 Red") the Table of Contents will not pick up the formatting.
A variation on this appears if you have one of your Heading Styles set
to be ALL CAPS. With such formatting, the case you use
when you type the heading does not change the appearance of the heading.
That is: "ThIS seLECTIon WILL appear" looks like: "THIS SELECTION WILL
APPEAR" in your heading but will appear with the case actually typed in
the Table of Contents. Fixing this requires changing the actual case of
the text in the heading, not just the displayed case.
See Direct Formatting and the Table of Contents (above)
and
Effect of Direct Formatting by Suzanne Barnhill, MVP.
The links in the Table of Figures are to a document rather than to
a place in this document.
See
this question and
this discussion on the Microsoft Community Forum. A Table of Figures
refers to Captions.
If those Captions are in Text Boxes, the links will
be hard-coded rather than relative to a position in the document.
The solution / workaround is to not have the captions in text boxes if
this becomes a problem. (04/2021 Windows and Mac)
I want my Table of Figures to show long descriptive text but the
page number to be with the first line.
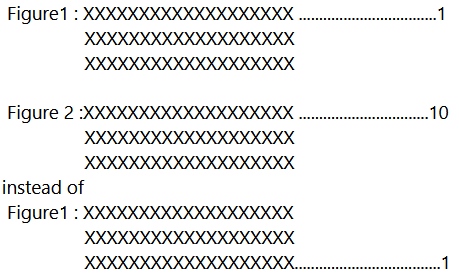
See
this question on the Microsoft Community Forum.
You can use workarounds to do something
like what you would want.
-
I would suggest having the long descriptive
text in a separate paragraph, perhaps showing on the same
line in the text using the
Style Separator.
-
Have the description in a different
style so that it shows up in your TOC under the Figure number (and
name) that is in the Caption style.
-
Then have the setting for that level used by
your separate style not display page numbers.
-
You will need to use a style not used in your
general TOC for the descriptive text.
Here is a link
to a document demonstrating this suggestion. What follows is a
screenshot from that document.
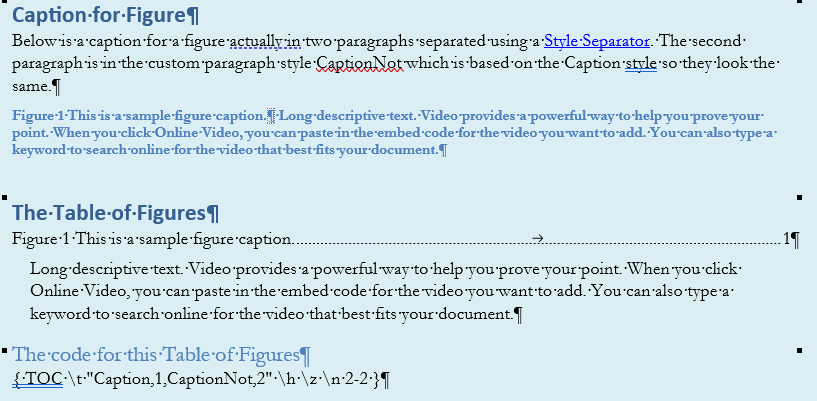
See also:
Multiple Entries for a single
Figure/Table/Image appear in the Table of Figures - all for the same
page.
This can happen when your figure/table/image is
opaque and is somehow moved on top of your Caption, hiding it, and then
another Caption is created.
To fix this, you need to remove the hidden
Caption. You can do this using the Selection Pane (Select > Show
Selection Pane). A list of objects on your page will appear. Captions
for objects not in-line-with-text are created in Text Boxes, which float
on the page independent of the object. (See also Moving a Figure and
Its Caption, above)
See Word MVP Lene Fredborg's page on
Troubleshooting Cross-References
Captions in my Word document all change to figure if I change only
one caption to figure. See Stefan Blom's response in
this Answers Question.
More Trouble-shooting
Complex Documents |
This chapter from original Legal Users Guide to Microsoft Word
2002 -
document in zip format
 since 14 April 2004
 Copyright 2000, Microsoft Corporation. Copyright 2000, Microsoft Corporation.
Copyright 2000-2002, 2004-2006, 2010-2026
Charles
Kyle Kenyon
See information about copy permission.
Search Intermediate Users Guide to Microsoft Word Using Google My office page as a
Madison,
Wisconsin Criminal Defense Lawyer.
Original Legal Users Guide to Microsoft Word 2002 - Documents in Zip Format
A note about link exchanges. This site does not participate in
link exchanges to build web presence. If you have a link that you think would be
of use to people reading this page, please send it to the webmaster with the url
of the page where you think it should appear and it will be considered. Your
placing a link to this site will not affect the decision on whether to add your
link, though.
|
