CK
NOTE: Since Word 2002,
the default has been to automatically display Tracked Changes and other
Comments whenever a document is opened. The user can turn this off, for
their own computer, but not for a recipient's computer. This
actually applies to all versions of Word since 2002. In Ribbon versions,
this is stored in the Trust Center settings. File > Options Here is the
Trust
Center Dialog for Ribbon Versions:
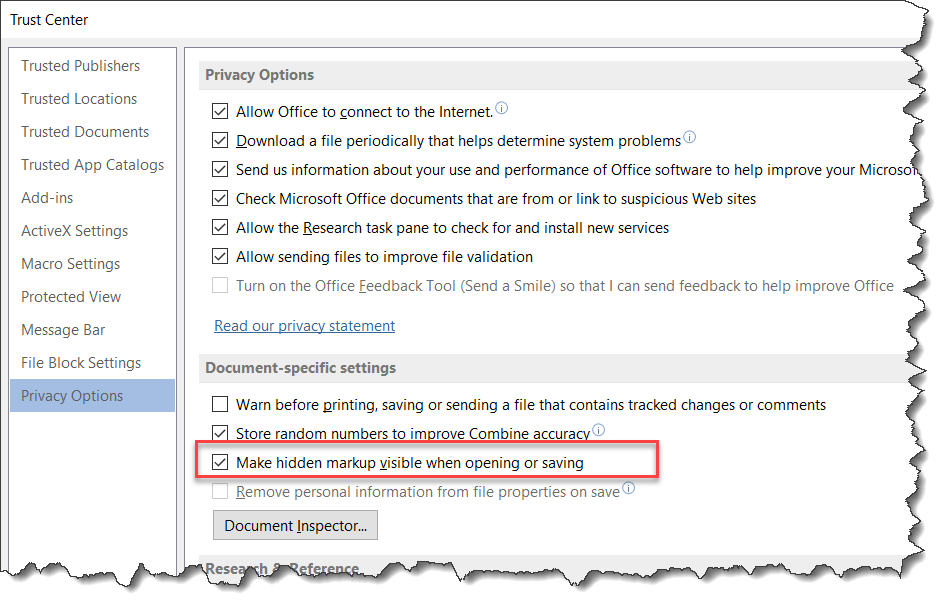
As a lawyer, I generally recommend that people leave at least
"Make hidden markup visible" or "Warn before printing..." checked.
Hidden markup is one very big source of what is called metadata that may
reveal confidential or internal work that you do not want disclosed. You
want to know about this.
In
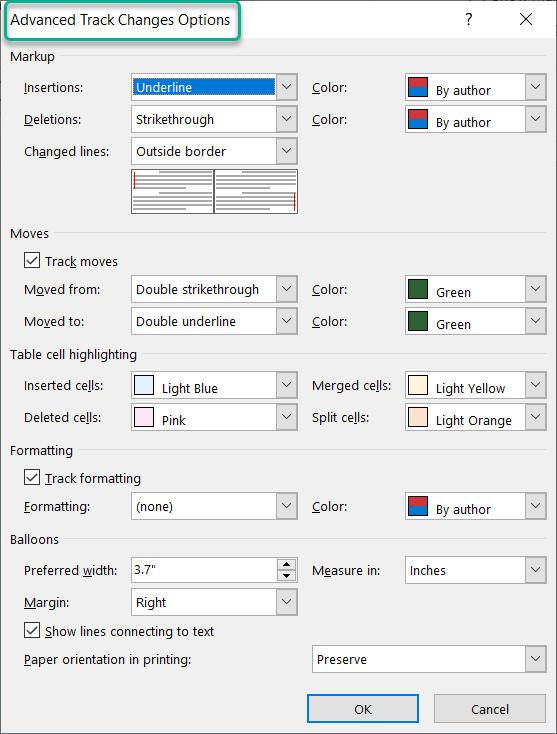
Word 2002+, changes are often shown in balloons. This changes your
displayed and printed formatting dramatically (when changes are shown). You can turn this
off in the track changes options. Turning this off for tracked changes also
turns it off for comments.
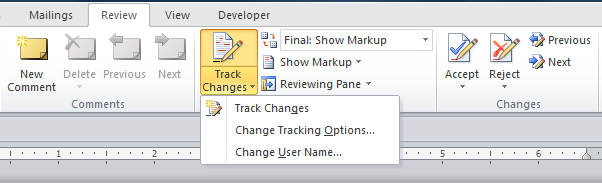
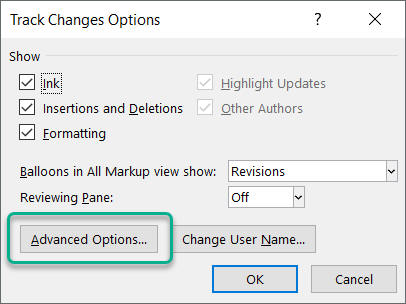
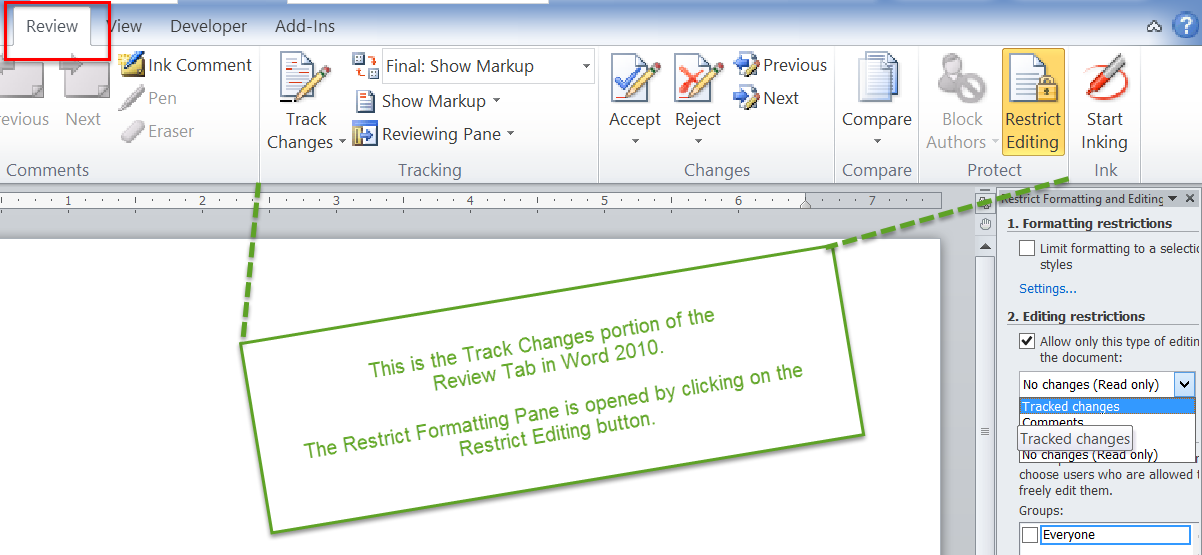
In Ribbon versions of Word, you can access the options
dialog under the Track Changes button on the Review tab.
See also:
Track Changes display - Trust Center Options are not
document-specific
(End of CK Note.)
Practice: Set Options and Track Changes
- Open a document for editing.
- Double click TRK in the Status bar (Click on Track Changes in the
Status Bar).
- Select the Options of your choice in the Options dialog and click
OK.
Tools > Options > Track changes in menu versions
Review Tab > Track Changes > Options in ribbon versions - Delete some text.
- Add some text.
- Change the formatting of a word or paragraph.
- Pause the cursor over the changes in the document to see when and by
whom they were made.
- Save the document.
When you receive a document with changes, you have several options for
viewing the changes and accepting or rejecting them.
In Word 97-2003, to access these options, turn on the Reviewing toolbar by
alternate-clicking any toolbar and selecting Reviewing or select
Track Changes under the Tools menu or (double-)click on TRK in
the Status Bar.
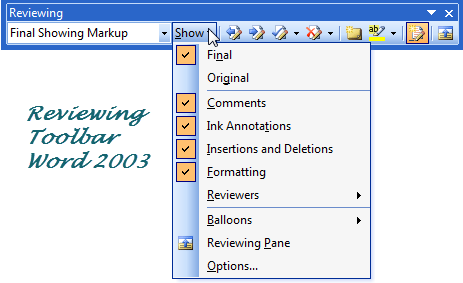
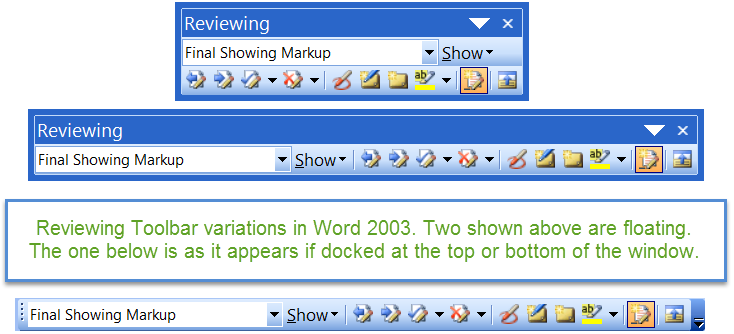
Above, dropdown of Track Changes options in reviewing toolbar.
Below, variations in appearance of toolbar.
Pause the cursor over any marked change and a ScreenTip appears.
If you do not want your changes marked, turn Track Changes off by
double-clicking the TRK (Single-clicking the Track Changes) on the Status bar. If you cannot turn it off, the
document has been protected with a password.
To assure that all reviewers have their changes tracked, protect and
add a password to the document.
Protecting a Document for Tracked Changes
Word 97-2003
- Open a document you want to protect.
- Select Tools > Protect Document.
- Select Tracked Changes, type a password that you are sure to
remember in the Password box, and click OK.
- Confirm the password by typing it in the Confirm Password dialog
box.
- Click OK.
Word 2007-2024(365)
- Use the Restrict Editing button on the Review tab or
Developer tab.
- Select Tracked Changes as the type of Editing Restriction.
- Click on the button to Start Enforcement.
- Type a password and confirm it.
- Click OK
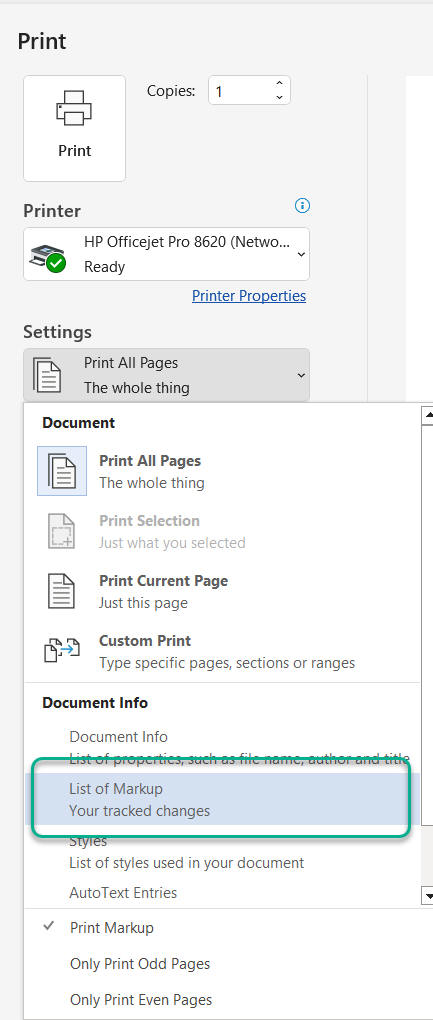
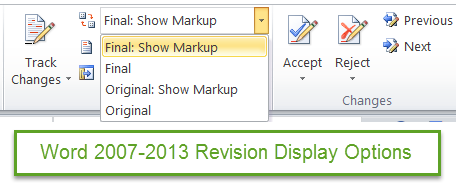
If your markup is showing, if you have chosen to display markup,
you can print the document with the markup. If you are displaying,
instead, the Original or Final then the markup is not shown.
Under the Print dialog, you can choose to print markup instead of
printing all pages.
IMPORTANT NOTE: Microsoft recommends that
most law firms use a third party solution for document comparison, such as
Lexis-Nexis' CompareRite, or Workshare's Deltaview. See the chapter on
third party solutions for more information about these products. Microsoft
Word's compare documents features works on relatively simple documents
that do not contain too much complex formatting. Because of the complex
nature of most legal documents, Word's compare documents feature does not
produce as good a result as the third party products mentioned above.
Microsoft is currently working to address this shortcoming, but in the
meantime the third party solutions are recommended.
CK
NOTE: In
Word 2000, there is a bug that shows up when the document includes one or
more tables. A workaround is given for this situation in knowledge base
article Q246486.
The workaround is to use the reviewing toolbar rather than the dialog box
to Accept or Reject Changes. If you use the dialog box and a row has
changes in more than one cell, only the first change in the row will be
handled, any others will be skipped.
CK NOTE: Recommended method of comparing complex
documents within Word. Convert one or both to text files and use Word to
compare the text files. You won't get formatting changes but will pick
up all changes to your text.
The compare document feature allows Word to compare one document to
another and mark the differences between the two. These marked changes
appear on the screen in the current document. If you wish to save the
changes in this marked document, select File > Save As. If you do not
need to save this "compared" document, it can be printed and closed
without saving changes.
See also:
View and Compare Documents in Word for side-by-side comparison.
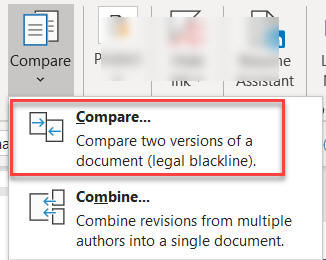
See also:
Compare v. Combine - What is the Difference? by legal guru Deborah
Savadra
In
ribbon versions of Word, this is done using the Compare button on the Review
Tab.
You will given a dialog in which you can select the two documents to be
compared.
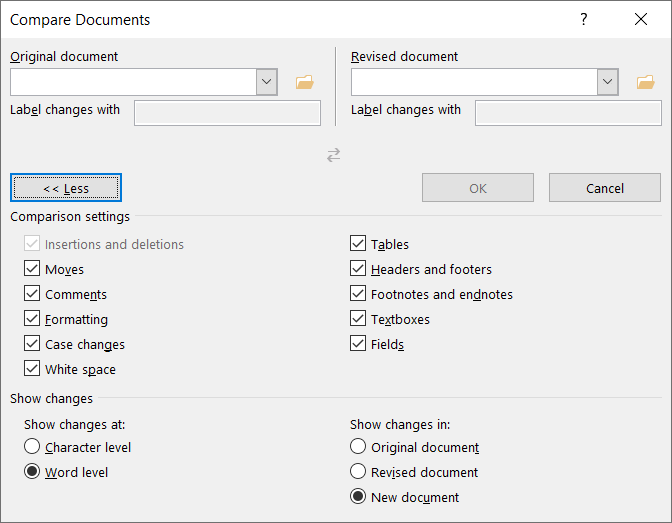
Word will give you a report document showing items from both documents and
noting changes. Using the Track Changes control, you can go through the
comparison document and accept or reject changes. This is a new document,
any revisions are done in the new document, not the originals.
You can print out the entire comparison with markup or under the Print
dialog, you can choose to print markup instead of printing all pages.
Practice: Compare Documents
- Open a new, blank document and type This is an original patent
application.
- Save the document as Original Pat.doc.
- With the document still open, change the word, "original" to
"amended."
- Add the words Filed on (today's date).
- Select File > Save As and name the document Amended Pat.doc.
- Leaving this file open, select Tools > Track changes > Compare
Documents.
This dialog box will open and you may select the original document by
double-clicking.
- The changes appear in the document.
- Click File > Save As, and name the new document Compared Pat.doc.
The first thing to remember is that this is not a mail merge! Document
Merge is a powerful feature in Word that allows you to take a document
that has been reviewed by a number of people and quickly incorporate or
merge these edits into the original document.
Each editor's revision is marked in a different color. If there are
more than eight people involved, the colors will be repeated. After you
merge the changes into the original, you can then accept or reject each
change.
Practice Merging Documents
- Protect the document by clicking Tools > Protect Document.
- Choose Tracked Changes and add a password.
- Remember that the password is case sensitive!
- After the document has been protected, tell others it is ready for
review. The document can be sent to all reviewers via e-mail or on a
floppy disk.
- After it has been reviewed and edited, the changes can be merged
into the original document.
- Open the original document.
- Select Tools > Merge Documents.
- Select File to Merge into Current Document

- Double-click one of the documents containing changes or click Open.
- Repeat step seven until all changes have been merged.
- You now have a single document (your original) with all the merged
changes.
- Select Tools > Track Changes > Accept or Reject Changes.
- Click the Find arrows to navigate through the document and choose to
Accept, Reject, Accept All, or Reject All to incorporate these changes
into your document.
You can
print your result as with other track changes.
Other Ways to Compare Documents
If you've used CompareRite for generating your compared documents in
the past, you can continue to use it in Word 97 and Word 2000. It is
available from LEXIS-NEXIS. Another product that is making a big splash in
the legal market is DeltaView made by Workshare Technologies. At the time
of this writing there is a downloadable trial version of DeltaView at http://www.workshare.net/.
CompareRite information is available from LEXIS-NEXIS at http://www.lexisnexis.com/. As
mentioned above, Microsoft recommends that for now, when comparing complex
documents, these third party products should be used instead of Microsoft
Word's built-in compare documents.
CK Section:
Inserting Comments in a Document
You can insert Comments into a document and either print or conceal them.
Insert => Comment.
In Word 97-2000 inserting a comment appears to highlight the preceding
text (but the highlighting does not print) and moving the mouse cursor over
the highlighted area displays the comment on screen as a tool tip.
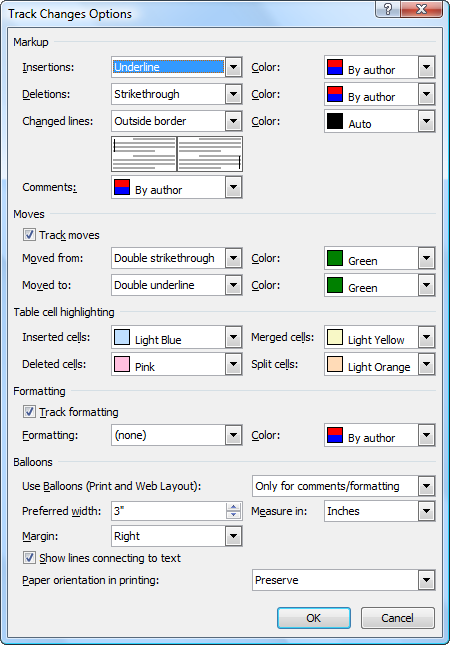
In Word 2002- comments are displayed in an expanded margin in balloons,
by default. This not only displays, but prints. You can change this back to
the Word 97 method under the Track Changes options.
Tools => Options => Track Changes (tab)
Tell Word that you want balloons displayed Never.
When you hover over a comment in text or in a balloon, you will see the
name of the person who commented and the date and time for that. This
information does not print out. Here are screenshots for balloon and inline
display of comments.
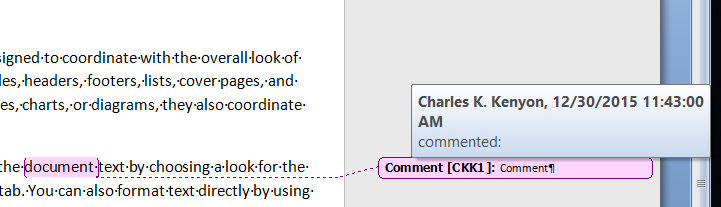
Comment displayed in balloon. Mouse-over the balloon gives
more information.
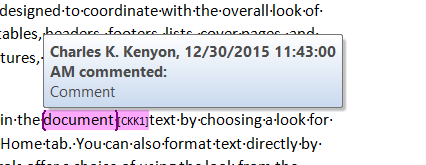
Comment displayed inline. Mouse-over comment marking gives
more information.
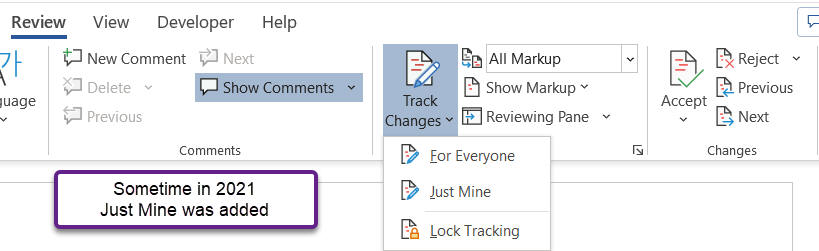
Major changes were made in how Comments display in 2021 in Word 365. As
of this writing, these changes are enabled by default but can be switched
off.
Modern Comments control! Screenshots for Windows and Mac
Why is Track Changes on when I just opened a document to edit?
It had been turned on when the document was last closed. To turn it
off, double-click TRK on the Status bar. If this does not turn it off,
there is probably a password attached and it is protected.
Four people have edited the document. How can I tell who did which
edits?
Pause the cursor over the edit and it will show you the author, date,
and time of the edit. Each new editor (up to 8 people) gets a new color,
so once you find out which person goes with which edit color, you can
quickly tell who edited what.
I need to send this document to a client. How do I get rid of all the
editing marks?
You can accept all changes, reject all changes, or go through them one
by one and mark to accept or reject them individually.
Can I use Word's Track Changes and then use CompareRite or
DeltaView?
This is not a good idea as the document may become corrupt no matter
which one is used first.
Track Changes does not notice changes in Case when done through the
Shift+F3 shortcut.
Nope. This is true in Word 95-Word 2019. Document Compare will catch the
change, though.
I want Track Changes to be on in every document I open or create. How
can I do this?
I do not recommend this. However, it can be done using macros in the
Normal template.
See
this forum thread for the set of macros that will do this.


 Copyright 2000, Microsoft Corporation.