Automated "Boilerplate"
Autotext and AutoCorrect in Microsoft Word - including Building Blocks with a little about AutoFormat as you type
by Charles Kyle Kenyon, Esq.
This page last edited Tuesday 05 May 2026
| Note: "Boilerplate" is a term of art used in the legal framework meaning standardized text. |
There are no promises that this chapter is of the same quality and depth as the other chapters of this guide. That is because it was written by a single author not working with Microsoft. You will not find this chapter on the Microsoft site. AutoText is a one form of Building Blocks in ribbon versions of Word for Windows. Virtually everything said about AutoText here applies to all Building Blocks.
Comments are welcome.
What You Will Learn
After completing this lesson, you will be able to:
Use and organize AutoText (and other Building Blocks) entries
| |||||||||||||||||||||||||||||
Use AutoCorrect
| |||||||||||||||||||||||||||||
Switch AutoFormat As You Type on and (mostly) off.
| |||||||||||||||||||||||||||||
| Know where AutoText and AutoCorrect entries are stored on your computer and move AutoText entries from template to template and AutoCorrect entries from one computer to another. | |||||||||||||||||||||||||||||
| Be able to print out your AutoText entries or AutoCorrect entries | |||||||||||||||||||||||||||||
| Troubleshoot problems with AutoText, AutoFormat as you type, and AutoCorrect - SharePoint |
Additional Written (and Web) Resources
Word for Law Firms and Lawyers
| |||||||||||||||||||
| AutoTextList Sampler - tutorial showing Autotext use in dropdowns and menus | |||||||||||||||||||
| AutoText articles on Word Tips by Allen Wyatt (especially for menu versions of Word and Word for the Mac) | |||||||||||||||||||
| AutoText articles on Word Tips (Ribbon) by Allen Wyatt | |||||||||||||||||||
| Gender Toolbar template - download this global template for an example of AutoText used to insert fields from a complex menu. | |||||||||||||||||||
| What is AutoText and How Do I Use It? by Cindy Meister, MVP, Beth Melton, MVP, and Jay Freedman, MVP - includes information on Building Blocks | |||||||||||||||||||
| Have Word Complete Your Typing - Microsoft help for the Mac | |||||||||||||||||||
| How to Add Pop-Up Lists to Any Word Document So You Can Click Your Way Through Changes in Seconds (or how to use the AutoTextList field) by Bill Coan, MVP. | |||||||||||||||||||
| AutoTextList in the Modern Age by Greg Maxey - includes vba procedure to create | |||||||||||||||||||
| AutoText Inserter Code Sampler - template with sample code to insert AutoText from a global (or document) template | |||||||||||||||||||
| Letterhead
Textboxes and Styles Tutorial - two-page template download that
demonstrates use of the AutoText list field restricted by
styles for the salutation and closing. | |||||||||||||||||||
| How can I import and export all my AutoCorrect entries, so they can be transferred to another machine? Also repesee correction by Dave Rado to AutoCorrect utility that comes with Word. This page has a downloadable utility that lets you see and edit all of you AutoCorrect entries in a Word table. You can then use the utility and table to move/copy your entries to a different computer. | |||||||||||||||||||
| Exploiting AutoCorrect - Not Just for Errors! by Suzanne Barnhill, MVP | |||||||||||||||||||
| AutoCorrect Hack: Use as a text expander! by legal office guru Deborah Savadra | |||||||||||||||||||
| AutoCorrect Utility Manager by Greg Maxey. | |||||||||||||||||||
| AutoCorrect articles on Word Tips by Allen Wyatt | |||||||||||||||||||
| How to Move (Copy) AutoCorrect Entries from One Computer to Another in Word 2007 (2010) | |||||||||||||||||||
| Limits on the number of AutoCorrect entries - remarks by MVPs Rich Michaels and Jay Freedman | |||||||||||||||||||
| Quick Parts in Word only last as long as one session - so save in a custom template (and not in a cloud location) | |||||||||||||||||||
| Word 2007 & Later Key Data File Location by Paul Edstein and Charles Kenyon | |||||||||||||||||||
| Insert a selection of documents by Graham Mayor, MVP - Add-In to insert documents - a document assembly tool versions for Word 97-2024 | |||||||||||||||||||
| How Templates, Styles, and Building Blocks Relate to One Another in Microsoft Word by legal office guru Deborah Savadra (video) | |||||||||||||||||||
| Create reusable headers and footers in Word by legal office guru Deborah Savadra (video) | |||||||||||||||||||
| Autocorrect in Word (Office) 2010 - Microsoft | |||||||||||||||||||
| Microsoft Knowledge Base:Turning Off Autocorrect Features (Q212339), FileName field doesn't update in Word 2002 or later. (Q832897), AutoCorrect Text Deleted or Partially Visible in Form Field (Q212394) | |||||||||||||||||||
| Choose Options for Autoformat as you type - Microsoft Support | |||||||||||||||||||
| Taming AutoFormat as you Type: Word is always making changes I don't expect. How can I get more control over my formatting? by Suzanne S. Barnhill, MVP, and Dave Rado, MVP. | |||||||||||||||||||
| Formatting AutoCorrect Entries by Deborah Savadra | |||||||||||||||||||
| Mapped Content Controls and Document Properties - repeating data in a Word document by Charles Kenyon | |||||||||||||||||||
| AutoFormat and AutoFormat as you type distinguished and explained - Microsoft | |||||||||||||||||||
| The Three Autos: AutoComplete, AutoFormat, and AutoCorrect - video by Pharos Technology | |||||||||||||||||||
| AutoText backup and restore by Graham Mayor, MVP - backup and restore AutoText stored in the normal template | |||||||||||||||||||
| How to Batch Add or Delete AutoText Entries using vba | |||||||||||||||||||
| Create or Edit AutoText Using vba - Lene Fredborg, MVP | |||||||||||||||||||
| Making the font in Building Blocks/AutoText match that in the destination file. - see responses of Stefan Blom, MVP and Charles Kenyon | |||||||||||||||||||
| Assigning Keyboard Shortcuts in Microsoft Word 2007-2024 (365) by Charles Kenyon | |||||||||||||||||||
| AutoCorrect and AutoText by Laura Townsend (video) | |||||||||||||||||||
| AutoComplete - for AutoText and Other Building Blocks by Charles Kenyon | |||||||||||||||||||
| Customizing the Cover Page (a Building Block) - see Charles Kenyon response | |||||||||||||||||||
| Microsoft Word - Quick Parts - BCTI | |||||||||||||||||||
| Microsoft Word Time Saver: The Quick Part Gallery - short video from Technology for Students and Teachers (one above is more thorough) | |||||||||||||||||||
| Introduction to Quick Parts, Creating and Editing Quick Parts, Exporting Quick Parts - three videos (apply to other Building Blocks as well) Note, although I've provided a link to the video on Exporting I urge you to NOT use this procedure. See below on where to store Building Blocks. Your building blocks for sharing should not be in your Normal.dotm file! | |||||||||||||||||||
| How to create and use Microsoft Word Quick Parts video by Donna Gilliland |
| Building Blocks in Word 2007 and later |
|
(Ribbon Versions)
Building Blocks & Autotext
by Greg Maxey - walks you through the concept of galleries for building
blocks - how to create and organize them - including ways
that Microsoft may not have conceived! Includes downloadable
enhancements.
| |
| Chapters 13-15 of Herb Tyson's Microsoft Word 2010 Bible - Building Blocks, AutoCorrect and Autoformat in Word 2010 (and 2007) | |
| Word 2007-2024 Building Blocks: Part I, Inserting and Swapping, Creating | |
| Providing Helpful Tips for Easy AutoText Entry - Autocomplete | |
| Add Building Blocks to a Template - Microsoft | |
| Building Blocks articles by Allen Wyatt | |
| My article: AutoComplete - for AutoText and Other Building Blocks | |
| Replacing All Building Blocks | |
| Adding an AutoText Entry | |
| Deleting an AutoText Entry | |
| Working more efficiently with Word 2007's new building blocks | |
| Create and use content Building Blocks in Word documents | |
|
Quick Parts vs. AutoText - When is one a better choice? by
legal office guru Deborah Savadra (video) - this is a good short video demonstrating use of the Building Blocks Gallery Content Control and other Content Controls in a form letter templaate. | |
| Add AutoText in Word 2010 - Microsoft (does not mention AutoComplete feature) | |
| Create and distribute boilerplate text - Word 2007 | |
| Microsoft Word - Quick Parts - BCTI | |
| Microsoft Word Time Saver: The Quick Part Gallery - short video from Technology for Students and Teachers (one above is more thorough) | |
| Building Document Generation Systems from Templates with Word 2010 and Word 2007 | |
| Create and use content Building Blocks in Word 2007(-2024) documents by Katherine Murray, Mary Milhollin, and Beth Melton. Excerpt from Microsoft Word 2007 Inside Out. | |
| Microsystems white paper on Building Blocks | |
| Insert a Building Blocks Gallery Content Control - Microsoft | |
| Missing Page Number / Header / Footer Commands - greyed out - Charles Kenyon | |
| Working With Building Blocks - Word Object Model - vba reference MSDN | |
| Create and Edit Building Blocks - LinkedIn Learning Word 2019 certification prep | |
| AutoComplete - for AutoText and Other Building Blocks by Charles Kenyon | |
| Introduction to Quick Parts, Creating and Editing Quick Parts, Exporting Quick Parts - three videos (apply to other Building Blocks as well) Note, although I've provided a link to the video on Exporting I urge you to NOT use this procedure. See below on where to store Building Blocks. Your building blocks for sharing should not be in your Normal.dotm file! | |
| How to create and use Microsoft Word Quick Parts video by Donna Gilliland | |
| Quick Parts in Microsoft Word. Building Blocks Organizer video by ItsEasyTraining (good on use of BB Organizer) | |
| Word 2016: Create & Modify Building Blocks video by Kirt Kershaw (for any ribbon version of Word, really) (good on use of BB Organizer) | |
| Word 2016 - Building Blocks - How to Use Quick Parts to Design a Document video by Adam Morgan | |
| Building Blocks - sort of - on the Mac by John Korchok (actual title: Custom Content in AutoText Gallery) | |
| How to transfer quick parts from MS Word to MS Outlook? - see my answer | |
| Controlling/Creating Building Blocks with vba - Microsoft documentation |
Boilerplate Macro Package (Commercial Add Ins)
| BoilerPlate Add-In - Insert a Batch of Files Into a Word Document by Graham Mayor, MVP | |
| BoilerPlate Add-In for Word by Bill Coan, MVP | |
| AutoText Manager by Chris Devrell |


(this
guide table of contents) ------- (MS
Word New Users FAQ)
When I started using computer word processing the way to repeat text was with macros (even on paper tape!). I learned to write very lengthy and complex macros in Word Perfect. Macros are still useful in Word, but repeating boilerplate text is not a good use for them. Word has AutoText and AutoCorrect that do a much better job and are more easily edited.
Distinguishing Among AutoText, AutoFormat and AutoCorrect (Overview and definitions)
There are three "Auto" functions that are easily confused and work in similar ways when you are creating documents. Those are AutoText, AutoFormat, and AutoCorrect.
AutoFormat and the related AutoFormat as you type are not useful for preparing boilerplate and may be discussed in depth elsewhere. You can turn functions on and off but you can't customize them. They don't insert text but can change how it looks dramatically. AutoFormat is applied all at once to a document while AutoFormat as you type changes the format of your text automatically as you type it. See below for a bit more on these.
Both AutoText and AutoCorrect allow the user to pick text to be inserted. Both come with predefined replacements. They are stored in different places and are edited or transferred in different ways. Both can insert and replace text but they act and show up on your screen in different ways.
AutoCorrect does what it name implies - fixes errors. It can do much more, though. It checks each "word" as you type by looking that "word" up in a database of corrections. Points to keep in mind:
| Because such errors and corrections are unique to each language, AutoCorrect is specific to each language, with different files for different languages if you are using more than one. | |
| It will change "hte" to "the" or "additinal" to "additional." | |
| It will also change "(c)" to the copyright symbol or ":)" to a smiley face. | |
| You can add your own entries to this replacement table and they can be quite lengthy. "pfp" can be replaced with "Party of the First Part." | |
| To Word a "word" is at least two characters that is followed by a space or punctuation or the Enter key. Those characters can include punctuation marks and numbers. | |
| Limits on AutoCorrect include a maximum size for an unformatted entry of 255 characters and a maximum size of the trigger "word" of 31 characters. | |
| Unformatted AutoCorrect entries (most of them) are available in (shared with) all Microsoft Office programs. Formatted AutoCorrect entries and AutoText/Building Blocks are available only in Word and Outlook. |
The advantage of AutoCorrect is that it corrects errors in real time rather than coming back for correction later. A very real disadvantage is that what Microsoft considers an error may be a word you intend to use. If you use Google to search for "AutoCorrect fun" or "AutoCorrect errors" you'll likely find some entertaining examples. In Word, the most likely source of problems is checking the box at the bottom of the option to automatically use suggestions from the Spelling Checker. (You can get the following dialog to show up using the keyboard short cut of Alt+T, A. That is, hold down the Alt key, and press T, release those and press A.)

Those suggestions will often be right, but when they are not, Word makes the substitution without telling you!
AutoCorrect
AutoCorrect is sometimes confused with AutoText but the two are very different. A key distinction is that unformatted AutoCorrect entries are shared by all Office programs. AutoText and Building Blocks are Word components only. (Outlook can use AutoText and Textbox building blocks but they are not shared with Word in Ribbon versions). A second distinction is that AutoText is stored in templates, while AutoCorrect is (mostly) stored in language-specific ACL files. Formatted AutoCorrect entries are stored in the normal template.
See Exploiting AutoCorrect by Suzanne Barnhill, MVP for creative ideas on making the best use of AutoCorrect.
With AutoCorrect, if you type the entry name and press Enter or the spacebar or punctuation, Word will insert the entry at that location, replacing what you typed. It will do this without notice to the user and very quickly. You can undo this with Ctrl+Z if you notice it and it is an unwanted replacement. For this reason:
- Be very careful to give AutoCorrect entries names that you do not ordinarily type.
- Be cautious about letting Word create such entries automatically from the spelling checker. You may get surprise results!
The key to using AutoCorrect is the AutoCorrect Option settings.
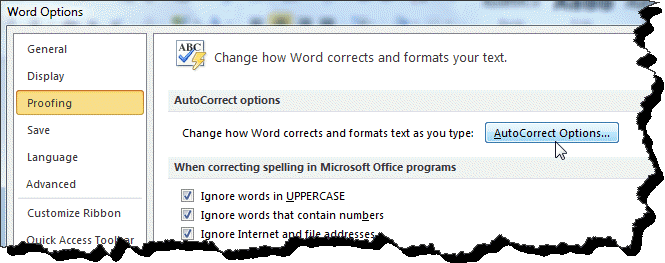
AutoCorrect Options
In Word 97-2003 you access the AutoCorrect options dialog under the Tools menu. In Word 2007-2024 you get to it from the Options. This is listed as Word Options under the Office Button in Word 2007 and under the File Tab in Word 2010-2024. In all versions of Word you can reach it with the keyboard shortcut Alt+T, A.
Word 2010 AutoCorrect Options Dialog
(tabs different in earlier versions)
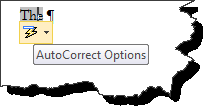 A
quick way to get to AutoCorrect Options in Word 2007-2024 is to click on
the lightning bolt drop down after an AutoCorrect. This is shown to the right.
Word just corrected "hte" to "The" at the beginning of a sentence. Bringing the
mouse pointer over the word displays the lightning bolt and after a few seconds
the tooltip. Clicking on the lightning bolt brings up the AutoCorrect Options
Dialog. If this is not showing up, you need to check the box in the AutoCorrect
Options dialog to show AutoCorrect Options buttons.
A
quick way to get to AutoCorrect Options in Word 2007-2024 is to click on
the lightning bolt drop down after an AutoCorrect. This is shown to the right.
Word just corrected "hte" to "The" at the beginning of a sentence. Bringing the
mouse pointer over the word displays the lightning bolt and after a few seconds
the tooltip. Clicking on the lightning bolt brings up the AutoCorrect Options
Dialog. If this is not showing up, you need to check the box in the AutoCorrect
Options dialog to show AutoCorrect Options buttons.
Using AutoCorrect to Correct typos
I suspect this is the original purpose behind AutoCorrect and the reason for the name. If you type "adn" and press the space bar, Word changes this to "and." When you type "adequit" followed by a period, Word changes it to "adequate" followed by the period. Like all AutoCorrect text replacements (other than the functions shown below) these are set forth in the table of AutoCorrect replacements.
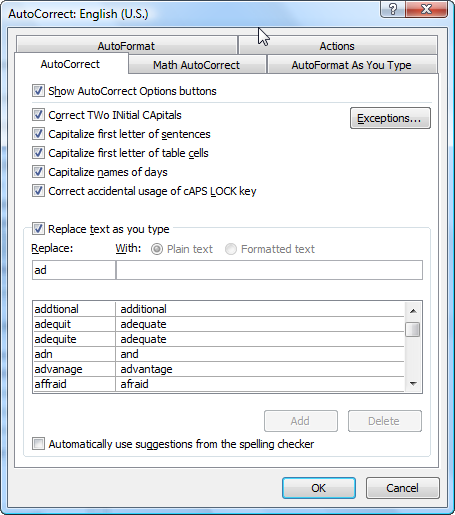
Again, these are language-specific. AutoCorrect, though, can be used for much more than correcting typos. Three uses are insertion of boilerplate text quickly, automatic insertion of formatted fractions, and insertion of dummy or random text.
Using AutoCorrect for quickly typing boilerplate text
Say the name of your company is "International WireWorks, Inc." and you have to type that 40 times a day. You could select the name and save it (without the period at the end) as an AutoCorrect entry with the trigger being "iww." or "_iww." Whenever you type "iww." or "_iww." in your documents, you will get "International WireWorks, Inc." Note, if you had included the period in your saved text, you would have two periods in your resulting text. The same can be done with much more extensive phrases. See Exploiting AutoCorrect by Suzanne Barnhill, MVP and AutoCorrect Hack - Use It as a Text Expander by Deborah Savadra.
If you create such entries make sure that the key or trigger is not something you would ordinarily be typing. Remember to remove the entry from you AutoCorrect entries when it is no longer needed.
Using AutoCorrect to type formatted fractions
AutoFormat as You Type already provides limited insertion of fractions. These are limited to the fractions built into the font being used. If you have the option for this checked, Word will replace typed common fractions like 1/2 and 1/3 with the font characters for those. (This option is checked by default in a Word installation.)
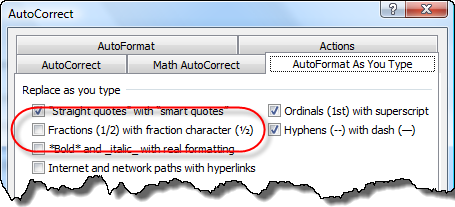
However many fractions (i.e. 2/3, 1/16) are not included in fonts. If you want to have more fractions handled automatically and have them appear with consistent formatting in your documents, you could create formatted AutoCorrect entries with the numerator formatted as superscript and the denominator formatted as subscript. To maintain consistent formatting, you would then want to uncheck the "Fractions" option on the AutoFormat as You Type option and include those fractions in your formatted AutoCorrect entries.

Since these are formatted entries, they are stored in the normal template, not in the language-specific acl file. For more on this, see How Can I Create a Fraction in Word that isn't in Any of the Fonts that I Have? For a macro solution see Create a Fraction by Graham Mayor. For a file that can be used with Jay Freedman's backup utility to add many of these in your installation, see Fractions AutoCorrect Document - add more fractions to AutoCorrect.
Using AutoCorrect to Insert Random Text - Rand and Lorem functions
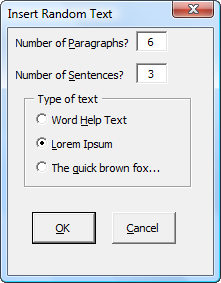
There is in AutoCorrect a function to insert random or filler text to help you see how a template will look when it is used. In Word 2000-2003 this is the Rand function. Later versions also have the Lorem function. Both use AutoCorrect but allow the user to specify the amount of text. Both require that they begin a paragraph and both are triggered by the Enter key at the end of the paragraph.
Here are the two functions before the enter key is pressed:
=rand(5)
=rand(5,3)
=lorem(7)
=lorem(7,3)
The function can take one or two parameters. When only one parameter is given, that is the number of paragraphs of three sentences. When two parameters are given, the first is the number of paragraphs and the second is the number of sentences in each paragraph.
In Word 2000-2003, the text used by rand is the sentence: The quick brown fox jumps over the lazy dog. This sentence uses all 26 letters used in English but does not give the variety offered by the ribbon versions of Word. You can get this in ribbon versions of word using the function "rand.old" instead of "rand."
=rand.old(5)
=rand.old(5,3)
In ribbon versions of Word the text used by rand appears to come from Word's help files.
The lorem function works with the same parameters but produced nonsense text that looks like Latin and is adapted from text written by Cicero. See Lorem Ipsum. It looks much more like ordinary text (at least in English or Latin). Sentence length varies and there is a normal distribution of ascenders and descenders in the letters. This use as dummy text dates back to the middle ages.
For more on this AutoCorrect function, see The Rand "Virus" or how to insert dummy text into a document.
You can download a free Add-In for Word 2007-2024 that writes these formulae for you to help you learn them. It has a custom dialog box that gives you choices.
Turning Off AutoCorrect
Usually what people want to really turn off is AutoFormat as you Type. If you truly want to turn off AutoCorrect, uncheck all of the boxes on the AutoCorrect Options dialog.
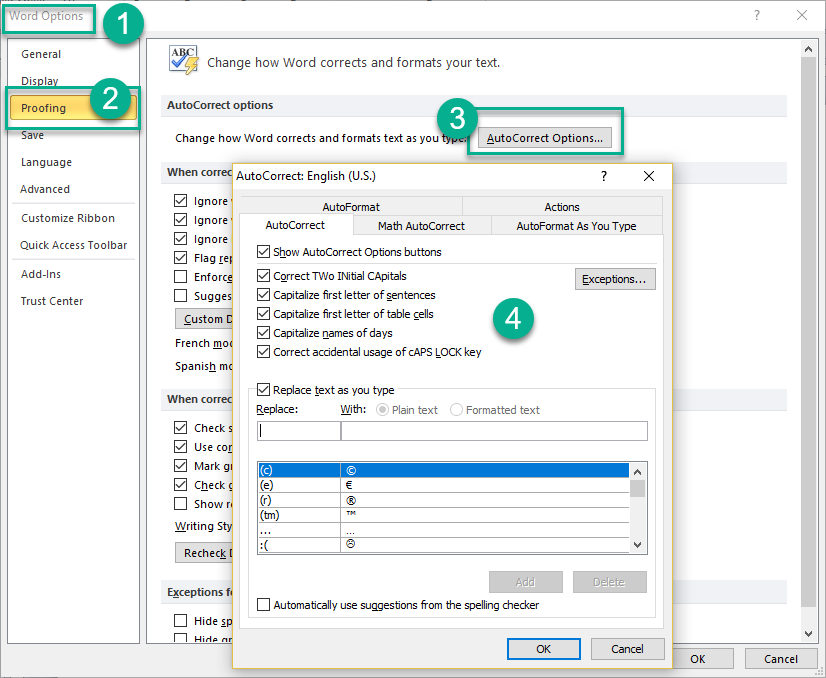
File>Options>Proofing>AutoCorrect Options
Note, I do not recommend turning AutoCorrect off, but do recommend turning off the option to Automatically use suggestions from the spelling checker.
Using AutoFormat as you Type to insert paragraph borders (fancy lines)
It's easy to add a variety of horizontal divider lines to Word documents. To create a solid, black line for example, type three HYPHENS (-) at the beginning of a new paragraph and then press ENTER. Typing three UNDERSCORES (_) will make a thicker line, and so on. (If you type more than three, it will still work.)
See the table below for a guide to the types of lines you can create:
| TO CREATE A LINE LIKE THIS | TYPE THIS AND PRESS ENTER | ||||
| --- (Three HYPHENS) | |||||
| ___ (Three UNDERSCORES) | |||||
| === (Three EQUAL SIGNS) | |||||
| ### (Three POUND SIGNS) | |||||
| *** (Three ASTERISKS) | |||||
| ~~~ (Three TILDES) | |||||
If you're having trouble making this tip work, try this:
- Select AutoCorrect from the Tools menu.
- Click the AutoFormat As You Type tab.
- Then select the Borders check box under the Apply as you type heading.
Note: These can be very disconcerting if you don't know that this is what is happening. For that reason, many experienced Word users, including your author, turn this option off. If you want to not apply these (or any other AutoFormat or AutoCorrect) press Ctrl+Z immediately after Word makes the change. You can also add a space after your three (or more) characters and Word will not convert the characters to a paragraph border. If you are past the point where Ctrl+Z will help, you can get rid of one of these borders by removing the border format from the paragraph.
In Word 97-2003, place your cursor in the text line above the border and use Format => Borders and Shading. Make sure that the apply to box says "paragraph" and click on the box for "none."
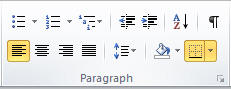 In
Word 2007-2024 (365), place your cursor in the text line above the border and
on the Home tab find the Borders and Shading dropdown in the paragraph group; it
will be highlighted (shown left). Select No Border.
In
Word 2007-2024 (365), place your cursor in the text line above the border and
on the Home tab find the Borders and Shading dropdown in the paragraph group; it
will be highlighted (shown left). Select No Border.
Using AutoFormat as you Type to insert Em-dashes and En-Dashes
Em-dashes (—) and
En-dashes (–)
are true dashes, not hyphens (-) or minus signs. An En-dash has about the width of the
upper-case letten N, and an Em-dash has about the width of the upper-case letter M.
See
How to Use the M-Dash and How to
Use the N-Dash.
To insert an Em-dash you put two hyphens -- without spaces between two words or characters as you type.
Any word (or character)--another word (or character) converts to an Em-dash.
Becomes: word (or character)—another word (or character)
To insert an En-dash you need to put it between two words with a space on either side of two hypens or minus signs.
Any word (or character) -- another word (or character) converts to an En-dash with spaces on either side.
Becomes: word (or character) – another word (or character)
Both of these AutoFormat as you Type methods require that the second word be ended in some way (space or punctuation) before the transformation takes place.
These can be inserted using Insert > Symbol. There are keyboard shortcuts for these as well. They use the minus sign on the numeric keypad.
Note, if your mouse pointer turns into a bold dash —, press the Esc key! That can remove commands from a menu or the Ribbon!

If you do not like the spaces around the En-dash, you may want to use AutoCorrect instead. That is discussed by MVP Jay Freedman in this Microsoft Answers thread.
Where Are AutoCorrect Entries Stored?
Unformatted AutoCorrect entries are stored in .acl files. These files are language-specific. That is, if you change the language setting for your text, a different .acl file will be used (or generated).
Formatted AutoCorrect entries are stored in normal.dot / normal.dotm.
See also
What Files Do I Need to Back Up?
Moving or Copying AutoCorrect Entries
MENU VERSIONS (97-2003)USE THE AUTOCORRECT UTILITY FROM THE MVP SITE
This utility supplants and improves the utility from Microsoft. It copies your AutoCorrect Entries into a Word table. They can be viewed and edited in that table. Then the utility can put your edits into your AutoCorrect all at once. You can also copy the table to a different computer and use the utility to copy your AutoCorrect onto that computer. Easy to use. Free!
The version of this utility for Word 2007 - 2024 can be found on Jay Freedman's site as AutoCorrect2007.zip and works with Word 2007-2024. Jay also has his AutoCorrectMath.zip utility which includes Math AutoCorrect. Another utility to manage AutoCorrect entries in the Ribbon versions of Word can be found on Greg Maxey's site: AutoCorrect Utility Manager
None of these utilities is a typical Add-In. They are .dotm templates that provide the table structure for storing the entries in newly created Word documents. All of them gather all the .acl files and formatted entries stored in the Normal template.
AutoText may be more suited to your purposes than AutoCorrect
For boilerplate, AutoText is usually superior to AutoCorrect because it is more easily edited and transferred from computer to computer, and any size limitation is related to storage space. AutoText resides in templates, rather than in a special file. AutoText is one of many types of Building Blocks in ribbon versions of Word. AutoText is a way to store parts of a Word document for re-use. You can, for example, create a library of boilerplate paragraphs for business letters, or keep a handy selection of headers and footers. An AutoText entry can store anything a Word document can contain, such as formatted text, pictures, and fields. Word comes with a number of predefined AutoText entries, and you can add as many as you like. (AutoText cannot store working Content Controls, for some reason. Many other Building Blocks can hold content controls.)
As of this writing (February 2022) AutoText is the only Building Block used on the Mac versions of Word. For the Windows version additional building blocks galleries are available. These can be mimicked to some extent on Word for the Mac. See John Korchok's article Custom Content in AutoText Gallery.
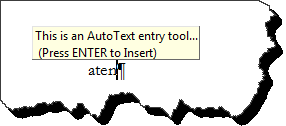 If your AutoText is stored in your Normal.dotm template
in Word 2010 it gives you an AutoComplete
"tooltip" previewing what the replacement text will be before it makes the
replacement. (In versions earlier than Word 2007 and beginning again in Word
2013, it shows this tooltip if the AutoText/Building Block is stored in the
Normal.dotm template (the default for AutoText), the document template, or
another template loaded as an Add-In.) The tooltip shown here is for
the AutoText entry named "ATEntry1" and the contents are "This is an AutoText
entry tooltip." It is shown after the first four letters of the name: "aten."
Note that this is not case-sensitive. In Word 2007 there are no tooltips for
AutoText entries. In Word 2013 the full tooltip (AutoComplete) feature was restored
and appears for any AutoText or other Building Block stored in the attached template, normal.dotm, and
other global templates (but not in the building blocks files which are not
treated as Add-In global templates).
If your AutoText is stored in your Normal.dotm template
in Word 2010 it gives you an AutoComplete
"tooltip" previewing what the replacement text will be before it makes the
replacement. (In versions earlier than Word 2007 and beginning again in Word
2013, it shows this tooltip if the AutoText/Building Block is stored in the
Normal.dotm template (the default for AutoText), the document template, or
another template loaded as an Add-In.) The tooltip shown here is for
the AutoText entry named "ATEntry1" and the contents are "This is an AutoText
entry tooltip." It is shown after the first four letters of the name: "aten."
Note that this is not case-sensitive. In Word 2007 there are no tooltips for
AutoText entries. In Word 2013 the full tooltip (AutoComplete) feature was restored
and appears for any AutoText or other Building Block stored in the attached template, normal.dotm, and
other global templates (but not in the building blocks files which are not
treated as Add-In global templates).
AutoComplete works with other Building Blocks as well, not just AutoText. The AutoComplete feature does not work with building blocks in a template that is stored in one of the building blocks folders; the F3 key, though, does work. AutoComplete works with Building Blocks (including AutoText) in your Normal.dotm template or in a Global Template stored in your Word Startup Folder.
With AutoText (or other Building Blocks) stored in these templates if you type the first four letters of your AutoText entry name you'll see a tooltip showing the entire entry (or its start). If you press Enter when the tooltip is showing, you'll get your replacement entry. Especially in Word 2007-2024, if the tooltip is not showing but you've typed the first four letters, try pressing the F3 key. Note, if the first four letters are not unique to one AutoText entry, you'll need to type enough to have a unique entry name. You can also attach a keyboard shortcut to your AutoText entries. See this Microsoft Answers thread on the appearance (or not) of the tooltip.
Either way you use AutoText you will probably find it useful. Continue using it and you will develop a whole library of boilerplate. In WordPerfect this function was filled with macros; in Word it is AutoText. (While Word uses macros, they fulfill a different purpose and are ill-suited for simple recording or creation of boilerplate.) In some early versions of Word (before Word 6), the AutoText feature was called the Glossary. In at least one current (2016) language version it is called Gjossario.
See also my article: AutoComplete - for AutoText and Other Building Blocks
Where Are AutoText Entries and Other Building Blocks Stored?
AutoText Entries and other Building Blocks are kept in templates. AutoText is stored in the normal template by default but is often better kept in a document template or in a different global template. In Ribbon versions of Word (2007-2024) AutoText is still stored in templates, but is a part of the concept "Building Blocks." In Word 2007 AutoText entries are stored by default in a separate building blocks file but can be stored in other templates, including normal.dotm. In all other versions of Word, the default storage location for AutoText is the normal template. In Word 2007 and later the name of the default building blocks storage file is "Building Blocks.dotx." That is the default storage location for user-created Building Blocks other than AutoText. In Word 2010-2024 there is a separate file for Building Blocks that come with Word: "Built-In Building Blocks.dotx." These files are stored in a sub folder of the User's Application Data folder. The precise building blocks storage folder depends on both the version of word and the operating system. These are hidden system folders
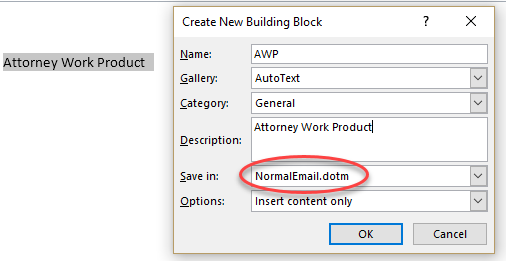
Note that Outlook AutoText entries are stored in the NormalEmail.dotm template. You can make them available in Word by placing a shortcut to that template in your Word Startup Folder.
Windows XP Location:
c:\Documents and Settings\{your username}\Application Data\Microsoft\Document
Building Blocks\1033\
Windows Vista & 7-10 Location:
c:\Users\{your username}\AppData\Roaming\Microsoft\Document Building
Blocks\1033\
The 1033 is the English-language version. Within that folder there may be additional folders for the version of Word. Again, that is the location for the default storage location. Any template stored in the Document Building Blocks folder will share building blocks with all files. If put in a subfolder, it should share the restrictions of that subfolder. That is, if the template is placed in the 1033 folder and the user is using a non-English language proofing set, the template may not be available, while if it were in the general Building Blocks folder (one level up) it would be available.
Building blocks including AutoText (Word 2007-2024) must be stored in templates. In Ribbon versions of Word, they can be stored in either dotx or dotm templates. For the template to have macros, it must be a dotm template and should not be stored in the Building Blocks folder if you want access to the macros. Templates to hold building blocks may be stored in the Document Building Blocks folder. They need not be stored in the same language- or version-specific folder as the built-in building blocks file. They can be stored in that folder and if they are, should carry the language restrictions of that containing folder.
Building Blocks stored in the building blocks folders are not treated as global templates. This is true even though the building blocks they contain are available in any other document or template (so long as there is not a naming conflict). In Word 2013 and later AutoComplete works for building blocks that are stored in (1) normal.dotm, (2) other global templates, and (3) the attached document template. The AutoComplete feature does not work with building blocks in a template that is stored in one of the building blocks folders; the F3 key, though does work.
Saving AutoText or Other Building Blocks
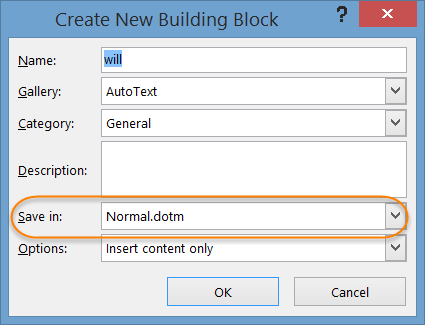
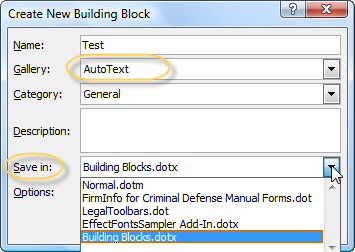
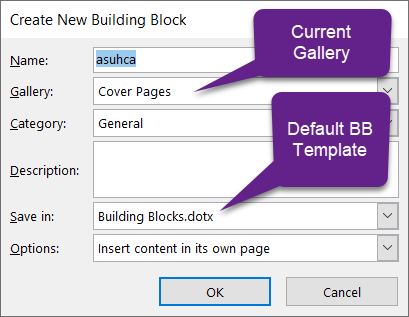
In order to save anything as AutoText or another type of Building Block (including textboxes), what you want to save must be selected. The quick way to get to the save dialog is to press Alt+F3. When you use Alt+F3 to save something as AutoText (or another type of Building Block) Word gives you a dialog box to let you assign a name to the AutoText entry. The default name is the actual text, but something else may be a better name. In Word 2007 and later that dialog gives you options for where the AutoText is to be stored, again, in the normal template by default. You can tell Word to save the selection in a different Building Blocks Gallery and assign a category. You can save a description as well.
In earlier versions (non-Ribbon) Alt+F3 does not give storage options and you will be saving in normal.dot.
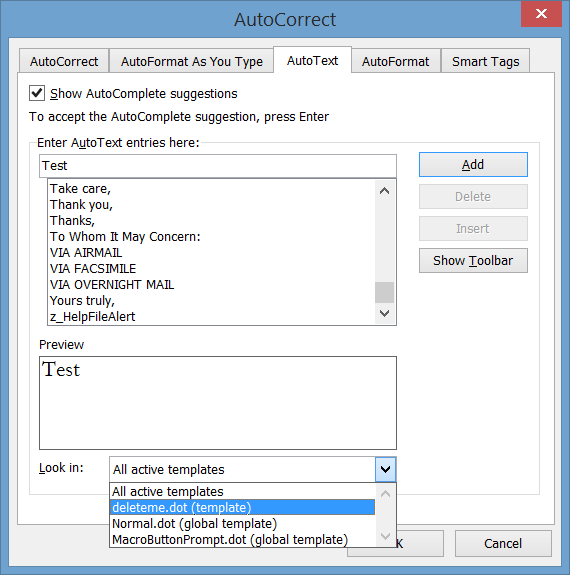
With these non-ribbon versions of Word, with the text you want to save selected, your can save in the normal template and use the Organizer to move the AutoText to a different template. Otherwise, you can save directly in a different template. This is a bit more complex. You need to go to AutoText under the Insert Menu and pick the general AutoText at the top. This will give you the following dialog from the AutoCorrect Options for AutoText:
The options you will have for storage locations for AutoText include the default normal template, the attached document template if that is different, and loaded Add-In templates that already have AutoText. The currently open document is not an option because documents cannot hold AutoText or other Building Blocks. If you first save your document as a template, it can then hold AutoText.
See Where Can Building Blocks Be Stored for more on the options for storage.
The Macintosh version has similar dialogs for saving AutoText. It does not sort by categories but does let you pick templates. As of this writing (February 2022) AutoText is the only Building Block used on the Mac versions of Word. For the Windows version additional building blocks galleries are available. These can be mimicked to some extent on Word for the Mac. See John Korchok's article Custom Content in AutoText Gallery.

Incorporating AutoText or other Building Blocks in Templates with AutoText Fields, AutoTextList Fields, or Building Block Content Controls
AutoText Fields
AutoText (and other Building Blocks) can also be retrieved using AutoText Fields. You can have AutoText stored in a Global Template created just for this purpose (.dot, .dotx, or .dotm file). In this way an office can have company-wide templates that show local information using AutoText fields that pull the local information into documents created from the template from one or more of the global templates. Note, if the document is going to go to a user who does not have those global templates, the AutoText field should be unlinked before being forwarded. You do this by placing the insertion point in the field and pressing the keyboard shortcut Ctrl+Shift+F9 or Ctrl+6.
The AutoText Field will also pull in other Building Blocks using the Building Block name. I do not know what will happen when different building blocks in different galleries have the same name. I have stored letterhead in Header Building Blocks and created letterhead templates that use an AutoText field to call in that header. I have used tables stored in the Tables Gallery using an AutoText field. When building blocks like headers/footers/cover pages have unique position elements, those are ignored by the AutoText Field.
AutoText fields usually need to be updated and perhaps unlinked when a new document based on the template is created. That can be done manually or by using macros. My macros for doing this automatically upon document creation are shown (far) below for anyone interested.
Menu Controls - Menus of your AutoText or other Building Blocks in your documents
Word has two easily added ways to put menus of your AutoText or other Building Blocks in your documents. These are the AutoTextList Field and the Building Blocks Gallery Content Control.
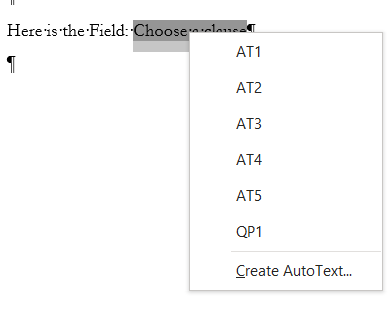
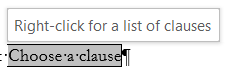
The AutoTextList Field
There are (at least) two ways to do this, neither of which involve macros or VBA. The first method requires use of styles in both the creation and implementation of the AutoText (or other building block) entries. Then you use the AutoTextList field to give you a drop-down menu in your document from which you can choose AutoText entries by entry name. This field works in all Windows and Mac versions of Word since Word 97. The AutoText field gives you what is in one entry named in the field. The AutoTextList field gives you choices.
To get the list, you right-click on the field. You can have pop-up help text that shows when someone hovers the mouse pointer over the field like that shown below.
Use the AutoText Entries drop down box (built-in field) in your text as a field
This method involves use of Paragraph styles in both the creation and use of the AutoText. Unless a paragraph mark is a part of the AutoText entry, the style in which the entry is created will have no effect on the formatting of the inserted text. It will, however, change the category under which the entry is classified by Word.
Creating your AutoText Entries so they will be placed in a category by Word.
To create the entries for your list, type them in a document where they would normally be used. This document should be based on a template other than Normal.dot. Then select a potential grouping of text that you want to fit into a particular category. For this exercise, be sure that the text does not include a paragraph mark. Go to the Format menu and select Style...
A dialog box will pop up with your current style selected. Unless you have already created a style for this kind of entry, click on the New button. This will pop up another dialog box for the creation of a new style. Give your new style a name, i.e., "z Interrogatories - AutoText." The "z" is in the name to put it at the end of most Styles lists; the "AutoText" tag is to indicate the style's function.
WARNING: The AutoText categories are based on Paragraph styles - not Character styles. The type of style you are creating will show up in the top right corner of the New Style dialog box. If it says "character," change it to "paragraph." Click on OK to close the New Style dialog box. Note that we didn't make any changes to the style, nor did we check the box about saving it to the template, we just gave it a name. That name will become the AutoText category for entries of this type. Click on the Apply button so that your current entry will be formatted using this style.
Then call up the AutoText dialog box.
Tools menu -> AutoCorrect -> AutoText (tab)
Change the box at the bottom so that it says: Look In: your template's name. What you want here is the name of the template on which your document is based, not "All available templates," or "Normal.dot."
Click on the Add button to add your entry. Choose a name for your entry so that it will be clearly identifiable when you use it. (i.e., pid Expert - treating physician)
Tip: Use a naming convention for your AutoText entries that will group the entries together by their intended use. We have already made the major cut. Our style name tells us that this entry is for use as an interrogatory. In the suggested name above, the "pid" stands for personal injury defense and the "Expert - treating physician" gives us the subject of the interrogatory. Other names might be "pid Expert - other care provider" and "pid Expert - Accident Reconstruction." This way, all interrogatories relating to expert witnesses in personal injury cases where the firm represents the defendant will be grouped together in your category list. Tip: Make sure that the starting part of the name is not a real word (or if four or more letters, the start of a real word that you are likely to type). Otherwise, you may end up inserting your AutoText entry in unexpected places! Tip: If you need to include multiple paragraphs in an AutoText entry, you can create styles that are used only to categorize AutoText entries and use your ordinary styles to hold your content. Word picks the category from the first style in an AutoText entry. If you format your naming styles as 1 pt. white hidden text, you should be able to use a paragraph in that style at the beginning of your AutoText entry without disrupting your documents much. I would suggest putting the following text in that paragraph: THIS IS AN AUTOTEXT NAMING PARAGRAPH AND MAY BE DELETED. Then select the other text that you want to use for entries, one word, sentence or paragraph (without the paragraph mark) at a time. Change the paragraph style of each paragraph to that of your category style and add the autotext entry, each time checking to make sure that it is being saved in your template.
At this point, close your document, without saving the changes to the document but saving changes to the attached template. You are now ready to create a drop down AutoText list based on the entries you just made.
You can include paragraph marks in your AutoText entries but if you do this, your text in that paragraph will maintain its style. If the style already exists in the document, it will use the style definition already in place. If the style does not exist, it will be imported. See the IncludeText field tutorial for examples of the sorts of result you will get.
When used with other Building Blocks, the AutoTextList Field does not care which template, gallery, or category was used in storing it. It only cares about the paragraph style used in the last paragraph mark of the selected part. Generally, I would use the Building Blocks Gallery Content Control instead of the AutoTextList field in most circumstances. It is easier to control and predict.
See How to add pop-up lists to any Word document, so you can click your way through changes in seconds by Bill Coan, MVP and AutoTextList in the Modern Age by Greg Maxey.
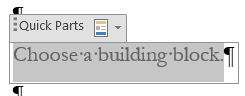
Building Blocks Gallery Content Controls
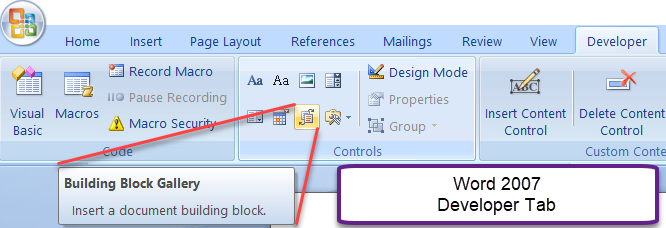
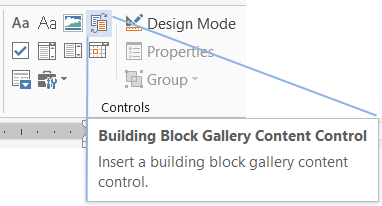
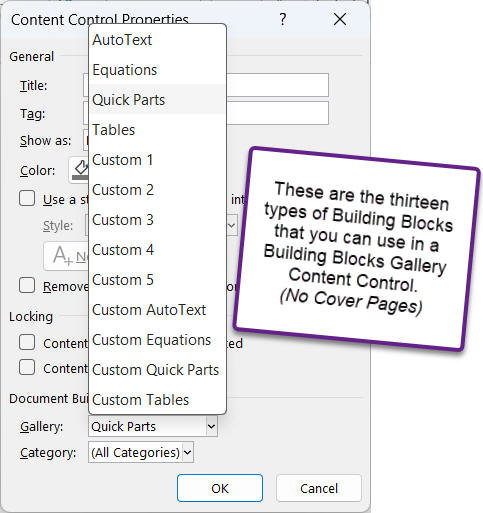
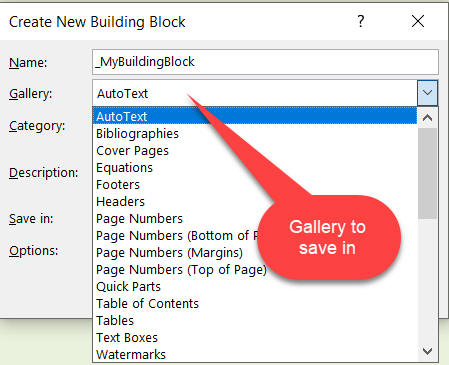
Since Word 2007, Windows versions of Word have also included the Building Blocks Content Control. For Word 2007-2024 (365) an easier way to categorize AutoText (and other Building Blocks) may be to put it in separate custom Galleries/Categories. Under the Developer Tab you can insert a content control for thirteen of the thirty-five available Building Blocks Galleries. You are limited to the (built-in) AutoText, Equations, Quick Parts, and Table Galleries, their four custom equivalents and the five custom Galleries.
(You cannot use the Building Blocks Gallery Content Control to insert Building Blocks in the Cover Pages, Headers, Footers, Page Numbers, Text Boxes, Watermarks, Tables of Contents, or Bibliography Galleries.)
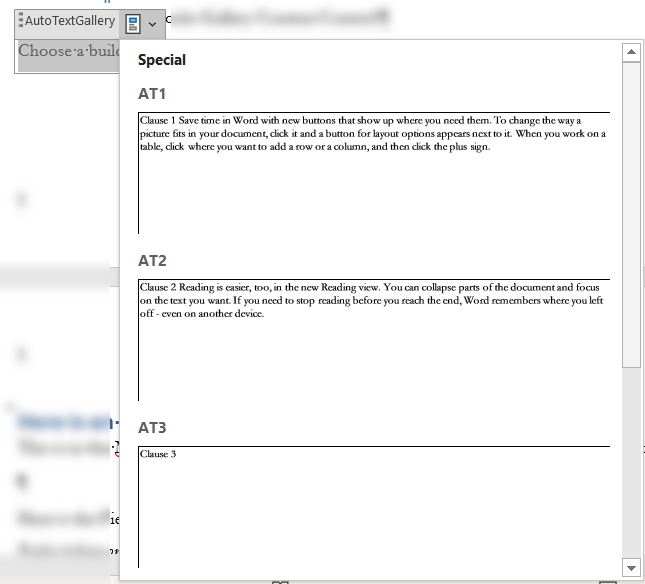
The screen shot above shows a sample of such a control. It gives you a drop-down for all building blocks in a given category of a given Gallery. You can specify those in the properties for the control. It is entered into your document using the button shown below.
When you first insert one, it will look like the first sample, which is for the all Categories of the Quick Parts gallery in a Bounding Box. The control will show the Gallery, but not the when displayed in the document. By using the Properties button for the Content Control you can change the title, appearance (Show As) and Gallery and Category. This means you can create your own custom menus and put them in your document. As with all Content Controls, you can modify the displayed default text using Design Mode. The Bounding Box only displays when the CC is selected and does not print. AutoText and Custom AutoText are separate as are the custom Galleries for the others.
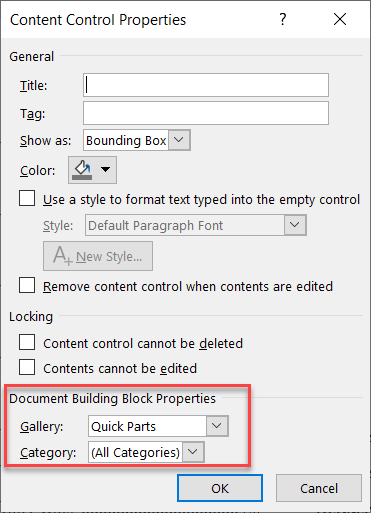
The dropdown you are given provides much more information than shows up with an AutoTextList Field. It displays the category, the name of the entries, and includes whatever you add to the Description when you originally save the Building Block. If there are more entries in the category than fit in the dialog, there is a scroll bar on the right side.
The Building Blocks Gallery Content control, itself, can be saved as a Building Block and retrieved using a Building Blocks Gallery Content Control!
Here is a download link to a demo template that shows some of the advantages and disadvantages of the AutoTextList Field and the Building Blocks Gallery Content Control. Note that the AutoTextList field can include entries in multiple Galleries.
Here is a link to my Building Blocks Gallery Content Control Tutorial.
The Building Blocks Gallery Content Control can be another way of creating an AutoText menu as well as a menu of other types of building blocks. For more on content controls, see Word Content Controls. This Content Control will combine entries stored in multiple loaded templates, so long as the entries are stored in the designated gallery and category.
See Greg Maxey's site for more on using Custom Galleries for your Building Blocks.
AutoCorrect is mostly kept in separate .acl files. Formatted AutoCorrect entries, though are stored in Normal.dot. (Normal.dotm in Word 2007-2024) More.
AutoFormat is built into Word and switched on or off with options settings. See Tame AutoFormat.
Assign Your AutoText Entries (Building Blocks) to a Key or Key Combination
The following is taken from my response to someone on a newsgroup who wanted to assign keystrokes to superscripted numbers 1-4. She had asked to replace four of the symbols over the numbers on the keyboard with these and had been told by another (knowledgeable) user that this was not a good idea.
Start Word. If you are already in Word, exit and restart it. Then, type five words in a new document. If you will only be using these in documents based upon a particular template, base your new document on that template. If you want to be able to share these with someone else or move them to a different computer, you do not want to store them in Normal.dot. See Template Basics information on Global templates. If these are not for use with only one particular template, my recommendation would be that you save your new document as a template so it can hold the AutoText.
Then insert the four superscripted numbers as if they were footnote references (that you were manually typing in rather than inserting footnotes). Then, in turn, select each of the superscripted characters and save them as AutoText entries named spr1, spr2, spr3 and spr4. (Alt+F3) Make sure that the AutoText entries are being saved in the proper template if you are basing your documents on a special template. Then select the fifth word and assign it to autotext as spr5.
Once you have the AutoText entries, you are ready to assign them to keys. The method we will use will replace only one of your keyboard's built-in key assignments for all five of the AutoText entries. (Ctrl+Shift+Alt+NumPad+)
(Word 97-2003) Tools => Customize => Keyboard (button)
(Word 2007) Modify the QAT => Keyboard Shortcuts Customize...
(Word 2010 and later) Customize the Ribbon => Keyboard Shortcuts Customize...
- Make sure that you are saving in the proper template. Again, if this is for sharing or you want to be able to move it from computer to computer, you want to save these settings in a template other than Normal.dot. It is recommended that the shortcut and AutoText (Building Block) be stored in the same template. Keyboard shortcuts can be saved in a document or template, but AutoText and Building Blocks can only be saved in a template.
- In the window on the left (categories), scroll down until you find AutoText.
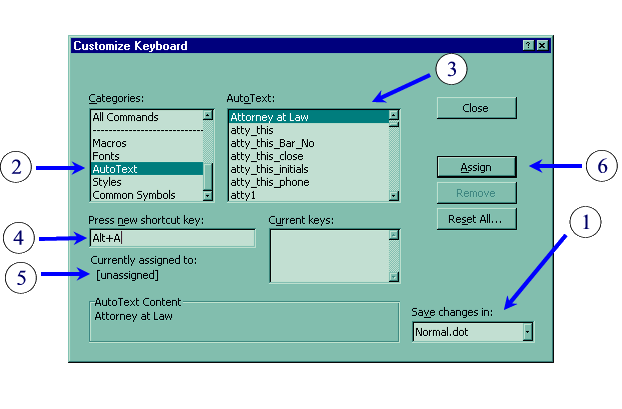
- Select that and find "spr1" in the AutoText (Building Block) list on the right.
- Click in the input window that says "Press new shortcut key" and holding down the Alt key press the letter S. The window will show "Alt + S." (The screenshots show "Alt+A/Ctrl+M.")
- Underneath, Word will show you if this has been assigned to anything else. (On my system, it comes up with [prefix] indicating that our use may not interfere with whatever other uses the key has, because we will be using it as a prefix key as well.) Next press the 1 key. The window should now show "Alt + S, 1." Underneath for currently assigned it should say [unassigned].
- Click on the Assign button.
Next repeat this process for your other four AutoText entries, typing the appropriate number for each. Then click on the close button and close the customize dialog box as well.
Test your keys out.
First press Alt+S. Nothing will seem to happen. Then type a 1. It will be superscripted. Type something else immediately after the 1. That should not be superscripted. Test each of your numbers. Finally, test it using the number 5. We put in this last entry so that you could see that it is indeed using your AutoText, not just altering the numbers that we happened to use as trigger keys.
If you want, you can now go back into the AutoText dialog box and delete spr5. It has served its purpose.
You could assign these autotext entries to any keystroke or keystroke combination (including the keys you originally requested). You should be very careful, though, about replacing key bindings because it can be very tricky to figure out what is going on when you forget about them (or if someone else tries to use your computer). You may have noted that you could use the Customize Keyboard dialog to assign not only AutoText but macros, styles, fonts, or any Word command to a key.
You might want to copy these instructions to a text file called something like "Word key assignments.txt" and keep it, with any notes you care to make, so that you can backtrack later.
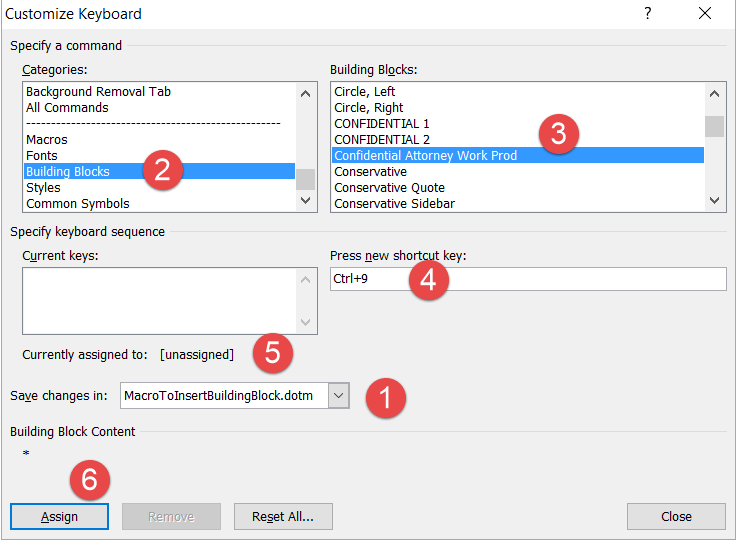
Note this works in all versions of Word. However if more than one AutoText entry or Building Block has the same name you can still do it, but Word will pick one of the entries to assign. I know of no good way to predict which entry that will be. In the screenshot above #7 shows a gallery and category for the AutoText entry. (There are multiple entries with that same name, only one is shown.) For instances with multiple entries with the same name, see below on using vba to insert building blocks. You can also assign keyboard shortcuts to macros. See also Assigning Keyboard Shortcuts in Microsoft Word 2007-2024 (365).
AutoText (Building Blocks) Keyboard Shortcuts Built into Word
There are two built-in keyboard shortcuts: F3 and Alt+F3.
F3 looks in the AutoText available for something that matches what you just typed and inserts it. If a tooltip for the entry is showing, you can press Enter or F3 to use your AutoText. If no tooltip is showing you need to use the F3 key.
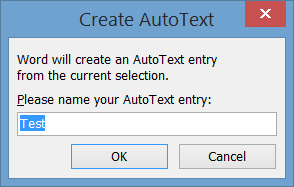
Alt+F3 tells Word that you want your selected text to be boilerplate. It will display a short dialog box allowing you to name the entry and (in Word 2007-2024) designate a storage location. Here are the dialog boxes for Word 97-2003 and Word 2007-2024 (365) respectively:
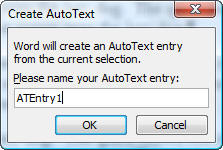
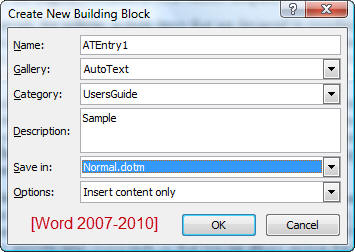
Remember that this (Alt+F3) is a shortcut method of adding an entry. You can also use the longer dialog boxes. In the earlier versions of Word this is the only way to designate a template other than normal.dot as the storage container. On Mac versions, the Create dialog can be reached with Opt+F3.
Moving/Copying AutoText Entries
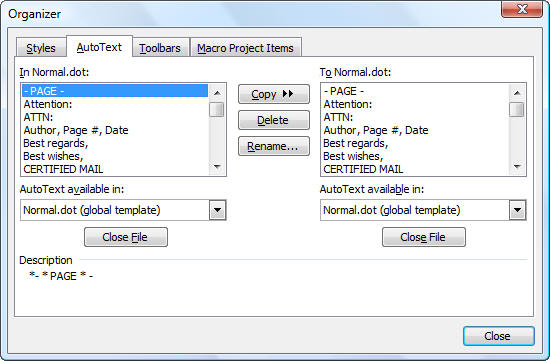
Using the Organizer to Copy AutoText
You can copy AutoText between templates. One of the most effective ways to do this is through the Organizer. The Organizer is a tool built into Word that allows you to quickly copy Styles, AutoText, Toolbars and Macros. In Word 97-2003, you can access the Organizer in one of three ways:
Tools => AutoCorrect => AutoText (tab) => Organizer (button)
Format => Style... => Organizer (button)
Tools => Templates and Add-Ins... => Organizer (button)
from the Format menu, choose Style and click Organizer; or from the Tools menu, choose Templates and Add-Ins and click Organizer. This gets you the following dialog box which controls AutoText, Styles, Toolbars and Macros:
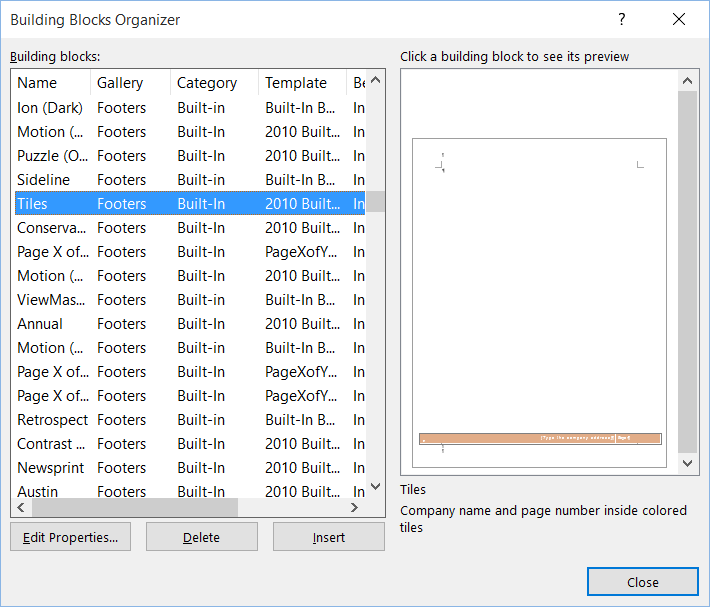
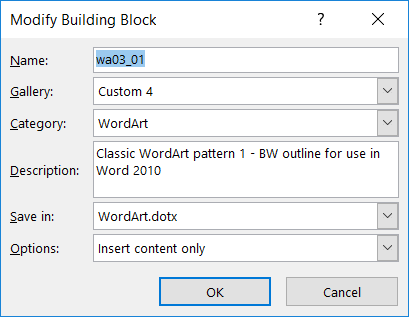
In Word 2007 - Word 2024 You can use the Building Blocks Organizer found under the Quick Parts drop-down on the Insert tab. This lets you move or modify a building block/AutoText but does not let you copy one unless you tell Word to not save changes to the template that originally had the building block. The screenshot below shows the Building Blocks Organizer with the Modify Building Block dialog (triggered by the Edit Properties button shown).
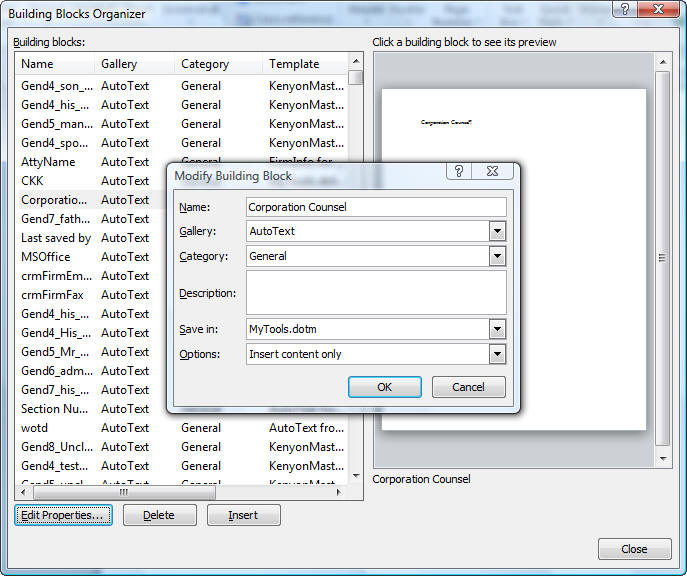
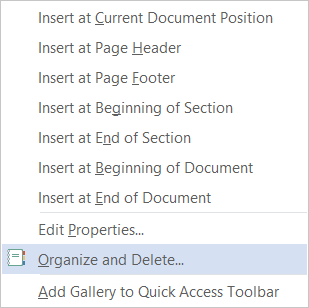
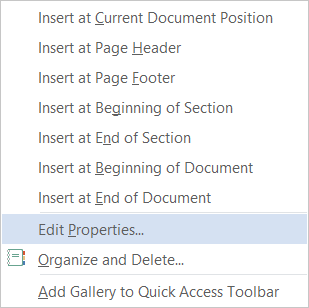
You can also access this dialog by right-clicking on any Building Blocks gallery item and choosing the "Organize and Delete" choice from the pop-up menu.
To move a building block using the Building Blocks Organizer, select it and edit the properties to get to the Modify dialog. You can change the storage location to any template that currently has at least one building block and which is loaded as an Add-In. When you exit Word, you will be asked if you want to save changes to your template containing building blocks. If you say "no" to the template that you moved the building block from and "yes" to the template you moved the building block to, you will have copied the building block rather than just moving it.
To copy a building block using the tools in Word 2007-2024, you can also copy the template that holds the building block to another template name. Then open the copy and use the Building Blocks organizer to modify it to use the template you want to hold it. (You may then have two building blocks with the same name. This makes maintenance difficult and can give unpredictable results.)
Instead, for Word 2007 - 2024, I recommend using Greg Maxey's free Add-In that gives you the following dialog boxes for all of your building blocks. Like the original Organizer, it allows copying and manipulation of multiple entries at the same time. The Building Blocks Organizer that comes with Word lets you work on one entry at a time when trying to move entries from template to template. If you use the link above, you'll find the download at the bottom of a page explaining the features as well as exploring Building Blocks.

Greg Maxey's Add-In adds a powerful (optional) ribbon tab. The dialog above (organizer) is one of the buttons on the left side of that ribbon.

The Add-In's Ribbon tab is controlled from the dialog box shown below. It lets you change the name of any of the galleries displayed on the tab and decide whether or not to display a particular gallery on the tab at all. You can even set it to not display the tab at all!
The Add-In also includes a powerful Building Blocks Loader that lets you bulk load items as Building Blocks.
In my opinion, these tools should have been included in Word 2007. If MS eventually adopts them, I hope they compensate Mr. Maxey! Anyone making extensive use of building blocks should have his (free) Add-In. If they use it much, they should send him a donation. I did!
See also Autotext backup and restore by Graham Mayor - works only on AutoText stored in the normal.dotm template but works very well for that.
Practice: Copy AutoText Using the Organizer
- Word 97-2003 From the Tools menu, choose Templates and Add-Ins.
- Click Organizer.
- Word 2007-2024 call up Greg Maxey's Enhanced Building Blocks Organizer from the Insert tab
- It is under the Document Parts drop-down. (You have to download his free Add-In to use this. Otherwise the drop-down will say Quick Parts and you will be trying to use the inferior Building Blocks Organizer.) The Building Blocks Organizer built into Word does not really allqw copying building blocks but will let you move them by editing the properties.
- Select the appropriate tab for items that you want to copy. For example, to copy AutoText from one template to another select the AutoText tab.
- To copy AutoText from your current attached template to the Normal.dot template which makes the AutoText available each time you start Word, select the AutoText and click Copy. (Note: It is recommended that you store your AutoText entries in either an attached template or a global template other than Normal.dot.) If your current attached template is Normal.dot, both windows will show Normal.dot. Close at least one of these templates!
- To switch to a different template click on the Close File button under the window you want to use for that template. Then click the same button again (except this time it will say Open File) and pick a template file from which (/ to which) you want to copy your AutoText.
- Generally, you do not want to have two AutoText entries with the same name available to your document at the same time. This means that if you are copying from Normal.dot to another global template, after you save that template with the changes, you will want to delete the AutoText entries from Normal.dot. If you have an AutoText entry with the same name in your document's attached template as one in a global template, Word will use the one in the attached template.
- Click Close.
In Word 2010 there can be advantages to storing AutoText in normal.dotm in that you can use the tooltip feature. I like to maintain a backup copy of normal.dotm when I do this. That is a good idea anyway. (The tooltip feature is not available in Word 2007; in Word 2013 and later, it is available for any AutoText stored in the attached template or in loaded global templates, but not that stored in the Building Blocks folder.)
Editing/Modifying Building Blocks including AutoText
Word does not provide any editor for building blocks within that structure.
The only way to edit a building block is to:
- insert it into a document (you can create a blank document for this purpose if you want),
- edit it in that document,
- select the content you want to be in your building block/AutoText,
- save it again as a Building Block, being careful to save it with the same entry name, in the same template, in the same gallery, in the same category as it was. Word will ask you if you want to overwrite the existing entry. You should say "Yes."
- If Word does not ask this, one of the these was not the same and you now have two building blocks.
- If that happens, use the Building Blocks Organizer to sort things out. There will be two entries. Figure out which one is the old one. Note its properties, delete it, and then modify the properties of the new one to match.
Once you have saved the edited Building Block, you need not save changes to the document in which you did the editing. However, if you are asked if you want to save changes to the template when you exit Word, say "Yes."
Where Can Building Blocks Be Stored? (Word 2007-2024)
| Name Choice |
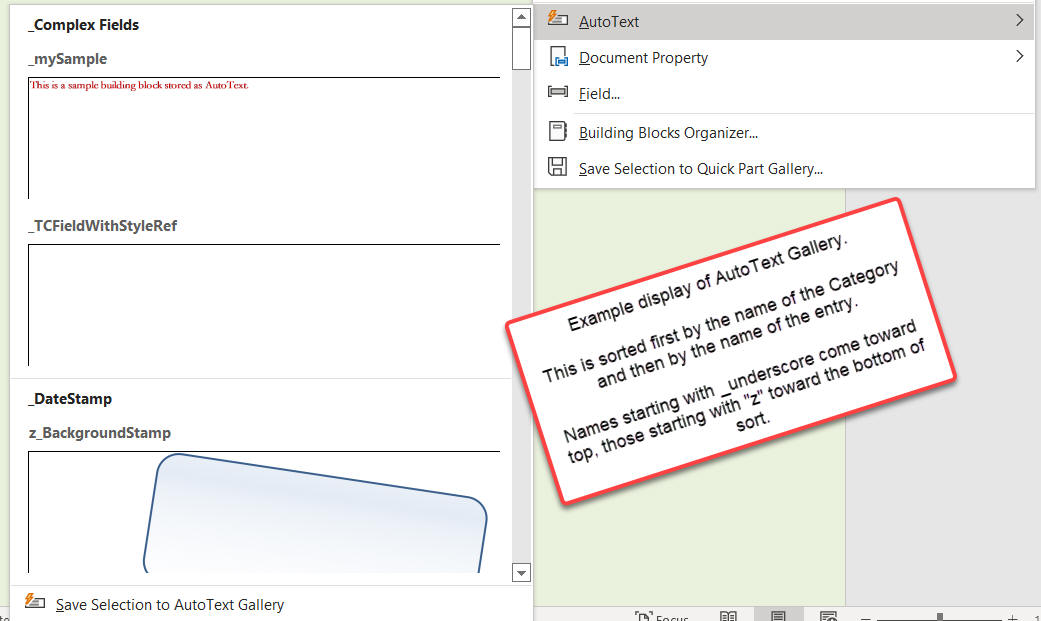
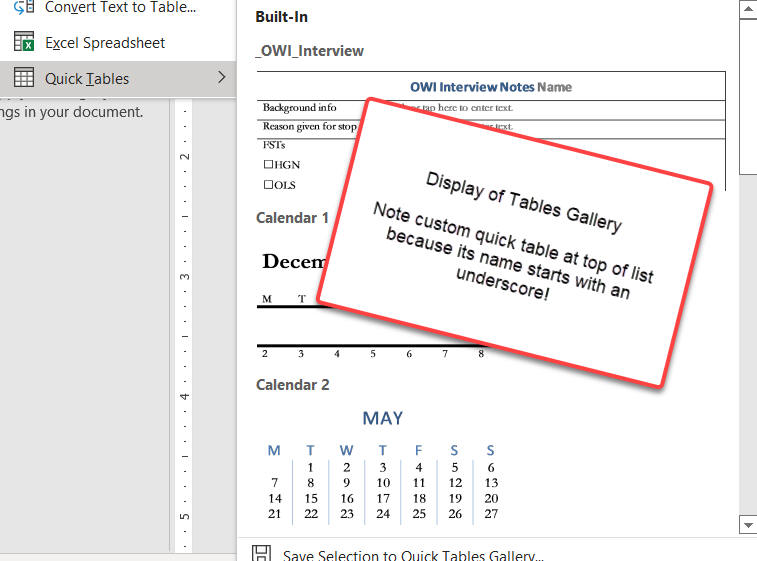
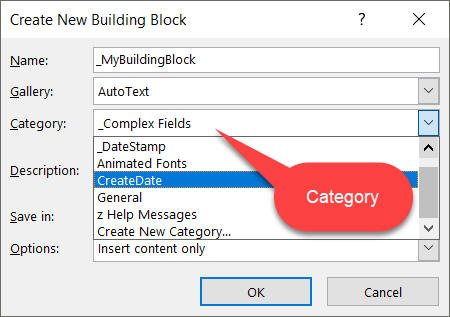
When you create a new building block (including AutoText), you can choose a name. The default will be the beginning text in the selection, if there is text. This is seldom what you want. You do want a unique name, a descriptive name. Further, you want a name that is unique in the first few characters. (Word needs a unique series of characters before it knows what to insert.) See Category Choice below for more thoughts on names. When you look at the Building Blocks in a gallery, they will be displayed first by Category and then by name in alphabetical order. Starting your name with an underscore (_) means that (1) you are unlikely to type it by accident, and (2) it will show up toward the top of any alphabetically-sorted list.
| Gallery Choice |
When you store a Building Block you can choose a Gallery. If you are storing text for use in the body of a document you probably want to use the AutoText Gallery. For a Header, you would use the Header Gallery; for a Footer, the Footer Gallery; for a Cover Page, the Cover Page Gallery. Some galleries will display under different controls and give different views. The AutoText gallery is notorious for showing tiny content. See Greg Maxey's Building Blocks pages for more on galleries.
When you use the choice at the end of a gallery to Save Selection to the gallery, the default gallery will be the same as the gallery you were using. If you use Alt+F3, the default gallery will be AutoText. You may want to change the Gallery to a custom one or one that better fits your content!
| Category Choice |
Category is a heading that can be used for sorting building blocks in the building blocks organizer. When a Building Blocks Gallery is displayed (Cover Pages, Watermarks, Textboxes) the entries are sorted first by category (in alphabetical order) and then by alphabetical order. If you want your entry to appear at the top of the list, you want it in the category that is first in alphabetical order, and to have a name that will place it first. People will often use an underscore to start a custom category or building block name: _MyAT, _MyCoverPage, _Watermark3, etc. Two categories that are likely to be there are "Built-In" and "General."
When you use the choice at the end of a gallery to Save Selection to the gallery, the default category will be General; you may want to change this to Built-In or your own choice. If you use Alt+F3, the default category will be Built-In; you may want to change this!
You can use custom categories to make good use of the Building Blocks Gallery Content Control. This lets you set up custom menus of your building blocks in line with text.
| Template Choice Building blocks must be stored in templates. When you are editing a template, the default storage location is that template; when you are editing a document, the default storage location depends on whether the entry is AutoText or another type of building block. 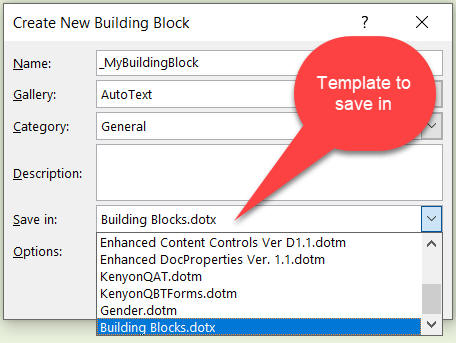 If you use the Save option in any of the Building Blocks Galleries, the default for the template choice will be Building Blocks.dotx. If you use the Alt+F3 method, the default gallery will be Normal.dotm. |
Any time you save a building block there are choices for storage location:
| The Building Blocks.dotx File (default for all except AutoText when saving from a document) shown above |
When you are saving from a document, by default, building blocks other than AutoText will be stored in your building blocks file. This file is "Building Blocks.dotx." In Word 2010 and later this file is stored in a version-specific, language-specific folder inside the 1033 folder. That is: 14 for 2010, 15 for 2013, 16 for 2016-2024(365). Unlike the file in Word 2007, this default file in later versions contains no built-in building blocks. Those later versions use a separate file called "Built-In Building Blocks.dotx" to hold the building blocks that come with Word. Word will not store custom building blocks in this "Built-In Building Blocks.dotx" file.
AutoComplete is not available for entries stored in Building Blocks.dotx. It is available for entries stored in Global Templates, document templates and the Normal template.
This file is not the place for building blocks that you want to share with others; you want to store these in global or document templates (see below).
In the English language version of Word these files are in the following language-specific folders:
Windows XP Location:
c:\Documents and Settings\{your username}\Application Data\Microsoft\Document Building Blocks\1033\Windows Vista, 7 - 11 Location:
c:\Users\{your username}\AppData\Roaming\Microsoft\Document Building Blocks\1033\Building Blocks.dotx is in a hidden system folder. If you have used different language settings when saving building blocks, you may have multiple Building Blocks.dot files. If your Start menu has a search function searching for %APPDATA% will lead you toward the folder. The folder 1033 is for English(US). This is a language-specific folder. 1057 is for English(UK).
Note that Word 2010 and Word 2013-24 come with different Cover Page building blocks. Since they are stored in separate folders there should be no confusion. However, if you want to use Word 2010 Cover Page Building blocks in Word 2013 and later, you will want to put a renamed copy of the 2010 Built-In Building Blocks template in the version folder or save it as a global template. I have done this after stripping out all the duplicated entries from the 2010 version. The differences are in the cover pages and the headers and footers.
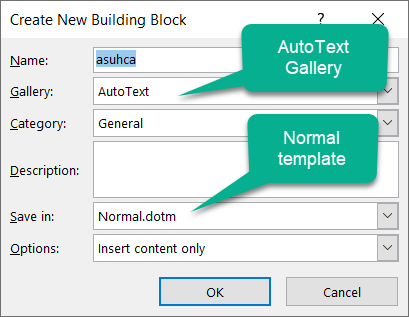
| Your Normal.dotm file (default for AutoText when saving from a document) |
This is the place of choice for personal AutoText in Word 2010 since AutoComplete can be used for AutoText entries stored in normal.dotm in Word 2010. (Autocomplete does not work in Word 2007 at all. In Word 2013 and later it works for AT entries stored in other templates.) AutoComplete works with AutoText and other building blocks.
When you are saving from a document, the Normal.dotm file is the default storage location for AutoText in all versions of Word except Word 2007. It is the default location when using the Alt+F3 keyboard shortcut.
The Normal.dotm file is not the place to store AutoText or other building blocks that you want to share with others; use a global or document template for those.
| A global template |
Stored in either the Word Startup Folder or in the appropriate building blocks folder. If you want, you can set up QAT shortcuts to your building blocks in such a template if it is to be stored in the Startup folder. Unless the template is to hold macros or other customizations, it can be a .dotx file and in the building blocks folder. If it contains macros, in will need to be in a "trusted location;" the Word Startup Folder should be such a trusted location. If you include QAT modifications, it can still be a .dotx file but must be stored in the Word Startup Folder.
AutoComplete is available for entries stored in Global Templates, document templates and the Normal template. AutoComplete is not available for entries stored in the Building Blocks.dotx file or others stored in that folder.
For such a template to appear in your choices, there must be at least one building block already stored in the global template. The screenshot above from my system shows a number of these that you will not see on yours. Those are global templates on my system that contain at least one building block. You can initially store a building block in a template that does not already have one if it is the attached template to the active document.
When you store building blocks from a document, the only templates, other than the attached template, the Building Blocks.dotx file, and the normal template, in which you can store building blocks are templates which already contain at least one building block and which are loaded as an add-in or in the building blocks folder. If you want to use a custom template for storage, either as a global template or a building blocks template, it must have at least one building block in it already (created when it was the attached template or open for editing directly).
AutoText for Outlook is stored in the template NormalEmail.dotm. A shortcut to that template stored in the Word Startup Folder loads it as a global template. So it becomes available as a storage location for AutoText created in Word.
| A document template (default when the document is open for editing) - the attached template |
If the building blocks are for use with documents created from a particular template, they might as well be stored in that template directly. Again, unless the template is to contain macros, it can be a .dotx template. Building Blocks, like AutoText, can not be stored in regular documents. If you actually have the template open for editing and that is the document you are editing when you try to save a building block, the template will be the default storage location. If, instead, you are in a document based on the template (it is the attached template) the document template will be an available choice (above normal.dotm).
If you are in an ordinary document (not a template) and want to save a building block to it, first save it as a template (.dotx unless you also want macros) and then save the building block.
| The Built-In Building Blocks template will not appear as a choice and is a poor place to store your building blocks. |
For an example of a building blocks template that acts as an Add-In see the Word 2003 WordArt Building Blocks Add-In.
See Saving AutoText above for more on the use of the Alt+F3 keyboard shortcut.
See also Moving / Copying Customizations (including AutoText) to another template.
Here is an example of a building blocks organizer screen for footers showing footers coming from the Word 2013 Built-In Building Blocks, the Word 2010 Built-In Building Blocks, and my Page X of Y Building Blocks Add-In. The sources are shown in the Template column.
Default Storage Templates - depends on how you get to the Create Building Block dialog
|
Alt+F3 keyboard shortcut |
This is the legacy from menu versions and is set for AutoText. It is still set for AutoText and stores in the normal.dotm template by default. It stores in the AutoText gallery and the General category by default.
|
Save Selection in the ??? Gallery choice at the end of a Gallery menu |
When you add your selection to a gallery, that gallery is the default. The default Category is General, which shows up under Built-in when the gallery is displayed. The default storage template is the Building Blocks.dotx template, which is the default storage location for user-created building blocks. The current gallery will be the default.
Where in a template are building blocks stored (for techies only)?
In the XML in the document.xml in the Gallery folder in the Word folder. Look for <w.docPart> to start a building block.
Video on adding a Building Block (Text Box)
Not on SharePoint!
Templates stored on SharePoint act more like documents than templates. Building Blocks in templates stored on SharePoint are not available to documents based on them. This has not been observed with local copies of the same templates, only cloud versions. The building blocks are still in the template but are not available.
Outlook
Outlook has used AutoText for some time and with the Ribbon versions of Word, added Quick Parts. These are stored in the NormalEmail.dotm file in your user templates folder (the same folder that holds the Normal.dotm file for Word. You can transfer them from Word to Outlook and vice-versa. See my answer to this question on the Microsoft Answers site: How to transfer quick parts from MS Word to MS Outlook?
How Can You Modify Building Blocks
The simple answer is to recreate them and store them again under the same name in the same gallery and category in the same template. Actually, that is not so simple, is it?
Word has a Modify Building Block dialog! (It looks remarkably similar to the Create Building Block dialog.)
You can access this from any building block gallery by right-clicking on an entry and selecting Edit Properties, or from the Building Blocks Organizer clicking on the Edit Properties button.
Using the Modify Building Block dialog, you can change any of the choices originally made, including the template in which the entry is saved. You cannot change the content of the building block, nor can you copy it to another template. See here for instructions on how to copy in the Ribbon versions of Word.
To change the content of a building block, you need to recreate it. Select the text or other content, save as a building block and give it the same name, gallery, category and template as the original. You will be asked if you want to redefine it; say yes or OK. To avoid confusion by getting one of these wrong, you may want to delete the original first.
AutoText and other Building Blocks in Outlook
This page is about Word. However, this section was added in response to a user question.
AutoCorrect is shared among all Office products. This is not true of AutoText and other Building Blocks. In the earlier non-ribbon versions of Word (Word 97-2004), Outlook uses the normal.dot file to hold its AutoText entries. In versions beginning with Word 2007, it uses the file "NormalEmail.dotm" to hold these. While this file can be opened and edited in Word, probably the best practice is to insert the entries directly from Outlook. The Alt+F3 shortcut will work for this.
See also my response to this question on the Microsoft Answers forum: How to transfer quick parts from MS Word to MS Outlook?
As far as I can tell, you can store Building Blocks for any Gallery in Outlook but the only ones you can access in Outlook are AutoText, Quick Parts, Tables, Text Boxes and Equations. I do not know of an equivalent to the Building Blocks Organizer in Outlook but you can open the NormalEmail.dotm file in Word and use the Building Blocks Organizer on those entries in Word. Save the changes and they will stay with Outlook.
Using macros to insert AutoText from a global or document template
Recorded macros don't work well for this and they are not portable. See the Knowledge Base article on this. You can download a template with concise portable code from my Word FAQ downloads page AutoText Inserter and Macros to Insert Building Blocks.
See below: Using VBA (macros) to Insert an AutoText Entry or other Building Block (Word 2007 or later)
(The following is from the Chapter on Numbering:)
Use AutoText to Create Sequence Fields for Interrogatories and More
A Sequence field tracks differently numbered lists within a document. Combining Sequence fields and AutoText entries give you a fast and easy way to insert Interrogatories, Requests for Production, and Requests for Admission.
Practice: Use Sequence Fields
- Type INTERROGATORY NO. followed by a space.
- Press CTRL+F9 to insert field characters.
- Type SEQ Rog within the field characters.
 |
Note The "Rog" in this example is the name of the Interrogatory numbering scheme. This name will keep this numbering scheme unique from any other schemes that may be running in the document. See Tip below for more information. |
- Press F9 to update the field. A number "1" should appear.
- Select INTERROGATORY NO. 1, and press ALT+F3 to create a new AutoText entry.
- Type rog for the AutoText entry name, and click OK.
- Type Request for ANSWER followed by a space.
- Press CTRL+F9 to insert field characters.
- Type SEQ Ans within the field characters.
- Select ANSWER 1, and press ALT+F3 to create a new AutoText entry.
- Type Ans for the AutoText entry name, and click OK.
- Type Ans and press F3. The next sequential number for an Answer appears.
- Press ENTER and type rog and press F3. The next sequential Interrogatory appears.
To use the AutoText entry, simply type rog and press F3.
| Tip Follow the same steps (above) to create Request for Production or Request for Admissions. The only difference would be in Step 3, you would change the "rog" to "rpf" or "rfa". This will keep unique numbering schemes running in the same document. Therefore, you could have an Interrogatory No.1 as well as Request for Production No.1. Keep in mind that if you cut, copy or paste sequence codes, you'll need to select them and press F9 to update the field codes. They do not update automatically. |
How to Print AutoText Entries
You can print all AutoText entries (in the attached template and any global templates) using:
File > Print
In the print dialog box toward the lower left you will see "Print what" answered with "Document." Change that to "AutoText entries." Click on OK.
To Print AutoCorrect Entries
Use the AutoCorrect backup utility you can download from the MVP FAQ site to create a table with your AutoCorrect entries. Print that table. See also AutoCorrect Utility Manager.
Turning AutoFormat as You Type Options Off (or on)
Many of the AutoFormat as You Type Options cause unexpected changes in your document. While there are times when they are useful, those times are not frequent for your author or many experienced Word users. Here are screenshots showing the ones that I uncheck, and those that I leave on. These are from Word 2003 and Word 2010.
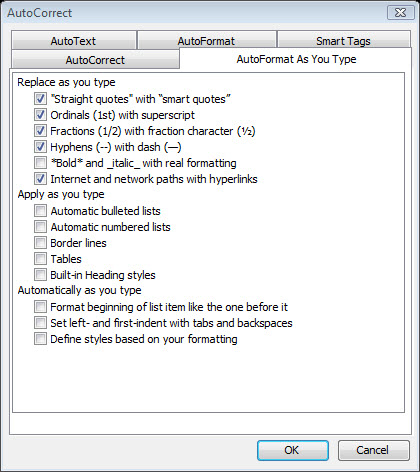

See Tame AutoFormat and How To Turn Off AutoFormat Options and AutoCorrect and AutoText (video).
You may want to use AutoCorrect rather than AutoFormat as you Type for Fractions and Em-and En-dashes.
If you found your way here, you may also be looking at a couple of Auto
features with
Styles.
Generally you do not want to be using either of these
settings/features.
| A setting in a style to Automatically update the style based on typing (see Whole Document Reformatted by Suzanne Barnhill, MVP ) This is not the same as the Define Styles Based on formatting in AutoFormat as you type. | |
| A setting to update styles in the document to the ones currently in the template. (see What happens when I send my document to someone else? Will Word mess up my formatting? by Shauna Kelly, MVP.) |
Using VBA (macros) to Insert an AutoText Entry or other Building Block (Word 2007 or later)
Recording a Macro
Recording a macro will work, to a limited extent. Recorded macros will not work on someone else's system even if they have the same building blocks or even if they are a different user on the same computer. Recorded macros will not work if the template contains more than one building block with the same name, even if they are different types. Note that the file that comes with Word "Built-In Building Blocks.dotx" has many building blocks with the same names. You can use the Building Blocks Organizer and sort by name to see if there are multiple building blocks with the same name and in the same template.
Because of these limitations, often you will need to actually write a macro.
However, you can try recording one. The key is to use the Building Blocks Organizer to insert the Building Block when recording the macro, rather than a shortcut or another gallery/menu.
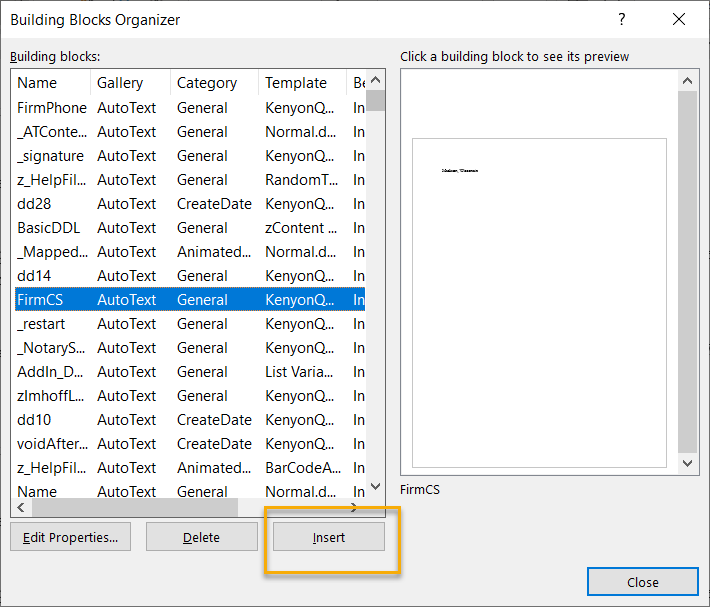
Any macro, recorded or written, should be stored in the same template that holds the building block. That way, if the macro is available, the building block is available.
Writing a Macro
To do this, you need to know:
- The name of the building block. If you have a unique name for the building block (no other building block of the same name exists in any building block entry location) then use Graham Mayor's macro found on one of his sample macro pages. A variation is shown below.
- The name (and location) of the template that holds the building block unless the macro is in the same template
- How to insert a macro. See Installing Macros and Install/Employ VBA Procedures (Macros).
Building Block Name = "MyBB" (example in this macro, change to fit)
Situation 1 and 1a have the Building Block and the macro in the same template. This simplifies coding because a macro can always tell the name and location of the template that holds it. That information is required to use a macro to insert a building block.
Situation 1 - template holds both the building block and the macro
Here is the macro to insert that uniquely-named building block at the insertion point in the document:
Sub InsertMyBB1()
' http://www.addbalance.com/usersguide/autotextautocorrect.htm#UsingVBABuildingBlock
' Situation 1 - template holds both the building block and the macro
' Updated 8 October 2021
'
' Will not work if there are multiple building blocks with the same name in the template! See InsertMyBB1a below.
' Template holds both code and building block
' Here is the macro to insert that uniquely-named building block at the insertion point in the document:
'
Const sBBName As String = "MyBB" 'use the name of your building block instead of "MyBB"
Dim oRange As range
Set oRange = Selection.range ' set a real range for better performance, not depending on selection
'
On Error GoTo Oops
Application.Templates.LoadBuildingBlocks ' Thank you Timothy Rylatt
Application.Templates(ThisDocument.fullname).BuildingBlockEntries(sBBName).Insert Where:=oRange, _
RichText:=True ' Insert MyBB Building Block
Set oRange = Nothing
Exit Sub ' We're done here
Oops: ' Didn't work - building block not there!
MsgBox Prompt:="The Building Block " & sBBName & " cannot be found in " & _
ThisDocument.Name & ".", title:="Didn't Work!"
Set oRange = Nothing
On Error GoTo -1
End SubThis and the following macro are both contained in a demonstration template that can be downloaded from my downloads page.
Situation 1a - template holding building blocks and macro in same template - multiple building blocks with the same name
In this situation, the previous macro would confuse Word and give unpredictable (to the user) results. In this case, the macro needs to know both the gallery and category of the building block. The following macro assumes that the building block is stored in the AutoText gallery and in the General category. You can find the name of the gallery and category using the Building Blocks Organizer. Category names are plain text. Galleries are referenced in vba as Building Block Types and use constants. You can find a list of the constants for the different galleries here.
Sub InsertMyBB1a()
'
' Assumes that the Building Block is of the type AutoText (wdTypeAutoText) in Category "General"
' See https://msdn.microsoft.com/en-us/library/bb243303(v=office.12).aspx
'
' This is based in part upon contributions from Greg Maxey and Jay Freedman - any errors remain mine
' Written by Charles Kenyon April 2021, updated October 2021
'
Const sBBName As String = "MyBB" 'use the name of your building block instead of "MyBB"
Const sTempName As String = ThisDocument.fullname ' puts name and full path of template in string
'
Dim oBB As BuildingBlock
Dim oRange As range
Set oRange = Selection.range ' set a real range for better performance, not depending on selection
'
On Error Resume Next
Application.Templates.LoadBuildingBlocks ' Thank you Timothy Rylatt
Set oBB = Application.Templates(sTempName).BuildingBlockTypes(wdTypeAutoText) _
.Categories("General").BuildingBlocks(sBBName)
If err.Number = 0 Then
oBB.Insert oRange, True
Else
MsgBox Prompt:="The Building Block '" & sBBName & "' cannot be found in " & _
ThisDocument.Name & ".", Title:="Didn't Work!"
End If
lbl_Exit:
On Error GoTo -1
Set oBB = Nothing
Set oRange=Nothing
End Sub
This and the preceding macro are both contained in a demonstration template that can be downloaded from my downloads page.
Situation 2 - template holding building block is in Word Startup Folder and named MyBBTemplate.dotx
This template, for some reason, does not hold the macro, it is in a separate template. We know the name of the BB container template. The name of the template containing the macro does not matter for our purposes.
Sub InsertMyBB2()
' Will not work if the Startup Folder is the root directory of a drive, i.e. C:\
' For use with building block stored in a template loaded in the Word Startup Folder that does NOT hold this macro
' Will not work if there are multiple building blocks with the same name in the template!
'
Const sBBName As String = "MyBB" 'use the name of your building block instead of "MyBB"
Const sTempName As String = "MyBBTemplate.dotx" 'use the name of your template instead of "MyBBTemplate.dotx"
Dim oRange As range
Set oRange = Selection.range ' set a real range for better performance, not depending on selection
'
On Error GoTo NoStartupPath
Const sStartupFolder As String = Application.Options.DefaultFilePath(wdStartupPath)
'
On Error GoTo Oops ' error handler
Application.Templates.LoadBuildingBlocks ' Thank you Timothy Rylatt
Application.Templates(sStartupFolder & "\" & sTemplateName).BuildingBlockEntries(sBBName) _
.Insert Where:=oRange, RichText:=True ' Insert MyBB Building Block
Exit Sub ' We're done here
NoStartupPath:
On Error GoTo -1
MsgBox Prompt:="No Startup Folder Set in Options"
Set oRange=Nothing
Exit Sub
Oops: ' Didn't work - building block not there!
MsgBox Prompt:="The Building Block " & sBBName & " cannot be found in " & _
sTemplateName & ".", Title:="Didn't Work!"
set oRange=Nothing
On Error GoTo -1
End SubVariation inserting in header instead of at insertion point
Sub InsertHeaderBBFirstPage()
' Charles Kenyon 4 April 2022
' Inserts building block from template Add-In in the first-page header
' Will not work if the Startup Folder is the root directory of a drive, i.e. C:\
' For use with building block stored in a template loaded in the Word Startup Folder that does NOT hold this macro
' Will not work if there are multiple building blocks with the same name in the template!
' Will not work if the template is not really in the Startup Folder (i.e. with a shortcut/alias)
'
' The following command activates the First-Page Headers and Footers
' It is not required for this to work but if that is not active the user
' will not see it and it will not print.
ActiveDocument.Sections(1).PageSetup.DifferentFirstPageHeaderFooter = True
'
Const sBBName As String = "MyBB" 'use the name of your building block instead of "MyBB"
Const sTempName As String = "MyBBTemplate.dotx" 'use the name of your template instead of "MyBBTemplate.dotx"
Dim oRange As range
' Set target range as the first-page header of section 1
Set oRange = Selection.Sections(1).Headers(wdHeaderFooterFirstPage). _
range.Paragraphs(1).range
' To insert in footer instead, would use
' Sections(1).Footers(wdHeaderFooterFirstPage).range.Paragraphs(1).range
'
On Error GoTo NoStartupPath
Dim sStartupFolder As String
Let sStartupFolder = Application.Options.DefaultFilePath(wdStartupPath)
'
On Error GoTo Oops ' error handler
Application.Templates.LoadBuildingBlocks ' Thank you Timothy Rylatt
Application.Templates(sStartupFolder & "\" & sTemplateName).BuildingBlockEntries(sBBName) _
.Insert Where:=oRange, RichText:=True ' Insert MyBB Building Block
Exit Sub ' We're done here
NoStartupPath:
On Error GoTo -1
MsgBox Prompt:="No Startup Folder Set in Options"
Set oRange = Nothing
Exit Sub
Oops: ' Didn't work - building block not there!
MsgBox Prompt:="The Building Block " & sBBName & " cannot be found in " & _
sTemplateName & ".", title:="Didn't Work!"
Set oRange = Nothing
On Error GoTo -1
End SubSituation 3 - Insert a building block with a unique name at a named bookmark, regardless of BB storage location
This macro does NOT care where the building block is stored but its name must be unique to have predictable results.
Sub InsertMyBuildingBlock_Bookmark()
' Charles Kenyon 09 April 2021
' based on Graham Mayor's macro at
' http://www.gmayor.com/word_vba_examples_3.htm
' In addition to checking the active template, add-in templates and the normal template,
' this macro looks in the building blocks.dotx template.
' Building Block name must be unique!
'
Const BookMarkNAME As String = "delete" ' use the name of the building block - make variable if multiple bookmarks
'
Dim oTemplate As Template
Dim oAddin As AddIn
Dim bFound As Boolean
Dim oRng As range
Dim i As Long
'Define the required building block entry
Const strBuildingBlockName As String = "Building Block Name" ' CHANGE TO YOUR BUILDING BLOCK'S NAME
' Set the range
Set oRng = ActiveDocument.Bookmarks(BookMarkNAME).range
'Set the found flag default to False
bFound = False
'Ignore the attached template for now if the
'document is based on the normal template
Application.Templates.LoadBuildingBlocks ' Thank you Timothy Rylatt
If ActiveDocument.AttachedTemplate <> NormalTemplate Then
Set oTemplate = ActiveDocument.AttachedTemplate
'Check each building block entry in the attached template
For i = 1 To oTemplate.BuildingBlockEntries.Count
'Look for the building block name
'and if found, insert it.
If oTemplate.BuildingBlockEntries(i).Name = strBuildingBlockName Then
oTemplate.BuildingBlockEntries(strBuildingBlockName).Insert _
Where:=oRng
'Set the found flag to true
bFound = True
'Clean up and stop looking
GoTo lbl_Exit
End If
Next i
End If
'The entry has not been found
If bFound = False Then
For Each oAddin In AddIns
'Check currently loaded add-ins
If oAddin.Installed = False Then Exit For
Set oTemplate = Templates(oAddin.Path & _
Application.PathSeparator & oAddin.Name)
'Check each building block entry in the each add in
For i = 1 To oTemplate.BuildingBlockEntries.Count
If oTemplate.BuildingBlockEntries(i).Name = strBuildingBlockName Then
'Look for the building block name
'and if found, insert it.
oTemplate.BuildingBlockEntries(strBuildingBlockName).Insert _
Where:=oRng
'Set the found flag to true
bFound = True
'Clean up and stop looking
GoTo lbl_Exit
End If
Next i
Next oAddin
End If
'The entry has not been found. Check the normal template
If bFound = False Then
For i = 1 To NormalTemplate.BuildingBlockEntries.Count
If NormalTemplate.BuildingBlockEntries(i).Name = strBuildingBlockName Then
NormalTemplate.BuildingBlockEntries(strBuildingBlockName).Insert _
Where:=oRng
'set the found flag to true
bFound = True
End If
Next i
End If
'If the entry has still not been found
'finally check the Building Blocks.dotx template
If bFound = False Then
Templates.LoadBuildingBlocks
For Each oTemplate In Templates
If oTemplate.Name = "Building Blocks.dotx" Then Exit For
Next oTemplate
For i = 1 To Templates(oTemplate.fullname).BuildingBlockEntries.Count
If Templates(oTemplate.fullname).BuildingBlockEntries(i).Name = strBuildingBlockName Then
Templates(oTemplate.fullname).BuildingBlockEntries(strBuildingBlockName).Insert _
Where:=oRng
'set the found flag to true
bFound = True
'Clean up and stop looking
GoTo lbl_Exit
End If
Next i
End If
'All sources have been checked and the entry is still not found
If bFound = False Then
'so tell the user.
MsgBox "Entry not found", _
vbInformation, _
"Building Block " _
& Chr(145) & strBuildingBlockName & Chr(146)
End If
lbl_Exit:
set oTemplate = Nothing
set oRng = Nothing
End SubFor more thoughts/ideas on inserting a building block at a bookmark, see this thread:
Updating bookmark with multiple building blocks based on checkboxHere is a variation inserting the Building Block in the First-Page Header - the only difference is the range
Sub InsertMyBuildingBlock_Header1stPage()
' Charles Kenyon 04 April 2022
' based on Graham Mayor's macro at
' http://www.gmayor.com/word_vba_examples_3.htm
' In addition to checking the active template, add-in templates and the normal template,
' this macro looks in the building blocks.dotx template.
' Building Block name must be unique!
'
' NOTE - only sets first section of document to have a different first page
'
ActiveDocument.Sections(1).PageSetup.DifferentFirstPageHeaderFooter = True
'
Dim oTemplate As Template
Dim oAddin As AddIn
Dim bFound As Boolean
Dim oRng As range
Dim i As Long
'Define the required building block entry
Const strBuildingBlockName As String = "Building Block Name" ' CHANGE TO YOUR BUILDING BLOCK'S NAME
' Set the range
Set oRng = Selection.Sections(1).Headers(wdHeaderFooterFirstPage). _
range.Paragraphs(1).range
'Set the found flag default to False
bFound = False
' Ignore the attached template for now if the
'document is based on the normal template
Application.Templates.LoadBuildingBlocks ' Thank you Timothy Rylatt
If ActiveDocument.AttachedTemplate <> NormalTemplate Then
Set oTemplate = ActiveDocument.AttachedTemplate
'Check each building block entry in the attached template
For i = 1 To oTemplate.BuildingBlockEntries.Count
'Look for the building block name
'and if found, insert it.
If oTemplate.BuildingBlockEntries(i).Name = strBuildingBlockName Then
oTemplate.BuildingBlockEntries(strBuildingBlockName).Insert _
Where:=oRng
'Set the found flag to true
bFound = True
'Clean up and stop looking
GoTo lbl_Exit
End If
Next i
End If
'The entry has not been found
If bFound = False Then
For Each oAddin In AddIns
'Check currently loaded add-ins
If oAddin.Installed = False Then Exit For
Set oTemplate = Templates(oAddin.Path & _
Application.PathSeparator & oAddin.Name)
'Check each building block entry in the each add in
For i = 1 To oTemplate.BuildingBlockEntries.Count
If oTemplate.BuildingBlockEntries(i).Name = strBuildingBlockName Then
'Look for the building block name
'and if found, insert it.
oTemplate.BuildingBlockEntries(strBuildingBlockName).Insert _
Where:=oRng
'Set the found flag to true
bFound = True
'Clean up and stop looking
GoTo lbl_Exit
End If
Next i
Next oAddin
End If
'The entry has not been found. Check the normal template
If bFound = False Then
For i = 1 To NormalTemplate.BuildingBlockEntries.Count
If NormalTemplate.BuildingBlockEntries(i).Name = strBuildingBlockName Then
NormalTemplate.BuildingBlockEntries(strBuildingBlockName).Insert _
Where:=oRng
'set the found flag to true
bFound = True
End If
Next i
End If
'If the entry has still not been found
'finally check the Building Blocks.dotx template
If bFound = False Then
Templates.LoadBuildingBlocks
For Each oTemplate In Templates
If oTemplate.Name = "Building Blocks.dotx" Then Exit For
Next oTemplate
For i = 1 To Templates(oTemplate.fullname).BuildingBlockEntries.Count
If Templates(oTemplate.fullname).BuildingBlockEntries(i).Name = strBuildingBlockName Then
Templates(oTemplate.fullname).BuildingBlockEntries(strBuildingBlockName).Insert _
Where:=oRng
'set the found flag to true
bFound = True
'Clean up and stop looking
GoTo lbl_Exit
End If
Next i
End If
'All sources have been checked and the entry is still not found
If bFound = False Then
'so tell the user.
MsgBox "Entry not found", _
vbInformation, _
"Building Block " _
& Chr(145) & strBuildingBlockName & Chr(146)
End If
lbl_Exit:
Set oTemplate = Nothing
Set oRng = Nothing
End SubSituation 4 - template holding building block is "Building Blocks.dotx" in the building blocks storage location
This template also does not hold the macro because templates in the building blocks folder do not contribute macros to Word even if they contain them. This macro incorporates code from Greg Maxey and Jay Freedman given in this thread. Building Blocks.dotx is the name of the template used, by default, to store custom building blocks other than AutoText. It is stored, by user, in a language-dependent, version-dependent folder. This macro is intended to retrieve the building block regardless of the language or version.
Sub InsertMyBB3()
' Based on code by Greg Maxey and Jay Freedman
' For use with building block stored in the default custom building blocks file "Building Blocks.dotx"
' Will not work if there are multiple building blocks with the same name in the template!
'
Const sBBName As String = "MyBB" 'use the name of your building block instead of "MyBB"
Const sTempName As String = "Building Blocks.dotx" 'use the name of your template instead of "MyBBTemplate.dotx"
Set oRange = Selection.Range
'
Templates.LoadBuildingBlocks ' in case building blocks not yet accessed
'
On Error GoTo Oops ' error handler
'
Application.Templates.LoadBuildingBlocks ' Thank you Timothy Rylatt
Application.Templates(sStartupPath & "\" & sTemplateName).BuildingBlockEntries(sBBName) _
.Insert Where:=oRange, RichText:=True ' Insert MyBB Building Block
Set oRange = Nothing
Exit Sub ' We're done here
Oops: ' Didn't work - building block not there!
MsgBox Prompt:="The Building Block " & sBBName & " cannot be found in " & _
sTemplateName & ".", Title:="Didn't Work!"
On Error GoTo -1
Set oRange = Nothing
End SubWarning on Multiple Building Blocks with the same name. See screenshot below!
If there are multiple building blocks that have the same name in the same template, the results will be unpredictable unless instead of BuildingBlockEntries the Collection of BuildingBlockTypes is used along with the specific category. The ordinary user will not be aware of these so the developer must set things up. Word has 35 types that correspond to the 35 galleries of building blocks. You can find a list here. See also What happens if two building block entries have the same name? below.
At this point, I will refer you to the thread that started this all if you want your entries in a different template (or want to get them from the Built-In Building Blocks). For your own use, you can record the insertion of a building block from any template. The problem comes when you try to transfer the macro and building block to another computer or user. (Again, see the idea of storing the macro and building block in the same template.)
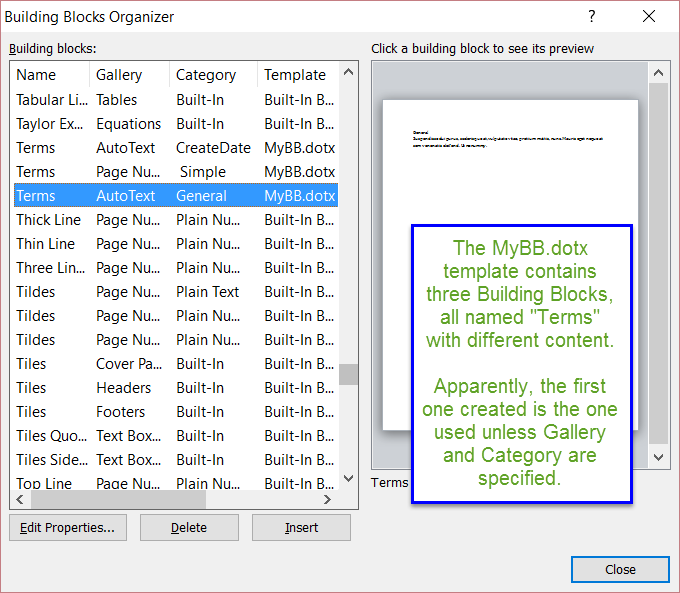
Using Macros with AutoText Fields
I often use AutoText Fields in my document templates. These work not only with AutoText but also with other Building Blocks. The AutoText itself is stored in either document or Global Templates. That way there is one central repository for the language or images. However, AutoText Fields are not necessarily automatically updated. In addition it is important to not send a document with an AutoText Field to someone who does not have access to the Global template, the field needs to be unlinked so that just the AutoText, itself, is what is in the document. This is also important for maintaining archival documents so the language does not change when the document is opened.
I handle this with an AutoNew macro in the document templates. That calls on two macros in the global template containing the AutoText when a new document is created based on the document template. Separate similar macros would be needed for AutoTextList fields. These will not do anything to Building Blocks Gallery Content Controls.
Here are the macros:
AutoNew Macro (in the document templates)
Sub AutoNew()
' Place in document templates containing AutoText Fields - runs when new document created
' Charles Kenyon November 12, 2020
Application.Run UpdateAllAutoText
Application.Run UnlinkAllAutoText
End SubUpdate all AutoText Fields macro (in global template)
Sub UpdateAllAutoText()
' Update all AutoText fields in a document, even if in headers/footers or textboxes
' based on code at https://gregmaxey.com/word_tip_pages/word_fields.html
' November 12, 2020 Charles Kenyon
Dim rngstory As Word.range
Dim lngValidate As Long ' do not know purpose of this - CK
Dim oShp As Shape
Dim oStory As range
Dim oField As Field
lngValidate = ActiveDocument.Sections(1).Headers(1).range.StoryType ' do not know purpose of this
For Each rngstory In ActiveDocument.StoryRanges
'Iterate through all linked stories
For Each oField In oStory.Fields
If oField.Type = wdFieldAutoText Then oField.Update
Next oField
Do
On Error Resume Next
For Each oField In rngstory.Fields
If oField.Type = wdFieldAutoText Then oField.Update
Next oField
Select Case rngstory.StoryType
Case 6, 7, 8, 9, 10, 11
If rngstory.ShapeRange.Count > 0 Then
For Each oShp In rngstory.ShapeRange
If oShp.TextFrame.HasText Then
For Each oField In oShp.TextFrame.Fields
If oField.Type = wdFieldAutoText Then oField.Update
Next oField
End If
Next
End If
Case Else
'Do Nothing
End Select
On Error GoTo 0
'Get next linked story (if any)
Set rngstory = rngstory.NextStoryRange
Loop Until rngstory Is Nothing
Next
'
Set oStory = Nothing
Set oField = Nothing
Set rngstory = Nothing
Set oShp = Nothing
End SubSub AutoTextFieldUpdateAllStory()
' Written by Charles Kyle Kenyon 9 March 2021
' assistance from Jezebel
' All Story Field Updater - AutoText fields
Dim oField As Field
Dim oStory As range
' On Error Resume Next
For Each oStory In ActiveDocument.StoryRanges
' This goes into headers and footers as well as the regular document
Do
For Each oField In oStory.Fields
If oField.Type = wdFieldAutoText Then
oField.Update
End If
Next oField
Set oStory = oStory.NextStoryRange
Loop Until oStory Is Nothing
Next oStory
Set oStory = Nothing
Set oField = Nothing
On Error GoTo -1
End SubMacro to Unlink Fields (in global template that holds AutoText or other Building Blocks)
Sub UnlinkAllAutoText()
' Unlink all AutoText fields in a document, even if in headers/footers or textboxes
' Based on code at http://www.gmayor.com/installing_macro.htm
' Charles Kenyon
' 2 Sept 2020
'
Dim oStory As range
Dim oField As Field
'
For Each oStory In ActiveDocument.StoryRanges
For Each oField In oStory.Fields
If oField.Type = wdFieldAutoText Then oField.Unlink
Next oField
'
If oStory.StoryType <> wdMainTextStory Then
While Not (oStory.NextStoryRange Is Nothing)
Set oStory = oStory.NextStoryRange
For Each oField In oStory.Fields
If oField.Type = wdFieldAutoText Then oField.Unlink
Next oField
Wend
End If
'
Next oStory
'
Set oStory = Nothing
Set oField = Nothing
End Sub
Troubleshooting
Troubleshooting AutoText
Weird formatting?
No tooltip is showing for my AutoText so I can't press Enter and insert it. AutoComplete problems
In Word 2010 this indicates that your AutoText is stored somewhere other than normal.dotm. This is perfectly acceptable but you can't use the Enter key or see the tooltip. Once you have typed at least four letters of the name, try pressing the F3 key to insert your AutoText. Long term, you can use the organizer to insert it. Word 2013 allowed tooltips for other Global Templates. Note that while AutoComplete works with Building Blocks other than AutoText, it only works with those stored in global or document templates (including the Normal template). AutoComplete does not work with those stored in Building Blocks folders.
In Word 2007 no tooltips show for AutoText entries. Period. You can still use the F3 key to enter AT entries in your text.
In Word 97-2003 this may indicate multiple AutoText entries with the same entry name or that you haven't typed enough of the name for Word to distinguish the entry you want from a different one with the same beginning to the name.
Missing Page Number / Header / Footer Commands - greyed out - Charles Kenyon
What happens if two building blocks entries have the same name?
Word will allow two different entries to have the same name so long as they are either stored in different templates, different Galleries in the same template or different Categories in the same Gallery. No error message or query will be generated when you try to save one with the same name as another unless you are trying to save in the same template, Gallery, and Category. In that case, you will be asked if you want to redefine the entry. Generally you want to have different names for different entries.
The F3 key after typing an entry name will call not only AutoText but also other Building Blocks.
The AutoText field will call not only AutoText but other Building Blocks. Different entries with the same name can lead to problems.
First, the general hierarchy of templates governs. You can add in the Building Blocks and Built-In-Building Blocks templates when dealing with AutoText and Building Blocks. When looking for an AutoText entry named "MyEntry" Word will look:
| First in the Attached Template, if the entry is not there, it will look | |
| In the Normal.dotm Template; if the entry is not there, it will look | |
| In loaded Global Templates; if the entry is not there, it will look | |
| In the Built-in Building Blocks Template; if the entry is not there, it will look | |
| In the Building Blocks Template. |
I have not yet explored what happens with other templates containing building blocks stored in the Building Blocks folder. Nor have I explored the hierarchy of galleries and categories within a template. I know that if one of the entries is in the AutoText gallery and one is in a different gallery, the AutoText entry will be called. If two entries are both in the AutoText Gallery and they are in different categories, the one created first will be called.
Building Blocks are not available from Templates stored on SharePoint
That is right. They is not. See this thread. This is not my personal experience because I do not use SharePoint. It is based on what I've seen in posts in help forums. This seems to be true of all Building Blocks.
Word does not treat templates stored on SharePoint the same as it does templates stored on the local computer or a network location. If you download the template to your local computer, any Building Blocks can be used (assuming they are loaded as global templates or used as document templates).
Troubleshooting AutoCorrect
If AutoCorrect does something you don't like, immediately press Ctrl+Z to UnDo it. You can edit the AutoCorrect Options to remove entries that consistently cause you problems.
Every Word user should have one of two key AutoCorrect Backup/Restore utilities. The one for Word 97-2003 can be found on the MVP site. The one for later (ribbon) versions (AutoCorrect2007.zip) can be found on Jay Freedman's site. These create a backup Word document that has all of the AutoCorrect entries in a given language in a table. This makes it easy to move entries to a new computer or make changes. Note the utility does not delete AutoCorrect entries that exist. If there is one with the same name, it will replace it. Another backup utility can be found at AutoCorrect Utility Manager.
On one of the Word help forums the question arose on how to deal with multiple AutoCorrect entries that were causing problems. Specifically, the user had AutoCorrects to change the "ise" endings on words to "ize." That is, it would automatically change "customize" to "customise" and so forth. It is likely that this happened from using the spell check option to add spelling errors to AutoCorrect (below). These are not built into Word.
Over time, having this checked is likely to result in a number of entries that are problematic. Going through the list in AutoCorrect Options would be hit-or-miss. The Backup/Restore utility could be used, though, to search the backup document for these entries so that they could later be changed using the AutoCorrect Options. It would also be possible, using that utility, to restore an AutoCorrect without the problem entries. Doing so would require that they be unformatted entries (not stored in the normal template). You could then rename the ACL file with Word closed so Word would not use it. Using the Backup utility would restore all of the other entries without the ones that were deleted.
I would be tempted, though, to simply rename the ACL file and start over from scratch, perhaps looking through the backup file to see if it contains anything very useful.
Running AutoCorrect on Existing or Pasted text (macro required)
AutoCorrect works as you type text. Sometimes, though, you would like to use it on text already typed or text pasted from another source. Here is a macro to do that.
Sub AutoCorrectBruteReplace()
' https://answers.microsoft.com/en-us/msoffice/forum/all/macro-for-autocorrect/91f9bdb1-47ac-4cec-9842-5f1ee38bd7cf?page=1
' rianvillareal 2022-06-11 modified by Charles Kenyon with help by Hans Vogelar to use range and work with selected text
' It is slow. Handles multi-word entries. Does not handle fractions
' It appears to operate only on selected text
'
Dim oEntry As Word.AutoCorrectEntry
Dim oRng As range
Set oRng = Selection.range
For Each oEntry In AutoCorrect.Entries
With oRng.Find
.ClearFormatting
.Replacement.ClearFormatting
.Text = oEntry.Name
.Replacement.Text = oEntry.Value
.Forward = True
.Wrap = wdFindStop
.Format = False
.MatchCase = False
.MatchWholeWord = True
.MatchWildcards = False
.MatchSoundsLike = False
.MatchAllWordForms = False
.Execute Replace:=wdReplaceAll
End With
Next oEntry
End SubHere is a second macro for this:
Sub AutoCorrectNow2()
' Graham Mayor Bob Sundquist, Hans Vogelar and Charles Kenyon 2022-06-10
' https://eileenslounge.com/viewtopic.php?f=26&t=38297&p=296123#p296123
' https://www.msofficeforums.com/word-vba/29148-how-replace-wordbasic-autocorrectnow-old-macro.html
' Runs autocorrect on selected text as if it were being retyped - only handles single-word entries
'
'
Dim oWrd As range
Dim Entry As Object
Dim iCount As Long, i As Long
On Error Resume Next
Let iCount = Selection.Words.Count
For i = 1 To iCount
Set oWrd = Selection.Words(i)
For Each Entry In Word.Application.AutoCorrect.Entries
If oWrd.Text = Entry.Name Then
oWrd.Text = Entry.Value
Exit For
ElseIf oWrd.Text = Entry.Name & " " Then
oWrd.Text = Entry.Value & " "
Exit For
End If
Next Entry
Next i
Set oWrd = Nothing
Set Entry = Nothing
End SubInstructions for Installing Macros from Forums or Websites by Graham Mayor, MVP
If you are running AutoCorrect on existing text using a macro, I would recommend doing it on a copy and then using the Compare Documents feature to generate a comparison so you can see the changes that are made and approve/disapprove them. There really is no substitute for human proofreading.
Note that the macros will not insert images and perhaps no formatted AutoCorrect entries. In this Answers thread, MVP Jay Freedman suggests using AutoText for these instead if you are going to need to do this. See my AutoText/Building Blocks macros above.
Checking in vba if an AutoCorrect Entry is already using a name
Private Function AutoCorrectEntryExist(strName As String) As Boolean
' Charles Kenyon 2022-06-14 Reports True if an AutoCorrect Entry uses the name given in strName
' https://stackoverflow.com/questions/72619065/check-if-an-entry-exists-in-autocorrect-entries/72625298#72625298
'
Dim oEntry As Word.AutoCorrectEntry
For Each oEntry In AutoCorrect.Entries
If oEntry.Name = strName Then
MsgBox prompt:=strName & " is already in use, Choose a different name.", _
title:="In Use!", buttons:=vbCritical
AutoCorrectEntryExist = True
GoTo EntryFound
End If
Next oEntry
AutoCorrectEntryExist = False
EntryFound:
Set oEntry = Nothing
End Function
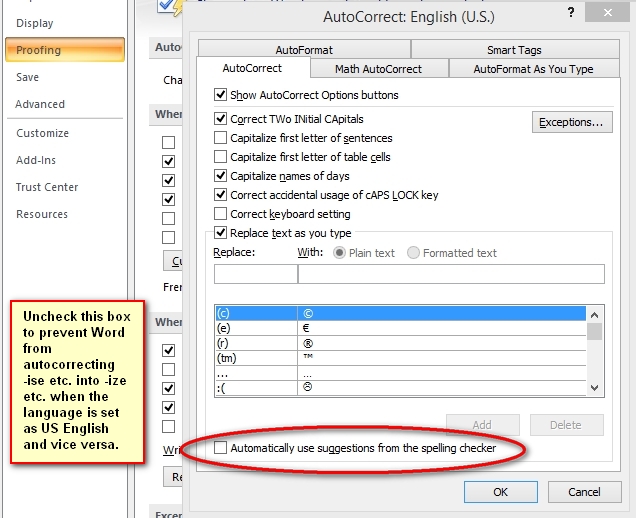
Troubleshooting AutoFormat as You Type
If AutoFormat as You Type causes you problems, immediately press Ctrl+Z to undo the change it made. Then go into the AutoCorrect Options to turn off the feature that is causing you problems. You can see at I keep most of the options off on my computer. Remember that there are two tabs for AutoFormat in the options. You want to make your changes to "Autoformat as You Type."
If you want to save or transfer AutoFormat and AutoFormat as you Type settings, you can record a macro and tab through the tabs of the settings dialog box. Just display each tab of the AutoCorrect settings dialog box and close the dialog and stop recording. The macro will have your settings.
AutoFormat and AutoFormat as you type differences with hyphen conversion
|
Input |
AutoFormat (Ctrl+Alt+K) |
AutoFormat As You Type |
|
x-y |
x-y (no change) |
x-y (no change) |
|
x - y |
x - y (no change) |
x – y (en dash with spaces) |
|
x--y |
x—y (em dash without spaces) |
x—y (em dash without spaces) |
|
x -- y |
x—y (em dash without spaces) |
x – y (en dash with spaces) |
Reported by Roger Phillips in the Word Answers forum.
Note that the option for hyphens in both of these also controls conversion of (c) and (r).
Style changes can seem like they must be AutoFormat gone whacky! The following is from the Chapter on Styles:
A style has changed unexpectedly
Check to see if automatic updating is turned on for the style. With automatic updating, a style is updated automatically when you make additional changes to the style, meaning that every paragraph in your document assigned to that style will change automatically. To turn off this feature, click the Format menu, and choose Style. Select the style in the Styles box, and then click Modify. If the Automatically update check box is selected, clear it.
Your style may have been based on another style that has changed. Changes to a base style affect other styles in the document that are based on it. For example, if you change the font in Normal to the Arial font, Word changes the font for the styles used in footnotes, headers, footers, page numbers, and other text. If you don't want a certain style to change when you change the base style, make certain your style is not based on another style. On the Format menu, click Style. In the Styles box, click the style you want to modify, click Modify, and then click (no style) in the Based on box.
 |
Warning When you base a style on No Style, you
will need to set the Language because the default will be No
Proofing.
(Word 97) Charles Kenyon note: I recommend that you not base any styles on normal and that you change the built-in styles so that they are not based on normal. This is particularly true for any styles that are involved in paragraph numbering. |
If you change the styles in a template and then reopen a document based on that template, styles in the current document may be updated, based on their definitions in the template. If you don't want the styles in documents based on a particular template to update when you open the documents, click Templates and Add-Ins on the Tools menu, and then clear the Automatically update document styles check box.
Charles Kenyon note: I recommend that you keep the Automatically update styles check box unchecked. Especially if you will be sharing your documents with others, leaving it checked can result in truly bizarre formatting and make your documents ugly or even unusable.
If the template that contains the style definitions is missing or damaged, styles in the current document use the style definitions from the Normal template.
Applying a style turns off bold, italic, or underlining
Sometimes when you apply a style that has specific formatting
attributes to text already formatted this way, the reverse formatting may
occur. For example, when you apply a style that contains bold formatting
to a paragraph that contains some bold text, the bold text may lose its
bold formatting. This problem will not occur if you apply character
formatting— either through a character style or direct formatting — after
you apply a paragraph style. Apply the style first, and then select the
words to have other formatting and apply the formatting directly.
| Tip To make sure that no direct formatting has been applied to the text, first select the text completely and then press CTRL+SPACEBAR. This removes manually applied formatting. Now when a style is applied, there is no reversing situation to occur. |
Article: http://support.microsoft.com/support/kb/articles/Q176/6/92.ASP
since 14 April 2004
|
|
 Copyright 2000, Microsoft Corporation.
Copyright 2000-2002, 2004-2006, 2010-2026
Charles
Kyle Kenyon
See information about copy permission.
Search Intermediate Users Guide to Microsoft Word Using Google My office page as a Madison, Wisconsin Criminal Defense Lawyer.
Original Legal Users Guide to Microsoft Word 2002 - Documents in Zip Format
A note about link exchanges. This site does not participate in link exchanges to build web presence. If you have a link that you think would be of use to people reading this page, please send it to the webmaster with the url of the page where you think it should appear and it will be considered. Your placing a link to this site will not affect the decision on whether to add your link, though.